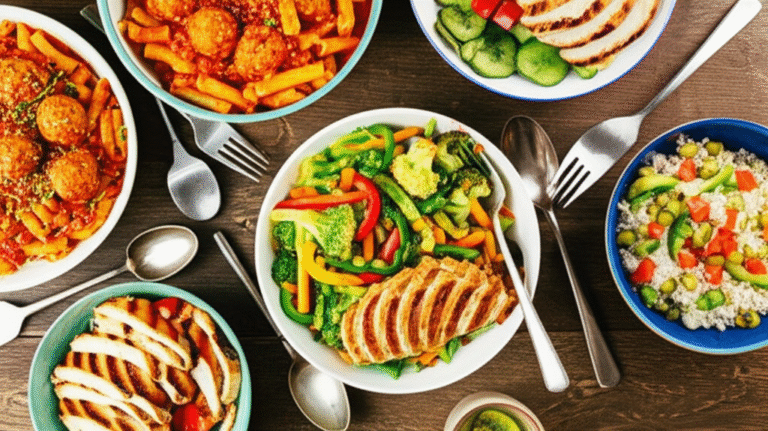
Making Minnesota Hot Dish Recipe

Minnesota Hot Dish Recipe

If you’re from the Midwest, chances are you’ve heard of the beloved Minnesota Hot Dish. Known for its creamy, hearty texture and topped with crispy Tater Tots, this dish is a staple at family gatherings, potlucks, and holidays. With humble origins, the Minnesota Hot Dish is a budget-friendly comfort food that has become a household favorite.

In this guide, we’ll dive into how to make the classic version of this recipe, provide variations, and even answer some frequently asked questions. Whether you’re new to the dish or looking to refine your recipe, this guide has everything you need to create the perfect Minnesota Hot Dish.


What is a Minnesota Hot Dish?

A Minnesota Hot Dish is essentially a casserole with three primary ingredients: meat, canned soup, and a starch. While the traditional recipe calls for ground beef, cream of mushroom soup, and Tater Tots, there are endless ways to customize this dish to suit your taste.

The hot dish has a rich history in the Midwest, where it became popular during the Great Depression for being affordable and easy to make. Today, it’s a go-to comfort food, loved for its versatility and simplicity.

If you’re experimenting with different variations or flavors, you might also enjoy rice-based dishes, such as in this article about why microwaving rice cakes is not recommended.


Classic Minnesota Hot Dish Recipe

Here’s how to create a traditional Minnesota Hot Dish that will leave your family and guests asking for seconds.

Ingredients:

  • 1 lb of ground beef (substitute with turkey or sausage if preferred)
  • 1 small onion, chopped
  • Salt and pepper to taste
  • 1 can (10.75 oz) cream of mushroom soup (undiluted)
  • 1 cup shredded cheddar cheese
  • 1 package (16 oz) frozen Tater Tots
  • 2/3 cup of milk

Instructions:

  1. Preheat the oven to 350°F (175°C).
  2. Cook the meat: In a skillet, cook the ground beef and onion over medium heat until the meat is browned. Season with salt and pepper. Drain excess fat.
  3. Layer the ingredients: In a greased 9×13 baking dish, layer the ground beef and onion mixture evenly. In a mixing bowl, whisk together the milk and cream of mushroom soup, then pour it over the meat. Sprinkle with cheddar cheese.
  4. Top with Tater Tots: Evenly layer the frozen Tater Tots on top of the cheese mixture.
  5. Bake: Place the dish in the oven and bake for 30–40 minutes or until the Tater Tots are golden brown and crispy.

For more family-friendly recipes, check out the ultimate guide to ground sausage dinner recipes for inspiration on incorporating different flavors into your meals.


Variations of Minnesota Hot Dish

One of the great things about Minnesota Hot Dish is its flexibility. You can easily adapt it to fit your preferences or dietary needs.

  • Alternative Proteins: Swap out ground beef for ground turkey, sausage, chicken, or even plant-based meats for a vegetarian option.
  • Starch Substitutes: While Tater Tots are a classic choice, you can replace them with cooked rice, noodles, or macaroni.
  • Cheese Options: If you’re not a fan of cheddar, try using pepper jack, Swiss, or even Colby to give the dish a different flavor.
  • Add Vegetables: Add a layer of vegetables like peas, corn, carrots, or even spinach for a more nutritious option.
  • Spice it Up: For extra flavor, consider adding seasonings like garlic powder, cayenne, or a dash of Worcestershire sauce.

For another hearty dinner idea, consider this garlic parmesan chicken recipe—a perfect complement to your weekly meal plan, found in the Crock-Pot garlic parmesan chicken guide.


Serving Suggestions

Wondering what to serve alongside your Minnesota Hot Dish? Here are a few ideas:

  • A fresh green salad with a tangy vinaigrette helps balance out the richness of the dish.
  • Serve with warm, buttery dinner rolls for a full Midwestern meal.
  • For dessert, a slice of homemade apple pie or classic Midwestern bars would be the perfect ending.

For more Midwestern cuisine ideas, explore these classic recipes from Minnesota.


FAQs About Minnesota Hot Dish

1. Can I freeze Minnesota Hot Dish?

Yes! You can freeze the dish either before or after baking. If freezing before, prepare the dish but don’t bake it yet. When you’re ready to eat, bake it directly from the freezer, adding about 10–15 minutes to the baking time. If freezing leftovers, store them in an airtight container and eat them within 2-3 months.

2. How long can I store leftovers?

You can refrigerate leftovers for up to 3-4 days. When reheating, bake the leftovers in the oven at 350°F until they are heated through, ensuring the Tater Tots regain their crispiness.

3. Can I make a vegetarian version?

Absolutely! Replace the ground beef with plant-based meat or extra vegetables like zucchini or bell peppers. You can also use a dairy-free cream of mushroom soup and vegan cheese for a fully plant-based hot dish.

For more health-conscious cooking ideas, consider reading this in-depth analysis of rice cakes’ nutritional value, which offers tips on incorporating healthier ingredients into your meals.

4. Can I use fresh vegetables instead of frozen?

Yes, fresh vegetables can be used instead of frozen. Just be sure to cook them slightly before adding them to the dish, as they won’t soften as much as frozen vegetables during baking.


Final Thoughts on Minnesota Hot Dish

Minnesota Hot Dish is more than just a comfort food; it’s a cultural staple that brings family and friends together. Whether you’re keeping it traditional with ground beef and Tater Tots or experimenting with new ingredients, this dish is sure to be a hit. So, grab your skillet, gather your ingredients, and get ready to make one of the heartiest, most satisfying meals the Midwest has to offer.

Sourdough Discard Cinnamon Rolls: A Delicious No-Waste Recipe

Sourdough Discard Cinnamon Rolls

If you’re a fan of homemade cinnamon rolls but looking for a way to use up your sourdough discard, you’ve come to the right place! Sourdough discard cinnamon rolls are a perfect way to create a delicious treat while minimizing food waste. Plus, the sourdough discard adds a tangy depth of flavor to the traditional cinnamon roll recipe that you won’t find anywhere else.

In this guide, we’ll walk you through the process of making fluffy, delicious cinnamon rolls using sourdough discard, along with some tips and variations to try. By the end, you’ll have a warm, irresistible batch of rolls that make the most of your leftover starter.

What Is Sourdough Discard?

Sourdough discard is the portion of sourdough starter removed during the feeding process. Many bakers tend to throw it away, but using discard in recipes is a great way to reduce waste. The discard still has a tangy flavor and slight fermentation, making it a versatile ingredient for various baked goods.

For example, if you’re curious about the health benefits of sourdough discard in baking, check out how fermentation enhances sourdough bread, as mentioned in this article on sourdough sandwich bread. Using sourdough discard in cinnamon rolls enhances the flavor of the dough, adding a subtle tanginess that complements the sweetness of the cinnamon filling.

Ingredients for Sourdough Discard Cinnamon Rolls

Here are the key ingredients you’ll need to make these delicious rolls:

  • 1 cup sourdough discard
  • 3 ½ cups all-purpose flour
  • ½ cup sugar
  • 2 teaspoons instant yeast
  • ¾ cup milk (lukewarm)
  • ¼ cup butter (softened)
  • 1 egg
  • Pinch of salt
  • 1 tablespoon cinnamon
  • ½ cup brown sugar for filling
  • Optional: cream cheese frosting, nuts, or dried fruits

For those exploring different variations, you might want to learn more about how other recipes like pound cake use simple ingredients to elevate flavor.

Step-by-Step Recipe for Sourdough Discard Cinnamon Rolls

1. Making the Dough

Start by mixing your sourdough discard with lukewarm milk, yeast, and sugar. Let it sit for 10 minutes until the yeast is activated. Then, add flour, salt, and an egg, and knead the dough until smooth. Add softened butter and knead again until it’s fully incorporated.

  • Tip: The dough should be slightly sticky but not too wet. If it’s too dry, add a tablespoon of milk at a time until you reach the right consistency.

2. Preparing the Cinnamon Filling

In a small bowl, combine brown sugar, cinnamon, and melted butter. This will be your cinnamon-sugar filling. If you’d like, you can also add chopped nuts or raisins for extra texture.

3. Rolling and Shaping the Cinnamon Rolls

Roll the dough out into a large rectangle, about ¼-inch thick. Spread the cinnamon-sugar filling evenly across the dough, then roll it up tightly from one end to the other.

Cut the roll into 12 evenly sized pieces and place them in a greased baking dish.

4. First Rise or Overnight Rest

Allow the rolls to rise for about 1-2 hours until they’ve doubled in size. Alternatively, you can refrigerate the dough overnight for a slow fermentation, which enhances the flavor.

Baking the Cinnamon Rolls

Preheat your oven to 350°F (175°C) and bake the rolls for 25-30 minutes, or until they’re golden brown. Make sure the tops are slightly firm to the touch but soft in the center.

  • Tip: For gooey rolls, bake for the lower end of the time range. If you prefer a firmer roll, bake closer to 30 minutes.

Cream Cheese Frosting (Optional)

For those who enjoy a little extra sweetness, whip up a cream cheese frosting to spread over your freshly baked rolls:

  • 4 oz cream cheese (softened)
  • 2 tablespoons butter (softened)
  • 1 teaspoon vanilla extract
  • 1 cup powdered sugar

Beat all the ingredients together until smooth and spread over the warm rolls for a decadent finish.

Variations of Sourdough Discard Cinnamon Rolls

  • Gluten-Free: Use a gluten-free flour blend to make this recipe accessible for those with dietary restrictions.
  • Vegan: Substitute the milk with almond or oat milk, and replace the butter with a plant-based alternative.
  • Add-ins: Try adding fresh fruit like apples, raisins, or even chocolate chips to the filling for a fun twist on the classic recipe.

If you’re interested in creative pairings or other variations, you might want to explore recipes like creamy sweet coleslaw for more ideas.

Baking Tips and Troubleshooting

How to Achieve the Perfect Rise

For the best results, make sure your kitchen is warm enough for the dough to rise. If it’s too cold, the yeast won’t activate properly, and your rolls might end up dense.

Common Mistakes to Avoid

  • Under-proofing: If the dough doesn’t rise properly, the rolls will be heavy and tough. Ensure enough time for the first rise.
  • Over-baking: Keep an eye on the rolls as they bake. Over-baking will result in dry, hard rolls.

Storing and Reheating Cinnamon Rolls

To keep your sourdough discard cinnamon rolls fresh, store them in an airtight container at room temperature for up to 2 days. You can also refrigerate them for up to a week. To reheat, simply pop them in the microwave for 10-15 seconds or reheat in a 300°F oven for 5-10 minutes.

Health Benefits of Sourdough Discard Cinnamon Rolls

While these sourdough discard cinnamon rolls are undoubtedly indulgent, using sourdough discard adds some nutritional benefits. The fermentation process in sourdough helps break down gluten, making it easier to digest. This makes sourdough a better option for some people compared to regular bread.

If you’re interested in other healthy alternatives, check out this resource on gluten-free cooking.

Frequently Asked Questions (FAQs)

Can I Make These Cinnamon Rolls Without Sourdough Discard?

Yes! If you don’t have any sourdough discard on hand, you can still make cinnamon rolls using a standard yeast-based recipe.

How Long Can I Store Sourdough Discard?

Sourdough discard can be stored in the fridge for up to a week. Make sure to keep it in an airtight container.

Can I Freeze Sourdough Discard Cinnamon Rolls?

Absolutely! After baking, let the rolls cool completely, then wrap them tightly in plastic wrap and aluminum foil. Freeze for up to 3 months.

Why Didn’t My Rolls Rise Properly?

If your cinnamon rolls didn’t rise properly, it could be due to under-proofing, using old yeast, or a kitchen that’s too cold.

How Do I Keep My Cinnamon Rolls From Drying Out?

To prevent drying, make sure to cover the rolls with foil during the last 10 minutes of baking if they’re browning too quickly.

Conclusion

Sourdough discard cinnamon rolls are a perfect way to make use of leftover starter while baking up a delicious treat. The unique tang of the sourdough discard balances the sweet cinnamon filling, creating an irresistible flavor combination. Whether you’re making them for breakfast, dessert, or a special occasion, these rolls are sure to be a hit!

Experiment with flavors, try out the variations, and enjoy the process of baking with less waste.

Soft and Fluffy Sourdough Sandwich Bread Recipe

sourdough sandwich bread recipe

Making sourdough sandwich bread recipe is a rewarding experience, especially when you’re aiming for a soft, fluffy loaf that’s perfect for everyday sandwiches. With just a few key ingredients and a little patience, you’ll soon be able to enjoy your own homemade bread with a natural tangy flavor. Sourdough is known for its distinct taste, texture, and health benefits due to the natural fermentation process involved.

Understanding the Sourdough Starter

The essential component of any sourdough recipe is the sourdough starter. This naturally fermented mixture of flour and water is what gives the bread its rise and characteristic flavor. By maintaining a healthy, active starter, you ensure that your bread will have the perfect texture and taste. If you’re new to the process, it’s important to understand how to feed and care for your sourdough starter.

In addition to its great flavor, sourdough bread offers health benefits. The natural fermentation process breaks down gluten and reduces the bread’s glycemic index, making it easier to digest. Read more about the health benefits of sourdough bread and how it compares to other types of bread here.

Ingredients for Sourdough Sandwich Bread Recipe

Here are the essential ingredients you’ll need to create a fluffy and delicious loaf:

  • Sourdough starter (active and bubbly)
  • All-purpose flour or bread flour
  • Water
  • Salt
  • Optional: Honey, butter, olive oil, or milk for flavor and softness

These ingredients combine to create a soft, flavorful loaf that’s perfect for sandwiches, toast, or simply enjoying with butter.

Step-by-Step Guide to Making Sourdough Sandwich Bread

1. Prepare Your Sourdough Starter

Ensure your starter is active and bubbly before using. Feed it at least 4-6 hours prior to mixing the dough for the best results.

2. Mix the Dough

In a large bowl, combine the starter, flour, water, and salt. You can also add honey or olive oil for additional flavor and softness. Knead the dough until it becomes smooth and elastic, about 10 minutes by hand.

3. Bulk Fermentation

Allow the dough to ferment at room temperature for 4-12 hours. The longer the fermentation, the more complex the flavor of your bread.

4. Shape the Dough

Once the dough has doubled in size, shape it into a loaf. Place it in a Pullman loaf pan or a regular loaf pan, depending on your preference.

5. Proofing the Dough

Allow the dough to rise again for 1-2 hours. This proofing stage ensures the bread will have a soft, airy crumb.

6. Bake the Bread

Preheat the oven to 375°F (190°C) and bake for 40-45 minutes. The bread should have a golden crust and sound hollow when tapped.

7. Cool and Slice

Let the bread cool completely before slicing for the best texture.

Troubleshooting Common Issues

If your bread doesn’t turn out as expected, here are some common problems and solutions:

  • Dense bread: This is usually caused by under-proofing or using an inactive starter. Ensure your starter is healthy, and allow enough time for the dough to rise.
  • Flat loaves: Over-proofing can cause the dough to collapse. Be mindful of the proofing time to avoid over-rising.
  • Cracked crust: Cracking can occur when the dough hasn’t been proofed properly. Be sure to let the dough rise fully before baking.

Variations of Sourdough Sandwich Bread

There are several ways to customize your sourdough sandwich bread to suit your taste:

  • Whole wheat sourdough: Replace part of the white flour with whole wheat flour for a more nutritious loaf.
  • Tangzhong method: This technique involves cooking a small portion of the flour with water to create a roux, resulting in an incredibly soft loaf.
  • Enriched sourdough: Add milk, butter, or eggs for a richer, softer loaf.

Serving Suggestions for Sourdough Sandwich Bread

  • Sourdough sandwich bread* can be used in a variety of ways:
  • Classic sandwiches like grilled cheese or ham and cheese.
  • Toast topped with butter, jam, or avocado.
  • Paninis and other grilled sandwiches.

Storing and Freezing Sourdough Sandwich Bread

To keep your bread fresh for longer, store it in a bread box or wrap it in a cloth bag. If you don’t plan to consume the loaf within a few days, you can freeze slices for later use. When freezing, wrap the bread tightly in plastic or place it in an airtight container to preserve its texture.

Conclusion

Making your own sourdough sandwich bread recipe at home is both enjoyable and rewarding. With a few simple ingredients and some practice, you can master the art of sourdough baking and enjoy fresh, homemade bread every week. Whether you’re making sandwiches, toast, or just enjoying the bread on its own, sourdough sandwich bread is a delicious and healthy option for any meal.

If you’re interested in learning more about crafting different types of bread or other delicious recipes, you might want to check out some related recipes on RecipesPlan like this guide on baking a crack cake or this carvel ice cream cake recipe.

BBQ Bacon Cheeseburger: Recipes for Flavor Lovers

bbq bacon cheeseburger

The Origin of the BBQ Bacon Cheeseburger

A Brief History of Burgers and Their Popularity

Burgers have a long history, with origins tracing back to Hamburg, Germany, where minced beef was popularized. The hamburger as we know it emerged in the U.S. in the late 19th and early 20th centuries, with street vendors serving beef patties between slices of bread. Over time, this simple meal gained immense popularity, especially in diners and fast-food restaurants across the U.S. By the mid-20th century, burgers had become a staple of American cuisine, a symbol of casual, comfort food.

When Bacon and BBQ Became a Popular Topping

Bacon has long been a popular addition to various dishes, offering a salty, savory contrast to meats and cheeses. Its pairing with burgers started gaining traction in the 1950s and ’60s as restaurants sought to create more indulgent and flavorful variations. BBQ sauce followed suit as a popular topping in the late 20th century. Smoky, tangy flavors complement the rich, juicy taste of beef, making it a natural match for bacon and burgers. The combination of BBQ sauce, bacon, and melted cheese brought a bold flavor profile that quickly appealed to American palates.

How the BBQ Bacon Cheeseburger Became a Classic

The BBQ Bacon Cheeseburger solidified its place as a classic due to the growing trend of gourmet burgers in the 1980s and 1990s. Restaurants began experimenting with bold, rich toppings, and BBQ sauce and bacon became standout choices. Chains like Burger King, Wendy’s, and Carl’s Jr. made the BBQ Bacon Cheeseburger a regular menu item, boosting its popularity. Today, it remains a favorite option, symbolizing the quintessential American love for hearty, flavorful burgers.

Essential Ingredients for a Perfect BBQ Bacon Cheeseburger

Quality Beef Patty Selection

The foundation of a great BBQ Bacon Cheeseburger starts with the beef patty. Choose high-quality ground beef, ideally 80/20 lean-to-fat ratio, to ensure the perfect balance of flavor and juiciness. Grass-fed or Angus beef can elevate the taste, providing a richer and more robust flavor. Freshly ground beef is preferred over frozen, as it forms a juicier patty with better texture. Aim for patties that are about 1/3 to 1/2 inch thick for optimal cooking and flavor retention.

The Ideal Bacon Cut for Crispness

Selecting the right bacon is key to achieving the perfect balance between crispness and flavor. Thick-cut bacon is preferred, as it holds up better in texture and provides a meaty, chewy bite without becoming overly crispy. If you prefer extra crisp bacon, thinner cuts can be used, but they should still maintain a balance so as not to overpower the burger. Smoked or applewood bacon adds a rich, smoky flavor that pairs perfectly with BBQ sauce and cheese.

BBQ Sauce: Choosing Between Store-Bought vs. Homemade

BBQ sauce is the defining element of a BBQ Bacon Cheeseburger, providing that signature sweet and smoky flavor. Store-bought options are convenient and come in a variety of flavors—ranging from tangy and spicy to sweet and bold. Popular choices include brands like Sweet Baby Ray’s or Stubb’s. For a more personalized touch, homemade BBQ sauce allows you to control sweetness, heat, and smokiness. A simple homemade version can combine ketchup, brown sugar, apple cider vinegar, Worcestershire sauce, and smoked paprika for an authentic taste.

How to Cook the Perfect BBQ Bacon Cheeseburger

  1. Grilling vs. Pan-Frying: Which Method Is Best?
    Both methods can deliver delicious BBQ Bacon Cheeseburgers, but each has its strengths:

    • Grilling: Adds a smoky, charred flavor that enhances the BBQ profile. It allows fat to drip away, resulting in a less greasy burger. Grilling also gives you the iconic grill marks and a slightly crisp exterior.
    • Pan-Frying: Offers more control over heat, leading to a consistent, juicy burger. The fat stays in the pan, making for a richer, more flavorful burger, and the caramelized crust adds an extra layer of texture.

    Ultimately, grilling is best for a smoky, outdoor flavor, while pan-frying is ideal for controlling juiciness and texture.

  2. Tips for Cooking Juicy Burgers
    • Avoid pressing down on the patty while cooking; this releases the flavorful juices.
    • Don’t overwork the beef when forming patties, as this can make them tough.
    • Cook burgers on medium-high heat to create a sear without overcooking the inside. For a medium burger, aim for 4–5 minutes per side.
    • Let the patties rest for a few minutes after cooking to allow the juices to redistribute evenly.
  3. Achieving Perfect Bacon Crispness
    For perfectly crisp bacon, cook it on medium heat, allowing the fat to render slowly. This ensures the bacon becomes crispy without burning. You can also bake the bacon in the oven at 400°F (200°C) for 15–20 minutes, which crisps the bacon evenly without constant monitoring. Use a wire rack over a baking sheet to allow fat to drip off while it cooks, resulting in crisp but tender bacon.

For even more versatility in the kitchen, try pairing this method with a delicious Cottage Cheese Breakfast Recipe for a protein-packed start to your day.

Assembling the BBQ Bacon Cheeseburger for Maximum Flavor

    • Start with the bun: Lightly toast the buns on the grill or in the pan for extra texture and flavor.
    • Layering: Place the patty first, followed by a slice of cheddar or American cheese (letting it melt on the patty). Add bacon strips on top of the cheese, then drizzle or brush with your chosen BBQ sauce.
    • Finish with veggies: Add toppings like lettuce, tomato, or grilled onions for added freshness and crunch, but avoid overloading to keep the BBQ and bacon as the primary flavors.

Careful attention to these steps will deliver a well-balanced BBQ Bacon Cheeseburger with juicy meat, crispy bacon, and flavorful BBQ sauce in every bite.

BBQ Sauce Varieties and Flavor Pairings

Sweet and Smoky BBQ Sauces

Sweet and smoky BBQ sauces are crowd-pleasers, blending the sweetness of brown sugar, molasses, or honey with the deep, rich flavor of smoked spices. These sauces pair wonderfully with bacon and cheddar cheese, enhancing the smokiness of grilled or pan-fried beef. They work particularly well with thick-cut, smoked bacon for a cohesive flavor profile. Popular examples include Kansas City-style BBQ sauce, which is thick, sweet, and mildly smoky.

    • Pairing: Beef burgers with sharp cheddar, grilled onions, and smoky bacon.

Spicy BBQ Sauces

For those who like a bit of heat, spicy BBQ sauces incorporate ingredients like cayenne pepper, chili powder, or hot sauce. These sauces add a fiery kick that pairs well with the richness of beef and the salty crispness of bacon. Spicy BBQ sauces also bring contrast to creamy elements, such as cheese or aioli, and are perfect for adventurous eaters.

    • Pairing: Jalapeño bacon burgers with pepper jack cheese, crispy bacon, and pickled jalapeños.

Bourbon-Infused BBQ Sauce for a Gourmet Twist

Bourbon-infused BBQ sauces add depth and complexity, thanks to the slightly sweet, smoky undertones of the whiskey. The alcohol cooks off during preparation, leaving a rich, caramel-like taste that pairs beautifully with beef. This sauce is ideal for creating a more upscale BBQ Bacon Cheeseburger, adding a touch of sophistication.

    • Pairing: Beef patty with bourbon BBQ sauce, smoked gouda cheese, crispy bacon, and caramelized onions.

Regional BBQ Sauce Variations

Different regions of the U.S. bring unique twists to BBQ sauce, each offering distinctive flavors:

    • Kansas City: Sweet and thick, emphasizing molasses and tomato for a rich, hearty sauce.
    • Memphis: A tangy, vinegar-based sauce with a lighter consistency, often used in combination with dry rubs.
    • Texas: Bold, spicy, and meat-forward, with smoky elements and a tomato base.
    • South Carolina: Mustard-based sauce, tangy and slightly sweet, bringing a sharp contrast to rich meats.
    • Pairing: Kansas City sauce with beef and cheddar; Texas sauce with grilled beef, bacon, and sharp cheeses; South Carolina sauce with a lighter burger topped with coleslaw.

Each BBQ sauce type adds its own unique flair to the BBQ Bacon Cheeseburger, allowing you to customize your burger experience based on your taste preferences.

4 Best BBQ Bacon Cheeseburger Recipes: Ingredients & Step-by-Step Guide

1. Classic BBQ Bacon Cheeseburger

Ingredients:

  • 1 lb ground beef (80/20 blend)
  • 4 slices thick-cut bacon
  • 4 slices sharp cheddar cheese
  • 4 hamburger buns
  • 1/2 cup BBQ sauce (store-bought or homemade)
  • Salt and pepper to taste
  • Lettuce, tomato, and pickles (optional)

Steps:

  1. Prepare the grill or preheat a skillet over medium-high heat.
  2. Form beef patties into 4 equal portions, about 1/3 inch thick. Season both sides with salt and pepper.
  3. Cook bacon in a pan until crispy. Drain on paper towels.
  4. Grill or pan-fry the patties for 4-5 minutes per side, or until desired doneness. Add cheese during the last minute to melt.
  5. Toast the buns lightly on the grill or in a pan.
  6. Assemble the burger: Place the patty on the bottom bun, top with bacon, BBQ sauce, and any desired toppings (lettuce, tomato, pickles). Finish with the top bun and serve.

2. Spicy BBQ Bacon Cheeseburger

Ingredients:

  • 1 lb ground beef
  • 4 slices pepper jack cheese
  • 4 slices jalapeño bacon
  • 1/2 cup spicy BBQ sauce
  • 1 small red onion, sliced
  • 4 hamburger buns
  • Sliced jalapeños (optional)

Steps:

  1. Cook the bacon in a skillet until crispy. Set aside.
  2. Form patties from ground beef, seasoning with salt, pepper, and a pinch of cayenne pepper.
  3. Grill or pan-fry patties for 4-5 minutes per side. Add pepper jack cheese in the last minute to melt.
  4. Grill onion slices until slightly charred.
  5. Assemble the burgers: Add the patty to the bun, top with jalapeño bacon, spicy BBQ sauce, grilled onions, and jalapeños for extra heat. Serve immediately.

3. Bourbon BBQ Bacon Cheeseburger

Ingredients:

  • 1 lb ground beef
  • 4 slices smoked gouda cheese
  • 4 slices thick-cut bacon
  • 1/2 cup bourbon BBQ sauce
  • 4 hamburger buns
  • 1/2 cup caramelized onions
  • Salt and pepper

Steps:

  1. Cook bacon until crispy. Set aside.
  2. Caramelize onions in a skillet with butter over low heat for 15-20 minutes until golden.
  3. Form patties and season with salt and pepper. Grill or pan-fry for 4-5 minutes per side, adding smoked gouda in the final minute to melt.
  4. Toast buns lightly on the grill.
  5. Assemble: Spread bourbon BBQ sauce on the bottom bun, place the patty, then top with bacon, caramelized onions, and more sauce. Serve with fries or onion rings.

4. Blue Cheese BBQ Bacon Cheeseburger

Ingredients:

  • 1 lb ground beef
  • 4 slices bacon
  • 1/4 cup blue cheese crumbles
  • 1/2 cup tangy BBQ sauce
  • 4 brioche buns
  • Arugula leaves
  • Salt and pepper

Steps:

  1. Cook bacon in a skillet until crispy. Set aside.
  2. Form patties, seasoning them with salt and pepper.
  3. Grill or pan-fry for 4-5 minutes per side. In the last minute, sprinkle blue cheese crumbles on top to melt slightly.
  4. Toast the buns on the grill.
  5. Assemble: Spread BBQ sauce on the bottom bun, add the patty, bacon, and fresh arugula. Top with more sauce and the top bun. Serve.

BBQ Bacon Cheeseburger: Popular Restaurant Options

Fast Food Chains Known for Their BBQ Bacon Cheeseburgers

    • Wendy’s: Known for their BBQ Bacon Cheeseburger, which features a fresh beef patty topped with crispy bacon, cheddar cheese, fried onions, and a sweet and smoky BBQ sauce. Wendy’s offers a solid fast-food option with great flavor at an affordable price.
    • Burger King: Offers the BBQ Bacon Whopper, combining their signature flame-grilled beef patty with crispy bacon, American cheese, lettuce, tomato, onions, and BBQ sauce for a smoky flavor.
    • Carl’s Jr./Hardee’s: Their Western Bacon Cheeseburger is a fan favorite, featuring a charbroiled beef patty, bacon, cheese, onion rings, and tangy BBQ sauce, offering a perfect mix of crunch and smokiness.

Famous Burger Joints Offering Unique Variations

    • Five Guys: Known for its customization options, Five Guys allows you to create your own BBQ Bacon Cheeseburger by adding bacon, BBQ sauce, and any choice of cheese to their fresh, hand-pressed patties. Their juicy, made-to-order burgers ensure a satisfying experience.
    • Shake Shack: Offers a SmokeShack, which, while not directly labeled as a BBQ Bacon Cheeseburger, features applewood-smoked bacon, ShackSauce (similar to BBQ), and chopped cherry peppers for a unique spicy-sweet twist on the traditional BBQ burger.
    • In-N-Out Burger: Though In-N-Out doesn’t have a BBQ Bacon Cheeseburger on their standard menu, customers often customize their Double-Double by adding bacon and BBQ sauce from their “secret” menu.

Gourmet Restaurants with Creative BBQ Bacon Cheeseburgers

    • Umami Burger: Known for its high-end, gourmet burgers, Umami offers the Manly Burger, featuring house-made bacon lardons, cheddar cheese, onion strings, and their own BBQ sauce. The quality of ingredients and attention to flavor balance make this a must-try for burger lovers.
    • The Counter: A fully customizable burger experience, The Counter lets you build your own BBQ Bacon Cheeseburger with high-quality beef patties, artisan cheeses, crispy bacon, and a variety of BBQ sauce options, including spicy and smoky variations.
    • BurgerFi: The CEO Burger features double wagyu patties, bacon-tomato jam, aged Swiss cheese, and truffle aioli for a rich and indulgent take on the BBQ Bacon Cheeseburger, elevating the classic flavor combination with gourmet twists.

FAQs

Can I Use Turkey Bacon for a BBQ Bacon Cheeseburger?

Yes, turkey bacon is a great alternative if you’re looking for a leaner option. It provides a similar crisp texture, though it won’t be as rich or flavorful as traditional pork bacon. Cook turkey bacon until crispy to maximize texture, and pair it with a flavorful BBQ sauce to compensate for its lighter taste.

How Do I Prevent My BBQ Sauce from Making the Bun Soggy?

To avoid soggy buns, add BBQ sauce just before serving or toast the buns for added structure. You can also create a barrier by layering lettuce or cheese directly on the bun before adding the sauce. This helps prevent the bread from absorbing too much moisture.

Can I Grill a BBQ Bacon Cheeseburger on a Gas Grill?

Absolutely! Gas grills are excellent for cooking BBQ Bacon Cheeseburgers. Preheat the grill to medium-high heat and cook the patties for 4-5 minutes per side. Using a gas grill also allows for better temperature control, ensuring you can get a perfect sear while keeping the inside juicy.

What’s the Best Way to Melt the Cheese Evenly?

To ensure the cheese melts evenly, place it on the patty during the last minute of cooking. If grilling, close the lid to trap heat and speed up the melting process. For pan-frying, you can cover the pan with a lid or use a heat-resistant bowl to create steam, which helps the cheese melt smoothly.

What Are Some Healthy Substitutes for Bacon?

    • Turkey bacon: A leaner alternative to pork bacon with less fat.
    • Chicken bacon: Another low-fat option with a milder flavor.
    • Tempeh bacon: A plant-based substitute made from marinated tempeh that mimics the smokiness and texture of bacon.
    • Mushroom bacon: Thinly sliced, roasted mushrooms can provide a crispy, savory element with much fewer calories and fat.

How Can I Make a Vegetarian BBQ Bacon Cheeseburger?

You can create a vegetarian version by using a plant-based burger patty (such as Beyond Burger or Impossible Burger) and substituting tempeh or mushroom bacon for traditional bacon. Top with your favorite BBQ sauce, cheese (or vegan cheese), and vegetables for a flavorful vegetarian alternative that captures the essence of the classic BBQ Bacon Cheeseburger.

Creamy Sweet Coleslaw Recipe: A Classic Side Dish

creamy sweet coleslaw

Introduction to Creamy Sweet Coleslaw

Creamy Sweet Coleslaw is a refreshing salad made with shredded cabbage, carrots, and a sweet, creamy dressing. The combination of crisp vegetables and smooth, tangy dressing offers a satisfying balance. Often served at BBQs, picnics, and summer cookouts, it adds a crunchy, cool contrast to heavier dishes.

History of Coleslaw

Coleslaw traces its roots to the Roman Empire, where people mixed shredded cabbage with vinegar and eggs. The word “coleslaw” comes from the Dutch term “koolsla,” which means “cabbage salad.” Dutch settlers brought the dish to America in the 1700s. By the 20th century, mayonnaise became a common ingredient, transforming it into the creamy coleslaw we know today. Over time, many regional variations emerged, including both vinegar-based and creamy versions.

Why Creamy Sweet Coleslaw is Popular

The popularity of Creamy Sweet Coleslaw stems from its contrasting textures and flavors. The crunchy vegetables complement the rich, velvety dressing. Sweetness from sugar or fruit enhances the tanginess, creating a perfect balance. This dish pairs well with savory foods like fried chicken, pulled pork, and burgers. Its ease of preparation and versatility also make it a favorite for large gatherings.

Essential Ingredients for Creamy Sweet Coleslaw

Creamy Sweet Coleslaw requires a few key ingredients to achieve its signature blend of crunch, sweetness, and creaminess. These components can be adjusted to taste, but the essentials remain consistent.

The Base Vegetables: Cabbage, Carrots, etc.

The core of any coleslaw is the vegetable base, usually made up of shredded green or purple cabbage and carrots. Cabbage provides the main crunch and fresh taste, while carrots add sweetness and color. You can also include other vegetables like red onions, bell peppers, or even broccoli for additional flavor and texture.

Sweet Additions: Sugar and Fruit Variants

To create the “sweet” aspect of the dish, sugar is commonly used in the dressing. This can be regular white sugar, honey, or even maple syrup. Many variations also add fruit for natural sweetness, such as raisins, apple slices, or pineapple chunks. These ingredients enhance the flavor and provide a refreshing twist to the traditional recipe.

Creamy Components: Mayonnaise and Dairy Alternatives

Mayonnaise is the traditional choice for making coleslaw creamy, giving the dressing its smooth, rich texture. For those seeking alternatives, Greek yogurt, sour cream, or dairy-free options like vegan mayo or coconut-based cream can work as substitutes. These ingredients help balance the sweetness and acidity, tying the dish together with a luscious, velvety finish.

Step-by-Step Preparation of Creamy Sweet Coleslaw

Follow these simple steps to make Creamy Sweet Coleslaw, ensuring a perfect balance of crunch, sweetness, and creaminess.

1. Slicing and Shredding Vegetables

Start by preparing your base vegetables. Shred about 1 medium-sized head of cabbage (green, purple, or a mix) and 2-3 large carrots. You can use a sharp knife, a mandoline slicer, or a food processor to achieve thin, even slices. Optionally, add finely chopped red onion or bell peppers for more color and flavor. Set the shredded vegetables aside in a large mixing bowl.

2. Mixing the Creamy Sweet Dressing

Next, make the dressing. In a small bowl, whisk together:

  • 1 cup of mayonnaise (or a dairy-free alternative)
  • 2-3 tablespoons of sugar (or honey)
  • 1 tablespoon of apple cider vinegar or lemon juice (for tang)
  • Salt and pepper to taste

For an extra touch of creaminess, add 2 tablespoons of sour cream or Greek yogurt. If you prefer a lighter dressing, you can mix in a bit of milk or almond milk to adjust the consistency. Taste and adjust the sweetness or tang as needed.

3. Combining Ingredients for Perfect Texture

Now, pour the dressing over the shredded vegetables. Use tongs or a large spoon to gently toss everything together, ensuring that all the vegetables are evenly coated with the dressing. Be careful not to overmix, so the vegetables retain their crispness.

Finally, refrigerate the coleslaw for at least 30 minutes to allow the flavors to meld. For an added sweet twist, fold in fruit variants like raisins, apple slices, or pineapple chunks right before serving. Enjoy!

Tips for Pairing:

This creamy sweet coleslaw goes well with a variety of dishes. If you’re serving it with grilled chicken or fish, you can check out this Delicious Garlic Chicken Thigh Recipe for a fantastic meal combo.

For a heartier meal, consider pairing the coleslaw with some BBQ Beef Ribs. Try this BBQ Beef Ribs Recipe to complement your coleslaw.

Or, if you’re craving something unique and seafood-based, this Calamari Steak Recipe would be a perfect companion to the tangy-sweet flavors of the coleslaw.

Choosing the Right Cabbage for Coleslaw

The type of cabbage you choose plays a significant role in determining the flavor, texture, and appearance of your coleslaw. Here’s a breakdown of popular cabbage varieties to help you make the best choice for your dish.

Green vs. Red Cabbage

  • Green Cabbage: The most common choice for coleslaw, green cabbage offers a mild flavor and a crisp texture. Its neutral taste allows the dressing to shine without overpowering other ingredients. It holds up well to creamy or vinegar-based dressings, making it a versatile option.
  • Red Cabbage: Red cabbage provides a slightly peppery flavor and a more vibrant appearance. Its striking color adds visual appeal to coleslaw, making it a popular choice for those who want a more colorful presentation. However, its tougher texture may require thinner shredding and a longer resting time for the dressing to soften the cabbage.

Napa Cabbage or Savoy Cabbage Options

  • Napa Cabbage: Napa cabbage, also known as Chinese cabbage, has a milder taste and a more delicate texture than green or red cabbage. Its leaves are softer and more tender, making it a great option for a lighter, more refreshing coleslaw. Because of its subtle flavor, Napa cabbage pairs well with lighter dressings or vinaigrettes.
  • Savoy Cabbage: Savoy cabbage has a more crinkled, softer leaf structure and a mild, sweet flavor. It’s less crunchy than green or red cabbage but still offers a pleasant texture. Savoy cabbage works well in both creamy and tangy dressings, providing a more elegant, softer bite in coleslaw.

Each variety of cabbage brings unique characteristics to coleslaw, so choose based on your flavor preference, desired texture, and how you want the dish to look!

Variations of Sweet Coleslaw Recipes

Sweet coleslaw can be adapted in numerous ways to suit different flavor profiles and preferences. Here are three popular variations that offer unique twists on the classic version.

1. Classic Coleslaw

The traditional coleslaw recipe relies on simple ingredients that combine to create a balanced mix of crunch and creaminess. It usually features:

  • Shredded green cabbage and carrots as the base
  • A dressing made of mayonnaise, sugar, vinegar, and a pinch of salt and pepper
  • Optional ingredients like celery seed or mustard for an added tang

This version is versatile and pairs well with most savory dishes like grilled meats, burgers, or BBQ.

2. Sweet Southern Coleslaw

Sweet Southern coleslaw takes the classic version and adds extra sweetness, along with a creamier texture. Key ingredients include:

  • A mix of shredded green and red cabbage for color
  • A sweetened dressing made with mayonnaise, sugar (often more generous than in the classic version), and a hint of apple cider vinegar
  • Some recipes also include buttermilk or sour cream to enhance the creaminess
  • A dash of hot sauce or mustard is sometimes added for a subtle kick

This variation is especially popular as a side for fried chicken, pulled pork, or other rich Southern-style dishes.

3. Fruit-Infused Coleslaw (e.g., Pineapple, Raisins)

For a refreshing twist, fruit-infused coleslaw adds natural sweetness and extra flavor. Popular fruit additions include:

  • Pineapple: Fresh or canned pineapple chunks provide a sweet, tropical flair that pairs beautifully with creamy dressings.
  • Raisins: A classic choice for adding a chewy texture and a hit of sweetness. Golden raisins can offer a softer taste.
  • Apples or Pears: Thinly sliced or julienned, they add a crisp bite and subtle sweetness.

In this version, you can also swap part of the mayo for Greek yogurt to lighten up the dish while keeping it creamy. The fruit variants work well with BBQ dishes, seafood, or light summer meals.

Each variation allows you to customize the coleslaw according to your taste and the occasion!

Tips for Achieving the Perfect Creamy Texture

Getting the perfect texture for Creamy Sweet Coleslaw requires attention to detail. Follow these tips to keep your coleslaw crisp, balanced, and flavorful.

1. Avoiding Soggy Coleslaw

To prevent your coleslaw from becoming soggy, it’s important to handle the vegetables properly:

  • Salt the cabbage: Before mixing it with the dressing, sprinkle salt over the shredded cabbage and let it sit for about 20-30 minutes. The salt will draw out excess moisture. Rinse the cabbage and pat it dry before adding the other ingredients.
  • Dry the vegetables: After shredding the vegetables, ensure they are well-dried using paper towels or a salad spinner. Excess water will thin out the dressing and make the coleslaw soggy over time.
  • Dress it just before serving: If possible, wait to add the dressing until just before serving, especially if making the coleslaw ahead of time.

2. Balancing Sweetness and Creaminess

Striking the right balance between sweetness and creaminess is key to a delicious coleslaw:

  • Sweetness: Add sugar or honey in small increments. Taste the dressing as you go to ensure it’s not overly sweet. Natural sweeteners like fruit can also add a balanced flavor without overwhelming the dish.
  • Creaminess: Mayonnaise is essential for a creamy texture, but you can adjust the richness by mixing in some sour cream or Greek yogurt. This lightens the dressing while maintaining a smooth consistency. For a dairy-free option, use vegan mayo or coconut-based alternatives.

3. Chilling for Enhanced Flavor

Chilling the coleslaw for at least 30 minutes (or up to a few hours) before serving is essential for flavor development:

  • Allow flavors to meld: Chilling lets the dressing absorb into the cabbage and carrots, enhancing the overall taste. The longer it sits, the more flavorful the coleslaw becomes.
  • Keep it crisp: Refrigeration helps maintain the vegetables’ crunch, so they don’t soften too quickly.

By following these steps, you’ll achieve a coleslaw with the perfect creamy texture, crisp vegetables, and a well-balanced flavor!

Creamy Coleslaw Dressing Recipe

A well-made coleslaw dressing enhances the crunch and flavor of the vegetables, adding the perfect balance of sweetness, tang, and creaminess. Here’s a simple recipe for a delicious, creamy coleslaw dressing.

Key Ingredients for Dressing

  • Mayonnaise (1 cup): The base of the dressing, providing richness and creaminess. For lighter versions, you can mix in Greek yogurt or sour cream.
  • Apple cider vinegar (2 tablespoons): Adds a tangy kick that balances the creaminess of the mayonnaise and cuts through the sweetness.
  • Dijon mustard (1 teaspoon): Adds a subtle tang and depth of flavor, giving the dressing a slight sharpness.
  • Salt and pepper (to taste): Season the dressing to taste, enhancing all the other flavors.

Sweeteners: Sugar, Honey, or Maple Syrup

  • Sugar (2 tablespoons): The most common sweetener in coleslaw dressing, giving it a classic sweet flavor. It dissolves well in the dressing, making it a great choice for traditional creamy coleslaw.
  • Honey (2 tablespoons): A natural alternative to sugar, honey adds a mild floral sweetness and smooth texture. It works well for those looking for a slightly healthier option.
  • Maple syrup (2 tablespoons): For a unique flavor twist, maple syrup adds a rich, earthy sweetness to the dressing, perfect for autumn-inspired variations of coleslaw.

Instructions:

  1. In a medium bowl, whisk together the mayonnaise, apple cider vinegar, and Dijon mustard.
  2. Add your sweetener of choice (sugar, honey, or maple syrup) and whisk until smooth.
  3. Season with salt and pepper to taste.
  4. Adjust the consistency by adding a tablespoon of milk or water if you prefer a thinner dressing.
  5. Pour the dressing over your shredded vegetables and toss to combine.

This dressing strikes the perfect balance between sweet, tangy, and creamy. Adjust the sweetness to suit your taste, and enjoy it with your favorite coleslaw variation!

FAQs

Is Coleslaw Best Served Cold?
Yes, coleslaw is best served cold. Chilling enhances the flavors and keeps the vegetables crisp, making it refreshing and perfect for pairing with hot, savory dishes like BBQ or fried chicken.

How Can I Make It Vegan?
To make coleslaw vegan, simply substitute the mayonnaise with a plant-based option, such as vegan mayo. You can also use dairy-free yogurt or a blend of avocado and olive oil for a creamy texture. Ensure that any added sweeteners like honey are replaced with maple syrup or agave.

Why Is My Coleslaw Watery?
Watery coleslaw usually happens when the cabbage releases excess moisture. To avoid this, salt the cabbage after shredding, let it sit for about 20-30 minutes, and then drain or pat dry before mixing with the dressing. This step prevents the dressing from becoming diluted.

Can I Add Nuts to Coleslaw?
Yes, adding nuts like slivered almonds, walnuts, or pecans can give coleslaw a crunchy texture and a rich, nutty flavor. Be sure to add them just before serving to maintain their crunch.

How Long Should I Chill Coleslaw Before Serving?
For the best results, chill the coleslaw for at least 30 minutes to 1 hour before serving. This allows the flavors to meld together while keeping the vegetables crisp and fresh.

What Can I Use Instead of Mayonnaise?
If you’re looking for an alternative to mayonnaise, you can use Greek yogurt, sour cream, or a dairy-free substitute like vegan mayo. These options still provide a creamy texture while allowing you to adjust the flavor based on your preference.


Everything You Need to Know About Peanut Butter Whiskey

butter whiskey

Introduction to Peanut Butter Whiskey

Peanut butter whiskey blends the rich, creamy taste of peanut butter with the smoothness of whiskey. This unique combination offers a fresh twist on traditional whiskey, appealing to whiskey lovers and those who enjoy experimenting with bold flavors. Whether you sip it neat, mix it into cocktails, or use it in dessert drinks, peanut butter whiskey offers versatility and a distinct experience.

What is Peanut Butter Whiskey?

Peanut butter whiskey combines whiskey with peanut butter flavor. Unlike typical whiskey, which highlights grains and oak barrel notes, this version brings a sweet, nutty flavor. Its sweetness and milder intensity attract a wide range of drinkers. You can enjoy it on its own, over ice, or mix it into drinks like peanut butter whiskey sours or spiked milkshakes.

Origins and History of Peanut Butter Whiskey

The concept of peanut butter whiskey emerged in the 2010s. Steve Yeng, a bar owner, created peanut butter whiskey as a drink in his bar. After its growing popularity, he and his wife Brittany Yeng launched the Skrewball brand in 2018. They marketed it as a playful, unconventional twist on whiskey, quickly gaining fans across the U.S.

Popularity and Market Demand

Peanut butter whiskey has skyrocketed in popularity, especially among younger drinkers who enjoy flavored spirits. Its playful, dessert-like qualities contribute to its success. Skrewball’s rise encouraged other brands to create similar products, further fueling demand. The drink also gained attention on social media, where bartenders and influencers shared creative recipes, boosting its appeal even more.

The Flavor Profile of Peanut Butter Whiskey

Peanut butter whiskey combines the rich, smooth texture of whiskey with the distinct taste of peanut butter, resulting in a flavor profile that’s both sweet and nutty. Here’s a closer look at its flavor characteristics:

Sweet and Nutty Flavor Notes

Peanut butter whiskey features a balanced blend of flavors. The sweetness, often reminiscent of caramel or vanilla, comes from the added sugars and flavorings. The nutty undertones evoke the creamy, roasted essence of peanut butter, making the drink appealing to those who prefer a less intense whiskey experience. While traditional whiskey can have smokey, spicy, or oaky flavors, peanut butter whiskey focuses more on dessert-like qualities.

How Peanut Butter Whiskey is Made

The process begins with a base whiskey, typically a blend of American whiskey varieties. To infuse the whiskey with peanut butter flavor, distillers use either real peanut butter extract or natural flavorings. The whiskey then undergoes filtration and blending to balance the sweet and nutty elements. Unlike traditional whiskey, which may age for years, peanut butter whiskey often has a shorter production cycle, as the focus is more on adding and balancing flavors rather than enhancing the whiskey’s complexity through long aging.

Comparison to Traditional Whiskey Flavors

Traditional whiskey often carries bold flavors such as oak, spice, and sometimes smoke, depending on its origin and aging process. These flavors come from the grains, fermentation, and the time spent aging in barrels. Peanut butter whiskey, in contrast, replaces the robust, earthy notes with sweeter and more approachable flavors. While traditional whiskey drinkers may appreciate its complexity and depth, peanut butter whiskey tends to appeal to those who prefer sweeter, smoother drinks without the intensity of oak or peat. It offers a fun, creative alternative to the classic whiskey experience.

Since butter whiskey might pair well in creative cocktail recipes, a link to this guide can highlight unique breakfast shot ideas. The Ultimate Guide to Breakfast Shots

Top Brands of Peanut Butter Whiskey

Peanut butter whiskey has grown rapidly in popularity, with several brands now offering their own versions. Here’s a look at the top brands making waves in the peanut butter whiskey market:

1. Skrewball: The Pioneer of Peanut Butter Whiskey

Skrewball launched in 2018 and revolutionized the flavored whiskey market. Created by Steve and Brittany Yeng, Skrewball stands as the original peanut butter whiskey brand, known for its smooth, sweet, and creamy flavor. Its success quickly made it a favorite among casual drinkers and bartenders alike. Skrewball’s branding emphasizes fun, creativity, and a sense of rebellion, making it a key player in the flavored spirits category.

2. Sheep Dog

Sheep Dog is another popular peanut butter whiskey brand, offering a similar flavor profile with sweet, nutty notes. Its affordable price point makes it accessible to a wide range of consumers. Sheep Dog positions itself as a casual, fun whiskey, appealing to those looking for a playful spirit to enjoy with friends or in creative cocktails.

3. Sqrrl

Sqrrl peanut butter whiskey delivers a smooth blend of peanut butter flavor with hints of caramel and vanilla. Known for its balance of sweet and nutty flavors, Sqrrl targets those who enjoy sweet spirits but still appreciate the whiskey’s warmth. It competes closely with Skrewball and has gained traction due to its approachable and fun branding.

4. Ole Smoky

Known for its moonshine and flavored whiskeys, added peanut butter whiskey to its line. Ole Smoky Peanut Butter Whiskey combines the brand’s reputation for high-quality spirits with the rich, creamy essence of peanut butter. It has a strong appeal for those who enjoy both moonshine and flavored whiskey, offering a unique twist on the trend.

5. Hard Truth

Hard Truth Peanut Butter Whiskey adds a premium touch to the category with a more refined, artisanal approach. The brand uses quality ingredients and careful blending to deliver a rich, peanut butter flavor with a hint of oak, making it slightly closer to traditional whiskey. Hard Truth caters to drinkers looking for something slightly more sophisticated while still enjoying the fun flavor of peanut butter whiskey.

These brands each offer a different take on the growing peanut butter whiskey trend, ensuring there’s a choice for every palate and occasion.

How Peanut Butter Whiskey is Made

Peanut butter whiskey, while fun and flavorful, still undergoes a well-thought-out production process. Below is a breakdown of the key stages involved, from the ingredients to the distillation and flavoring processes.

Ingredients Used in Production

  1. Base Whiskey: The foundation of peanut butter whiskey starts with a blend of standard whiskey, typically an American whiskey or bourbon. The whiskey provides the alcohol content and some of the underlying grain and oak notes.
  2. Sweeteners: To achieve the sweeter profile that peanut butter whiskey is known for, distillers often use added sugars, caramel, or vanilla to enhance sweetness and smooth out the drink.
  3. Peanut Butter Flavoring: The signature peanut butter flavor comes from either natural peanut butter extract or artificial flavorings, depending on the brand and production method. Some brands may use real peanuts to develop authentic flavor, while others opt for laboratory-created flavor compounds.
  4. Additional Flavor Enhancers: Some brands may also use caramel, vanilla, or chocolate flavoring to enrich the overall taste.

Distillation Process

The distillation process for peanut butter whiskey generally follows the same method as traditional whiskey. Here’s a simplified version of the steps:

  1. Fermentation: Grains (like corn, barley, or rye) are mashed and combined with water and yeast, which ferments the sugars into alcohol.
  2. Distillation: This fermented liquid is then distilled in copper stills, where it is heated, separating the alcohol from the water and solids. The resulting liquid is a high-proof spirit that serves as the base for the peanut butter whiskey.
  3. Aging (Optional): Some brands may age their whiskey in oak barrels to develop additional depth and character, but since the focus of peanut butter whiskey is on flavor, aging times are often shorter than for traditional whiskey. The barrels can impart mild oak and vanilla notes before the flavoring process begins.

Flavoring Process: Natural vs. Artificial Flavors

  1. Natural Flavors: Brands using natural peanut butter flavoring often extract oils and essences from real peanuts. These natural extracts are blended with the whiskey, creating an authentic peanut taste. Using real ingredients gives the whiskey a more subtle, organic flavor, though it can make the product more expensive due to the higher cost of natural extracts.
  2. Artificial Flavors: Some brands opt for artificial peanut butter flavoring, which mimics the taste of real peanuts. These synthetic flavors can be more consistent and stable in terms of taste but may lack the complexity of real peanut extracts. Artificial flavorings often give the whiskey a more pronounced, candy-like sweetness, making it appealing to those who enjoy bolder, sweeter drinks.
  3. Blending and Bottling: Once the base whiskey and flavorings are combined, the whiskey is often filtered to ensure a smooth consistency. The final product is then diluted to the desired proof (usually around 70 proof, or 35% alcohol by volume) before being bottled.

By focusing on this delicate balance of natural and artificial flavors, distillers can create the characteristic sweet and nutty taste of peanut butter whiskey, while maintaining the warmth and richness of the whiskey itself.

Peanut Butter Whiskey Cocktails

Peanut butter whiskey is incredibly versatile, making it a fun ingredient for both simple drinks and more elaborate cocktails. Here are some popular ways to mix it, whether you’re using basic mixers, reinventing classic cocktails, or going for indulgent dessert drinks.

Peanut Butter Whiskey with Soda or Mixers

  1. Peanut Butter Whiskey & Cola: A simple and delicious combo. The sweetness of cola pairs perfectly with the nutty richness of peanut butter whiskey. Just pour peanut butter whiskey over ice and top with your favorite cola. Garnish with a lime wedge for extra zing.
  2. Peanut Butter Whiskey & Ginger Ale: The spicy kick of ginger ale complements the sweet nuttiness of the whiskey. Serve over ice with a slice of fresh ginger or lemon for added flavor.
  3. Peanut Butter Whiskey & Cream Soda: If you’re looking for something really sweet and creamy, mix peanut butter whiskey with cream soda. It’s a dessert-like drink that’s simple but packed with flavor.
  4. Peanut Butter Whiskey & Apple Cider: Perfect for fall, this combination brings together the spiced sweetness of apple cider and the creamy, nutty whiskey. Serve it warm or cold, depending on the season.

Classic Cocktails with a Twist

  1. Peanut Butter Old Fashioned:
    A classic Old Fashioned with a peanut butter twist.

    • Ingredients: 2 oz peanut butter whiskey, 1 dash of bitters, 1 sugar cube, and a splash of water.
    • Instructions: Muddle the sugar cube and bitters with a splash of water in a glass. Add the whiskey, stir well, and garnish with an orange peel and a cherry.
  2. Peanut Butter Whiskey Sour:
    A tangy, nutty variation of the whiskey sour.

    • Ingredients: 2 oz peanut butter whiskey, 1 oz fresh lemon juice, ½ oz simple syrup, and 1 egg white (optional for froth).
    • Instructions: Shake the ingredients with ice, strain into a glass, and garnish with a lemon wheel or cherry.
  3. Peanut Butter Manhattan:
    A rich take on the classic Manhattan.

    • Ingredients: 2 oz peanut butter whiskey, 1 oz sweet vermouth, 2 dashes Angostura bitters.
    • Instructions: Stir ingredients with ice, strain into a chilled glass, and garnish with a cherry.

Dessert Cocktails

  1. Peanut Butter Whiskey Milkshake:
    A boozy, dessert-style milkshake perfect for indulging.

    • Ingredients: 2 oz peanut butter whiskey, 2 scoops of vanilla ice cream, 1 tablespoon peanut butter, ½ cup milk, and whipped cream (optional).
    • Instructions: Blend all ingredients until smooth, pour into a glass, and top with whipped cream, chocolate syrup, or a peanut butter drizzle.
  2. Peanut Butter Mudslide:
    A nutty twist on the classic mudslide cocktail.

    • Ingredients: 1 oz peanut butter whiskey, 1 oz coffee liqueur, 1 oz Irish cream liqueur, and 2 scoops of ice cream (optional).
    • Instructions: Shake the whiskey, coffee liqueur, and Irish cream with ice. For a thicker drink, blend with ice cream. Serve in a chilled glass with chocolate syrup drizzled around the rim.
  3. Peanut Butter Whiskey Hot Chocolate:
    Cozy up with this rich and creamy hot chocolate.

    • Ingredients: 2 oz peanut butter whiskey, 1 cup hot chocolate, and whipped cream.
    • Instructions: Prepare your favorite hot chocolate, stir in the peanut butter whiskey, and top with whipped cream, mini marshmallows, and a peanut butter drizzle for the perfect winter treat.

Peanut butter whiskey works in so many different drink styles—from simple and refreshing to rich and decadent. It’s great for experimenting with both familiar cocktails and creating new dessert-inspired drinks.

Best Ways to Enjoy Peanut Butter Whiskey

Peanut butter whiskey offers versatility in how it can be enjoyed, whether you’re sipping it straight, pairing it with food, or incorporating it into recipes. Here are some of the best ways to experience its unique flavor:

Neat vs. On the Rocks

  1. Neat:
    Sipping peanut butter whiskey neat (without ice) allows you to fully appreciate its sweet and nutty flavor profile. It’s a great way to enjoy the warmth and smoothness of the whiskey, especially if you’re a fan of dessert-like drinks. The whiskey’s sweetness stands out more when it’s not diluted, making neat a perfect option for those who love a bold peanut butter taste.
  2. On the Rocks:
    Serving peanut butter whiskey over ice (on the rocks) mellows out the sweetness and enhances the whiskey’s smooth texture. As the ice melts, it slightly dilutes the whiskey, which can make it more refreshing and easier to drink over time. This is ideal for those who prefer a lighter flavor or want a chilled, more refreshing experience.

Pairing with Desserts and Savory Foods

  1. With Desserts:
    Peanut butter whiskey pairs exceptionally well with dessert items, thanks to its sweet and nutty flavor. Try pairing it with:

    • Chocolate-based desserts: The rich cocoa in brownies, chocolate cakes, or truffles complements the creamy peanut butter notes in the whiskey.
    • Ice cream: A scoop of vanilla or chocolate ice cream with a shot of peanut butter whiskey creates a decadent dessert pairing.
    • Peanut butter treats: Foods like peanut butter cookies or peanut butter cups naturally complement the flavor of peanut butter whiskey for a harmonious match.
    • Cheesecake: The creamy texture and slight tanginess of cheesecake pair wonderfully with the sweet, nutty whiskey.
  2. With Savory Foods:
    Peanut butter whiskey also works surprisingly well with savory dishes, especially those that feature salty or spicy components. Consider pairing it with:

    • Bacon: The salty, crispy flavor of bacon contrasts beautifully with the sweetness of peanut butter whiskey.
    • Spicy BBQ: The sweetness of the whiskey balances out the bold, smoky, and spicy flavors of BBQ ribs, wings, or pulled pork.
    • Thai or Asian peanut dishes: Savory dishes with peanut sauce, like Thai chicken satay or stir-fries, pair perfectly with peanut butter whiskey, as the flavors complement each other.

Peanut Butter Whiskey in Baking and Cooking

  1. Baking with Peanut Butter Whiskey:
    Peanut butter whiskey can be a fantastic addition to baked goods, adding both flavor and a slight alcoholic kick. Some ways to use it include:

    • Brownies: Add a splash of peanut butter whiskey to your brownie batter or frosting for a nutty, boozy twist.
    • Cookies: Incorporate it into peanut butter cookie dough to enhance the peanut flavor or drizzle it over freshly baked cookies as a glaze.
    • Cupcakes and cakes: Use peanut butter whiskey in cake batter or frosting, particularly for chocolate, vanilla, or peanut butter-flavored cakes, for an indulgent flavor boost.
  2. Cooking with Peanut Butter Whiskey:
    You can also use peanut butter whiskey in savory cooking. It adds depth and a hint of sweetness to sauces, marinades, and glazes.

    • BBQ sauce: Add peanut butter whiskey to homemade BBQ sauce for a rich, tangy-sweet flavor that pairs well with grilled meats.
    • Peanut sauce: Stir a dash of peanut butter whiskey into a peanut sauce for stir-fries or satay to enhance the nutty flavor.
    • Glazes: Use it in a glaze for meats like pork chops, chicken, or even salmon for a sweet, savory, and slightly boozy finishing touch.

Peanut butter whiskey shines whether you enjoy it neat, paired with food, or as a fun ingredient in baking and cooking. Its versatility makes it a delicious and unique addition to a wide range of experiences.

Peanut Butter Whiskey and Health Considerations

While peanut butter whiskey can be enjoyed in moderation, there are a few important health considerations to keep in mind, especially regarding alcohol content, calories, and potential allergies.

Alcohol Content and Serving Sizes

Peanut butter whiskey typically has an alcohol content of 35% ABV (alcohol by volume), which is slightly lower than traditional whiskey (usually around 40% ABV). However, the alcohol content remains significant, so it’s important to monitor serving sizes.

  • Standard serving size: A typical serving of peanut butter whiskey is 1.5 ounces (44 ml), which contains about 0.6 ounces of pure alcohol.
  • Moderation: It’s recommended that adults consume alcohol in moderation, which means no more than one standard drink per day for women and two for men, according to health guidelines.

Calories and Nutritional Information

Peanut butter whiskey, due to its added sugars and flavorings, tends to be higher in calories than traditional whiskey. Below are estimates for a standard 1.5 oz (44 ml) serving:

  • Calories: Approximately 98-105 calories per 1.5 oz serving.
  • Carbohydrates: Most peanut butter whiskeys contain around 4-6 grams of carbs per serving, primarily due to the added sugars.
  • Sugar content: Peanut butter whiskey can contain 3-5 grams of sugar per serving, depending on the brand.

The extra sugars and flavorings contribute to its sweetness and creaminess, but they also increase the caloric and carbohydrate content, making it a higher-calorie option compared to unflavored whiskey.

Allergies and Peanut Sensitivity Concerns

  1. Peanut Allergies:
    Peanut butter whiskey may pose a concern for individuals with peanut allergies or sensitivities. However, many brands, like Skrewball, use natural or artificial peanut flavoring rather than actual peanuts. This means that while the whiskey tastes like peanut butter, it may not contain real peanuts. Still, individuals with peanut allergies should carefully read labels or consult the manufacturer for clarity.

    • Cross-contamination: Even if a brand doesn’t use real peanuts, there is still the risk of cross-contamination during production. People with severe peanut allergies should avoid peanut butter whiskey or contact the brand for detailed allergen information.
  2. Artificial Flavoring Sensitivities:
    Some peanut butter whiskey brands use artificial flavorings instead of natural peanut butter, which may trigger sensitivities in individuals sensitive to artificial additives. Those with concerns about additives should check ingredient lists or choose brands that use natural flavors.

Final Note on Health

While peanut butter whiskey can be a fun and enjoyable treat, it’s important to keep these health considerations in mind. Enjoying it responsibly, in moderation, and being aware of potential allergens or sensitivities will help ensure that it can be savored safely.

Homemade Peanut Butter Whiskey

Making peanut butter whiskey at home can be a fun and rewarding project. By crafting your own version, you can control the sweetness, richness, and intensity of the peanut butter flavor to suit your taste.

DIY Recipe: How to Make Your Own Peanut Butter Whiskey

Here’s a simple recipe for making peanut butter whiskey at home:

Ingredients:

  • 1 bottle (750ml) of whiskey (choose a smooth, mild whiskey like bourbon or American whiskey)
  • 1 cup creamy peanut butter (natural or regular)
  • ¼ cup honey or maple syrup (optional, for sweetness)
  • 1 tablespoon vanilla extract (optional, for added depth)
  • ¼ cup brown sugar (optional, for extra sweetness)
  • Pinch of salt (optional, to enhance flavors)

Equipment:

  • Large mason jar or airtight container
  • Fine mesh strainer or cheesecloth
  • Funnel
  • Bottles for storage

Instructions:

  1. Combine Ingredients:
    In a large mason jar or container, combine the whiskey, peanut butter, and any optional ingredients like honey, brown sugar, vanilla extract, and a pinch of salt. Stir or shake the mixture well until all ingredients are thoroughly blended.
  2. Infuse:
    Let the mixture sit at room temperature for 1-3 days, giving the flavors time to infuse. Shake the jar gently once or twice a day to ensure even flavor distribution. Taste after 24 hours to check if the flavor is to your liking. You can leave it for an extra day or two if you want a stronger peanut butter taste.
  3. Strain the Mixture:
    Once the desired flavor is achieved, strain the mixture through a fine mesh strainer or cheesecloth into a clean bottle or jar to remove any peanut butter solids. You may need to strain it more than once to achieve a smooth consistency.
  4. Bottle and Store:
    Transfer the strained mixture to clean bottles using a funnel. Store in the fridge or a cool, dark place. Shake well before serving, as slight separation may occur.

Tips for Perfecting the Flavor Balance

  1. Choose the Right Whiskey:
    Opt for a mild and smooth whiskey, like bourbon or American whiskey, that won’t overpower the peanut butter flavor. Avoid using heavily peated or smokey whiskeys, as they may clash with the sweetness of the peanut butter.
  2. Adjust the Sweetness:
    If someone prefers a sweeter version, they can add more honey, maple syrup, or brown sugar. For a less sweet version, they can reduce or skip these ingredients entirely.
  3. Peanut Butter Texture:
    Use creamy peanut butter to ensure smoothness in your final product. Natural peanut butter can work well but may require extra straining due to its oil separation. Avoid chunky peanut butter, as it will add too many solids and make the whiskey difficult to strain.
  4. Infusion Time:
    Be mindful of how long you infuse the whiskey with the peanut butter. The longer it sits, the more intense the peanut flavor will become. If you want a milder taste, strain it sooner.
  5. Flavor Additions:
    Vanilla extract and a pinch of salt can enhance the richness and depth of the flavor. You can also experiment with other flavorings like cinnamon or cocoa powder for a unique twist.

By following this simple process, one can enjoy homemade peanut butter whiskey with a flavor profile tailored exactly to their preferences.

Frequently Asked Questions

1. How does peanut butter whiskey taste?

It combines the warm, smooth notes of whiskey with a creamy, sweet, and nutty peanut butter flavor. It’s typically sweeter than traditional whiskey, with hints of caramel, vanilla, and roasted peanuts. The overall profile is dessert-like, making it popular for sipping, mixing into cocktails, or adding to desserts.

2. Is peanut butter whiskey gluten-free?

Most brands are considered gluten-free because the distillation process typically removes gluten proteins from the grains used in whiskey production. However, if someone has a severe gluten sensitivity, it’s always a good idea to check with the specific brand to ensure there’s no risk of cross-contamination.

3. What is the best mixer for peanut butter whiskey?

Peanut butter whiskey pairs well with a variety of mixers. Some popular options include:

  • Cola: The sweetness of cola complements the whiskey’s nutty flavor.
  • Cream soda: This enhances the dessert-like qualities of the drink.
  • Apple cider: For a fall-inspired cocktail with warm flavors.
  • Chocolate milk: A fun and indulgent mixer for dessert drinks.
  • Ginger ale: Adds a refreshing spicy kick to the sweet whiskey.

4. Can you cook with peanut butter whiskey?

Can be used in both savory and sweet dishes. It works well in baking, especially in brownies, cookies, and cakes. It can also be used in savory recipes like BBQ sauces, glazes for meats, or in peanut-flavored sauces for stir-fries and marinades. Its sweet, nutty flavor adds a unique twist to many dishes

5. Does peanut butter whiskey contain real peanuts?

It depends on the brand. Some brands use real peanut butter or peanut butter extract, while others rely on artificial peanut flavors. If someone has a peanut allergy, it’s essential to check the ingredients list or contact the manufacturer directly to confirm whether real peanuts are used and to assess any risks of cross-contamination.

6. Where can I buy peanut butter whiskey?

It is widely available at liquor stores, online retailers, and some supermarkets. Popular brands like Skrewball, Sheep Dog, and Sqrrl can be found in most places where liquor is sold. Additionally, it can often be ordered online through services like Drizly, ReserveBar, or directly from the brand’s website.

These FAQs cover the most common questions about it, providing helpful information whether someone is curious about taste, allergies, or ways to enjoy it.

Cookie Butter: Uses, Recipes, and the Future of this Sweet Spread

Cookie Butter

What is Cookie Butter

Definition

Cookie butter is a creamy, spreadable paste made primarily from crushed cookies, sugar, and oil. It’s similar in texture to peanut butter or other nut spreads but offers the flavor profile of spiced, sweet cookies. It can be used as a spread on bread, waffles, pancakes, or as an ingredient in desserts.

Origins and History

Cookie butter originated in Belgium, where speculoos cookies (spiced shortcrust biscuits) are widely enjoyed. In the early 2000s, Belgian baker Els Scheppers came up with the idea of transforming these crunchy cookies into a spread. She pitched the idea on a Belgian TV show, which led to the product’s mass production. Speculoos cookie butter quickly gained popularity in Europe and the U.S., thanks to brands like Lotus Biscoff.

Ingredients Used in Making Cookie Butter

The key ingredients in cookie butter typically include:

  • Crushed spiced cookies (like speculoos or other types of biscuits)
  • Sugar or sweeteners
  • Vegetable oils or butter
  • Emulsifiers (to create a smooth consistency)
  • Sometimes additional flavors like cinnamon or vanilla

The Evolution of Cookie Butter

Early Beginnings

Cookie butter started in Belgium with speculoos cookies, spiced biscuits popular for centuries. In the early 2000s, Belgian baker Els Scheppers had the idea to turn these cookies into a spread. After presenting it on a TV show, Lotus Biscoff began producing cookie butter, which soon became well-known in Belgium and the Netherlands.

Popularity Boost in Recent Years

In the late 2000s, started to become popular in the U.S., particularly after Trader Joe’s introduced their version. Its unique flavor and versatility helped it catch on, especially in desserts. Food bloggers and chefs helped spread its use in creative ways, from desserts to snacks.

Influence of Social Media on Cookie Butter’s Rise

Social media, especially Instagram and Pinterest, played a huge role in cookie butter’s popularity. Food influencers and home chefs shared recipes using cookie butter, and the appealing look of these treats made them viral. Challenges and recipe ideas around cookie butter spread quickly, making it a trendy favorite worldwide.

How Cookie Butter is Made

Key Ingredients:

  • Cookies: Crushed spiced cookies like speculoos or Biscoff.
  • Oil: Vegetable oil or butter helps create the creamy texture.
  • Sugar: Adds sweetness.
  • Optional Add-ins: Cinnamon, vanilla, or salt for extra flavor.

Manufacturing Process:

  1. Grind the cookies into a fine powder.
  2. Mix the cookie powder with oil and sugar.
  3. Blend the mixture until smooth and creamy.
  4. Package the spread in jars for sale.

Homemade Recipe Variations:
To make cookie butter at home:

  1. Ingredients:
    • 1 cup of crushed cookies
    • ¼ cup of oil or melted butter
    • 2 tablespoons of sugar
  2. Instructions:
    • Blend the cookies until fine.
    • Add oil, sugar, and optional spices.
    • Mix until smooth and adjust with water if needed. Store in a jar.

Different Types of Cookie Butter

Popular Brands:

  • Lotus Biscoff: The original cookie butter, made from speculoos cookies, with a smooth or crunchy texture.
  • Trader Joe’s: Another popular version, available in smooth or crunchy, made with spiced cookies similar to speculoos.
  • Speculoos Cookie Butter: Often used as a generic term for cookie butter based on Belgian spiced cookies, available from various brands.

Homemade Cookie Butter:
Homemade versions allow for customization, using any type of cookie, from chocolate chip to gingersnaps. The basic recipe includes crushed cookies, oil or butter, sugar, and flavoring options like vanilla or cinnamon.

Allergy-Friendly Variations:
For those with allergies, alternative cookie butters are available:

  • Gluten-free Cookie Butter: Made using gluten-free cookies.
  • Nut-free Cookie Butter: Avoids the use of any nut ingredients, ideal for peanut or tree-nut allergies.
  • Dairy-free Cookie Butter: Uses plant-based oils and dairy-free cookies to accommodate those with lactose intolerance or vegan diets.

Cookie Butter vs. Peanut Butter

Comparison of Texture and Taste

  • Texture:
    Cookie butter has a smooth and creamy consistency, sometimes with crunchy bits, depending on the brand. It is slightly softer and less dense than peanut butter, making it easier to spread. Peanut butter comes in smooth or chunky versions and tends to be thicker and stickier due to its nut-based content.
  • Taste:
    Cookie butter has a sweet, spiced flavor, often with hints of cinnamon, caramel, and gingerbread. Peanut butter, on the other hand, has a nutty, savory taste with a hint of sweetness, depending on added sugars.

Nutritional Differences

  • Cookie Butter:
    Higher in sugar and carbohydrates due to its cookie base, making it a sweeter, more indulgent option. It also contains more fats from the oils used but generally lacks significant protein.
  • Peanut Butter:
    Rich in protein and healthy fats, peanut butter is often considered more nutritious. It is lower in sugar (especially in natural varieties) and offers vitamins and minerals like potassium and magnesium.

Uses in Cooking and Baking

  • Cookie Butter:
    Works best in desserts like cheesecakes, milkshakes, cookies, and ice creams. It adds a unique spiced sweetness to treats, making it popular for drizzling on pancakes or dipping fruits.
  • Peanut Butter:
    Versatile in both sweet and savory dishes, peanut butter is used in cookies, sauces, sandwiches, smoothies, and energy bars. It pairs well with fruits, bread, and savory ingredients like noodles in peanut-based sauces.

Nutritional Information of Cookie Butter

Calories and Sugar Content

Cookie butter is calorie-dense, with approximately 180–200 calories per 2 tablespoons. It contains about 11–12 grams of sugar, depending on the brand. The high sugar content is due to its cookie base, making it sweeter than other spreads.

Comparison to Other Spreads

  • Peanut Butter:
    • Calories: ~190 per 2 tablespoons
    • Sugar: 1–3 grams (for natural peanut butter)
    • Peanut butter is higher in protein (about 8 grams) and healthy fats, making it a more balanced option for energy and satiety.
  • Almond Butter:
    • Calories: ~190–200 per 2 tablespoons
    • Sugar: 1–2 grams (natural versions)
    • Almond butter is rich in healthy fats, vitamin E, and lower in sugar, with about 7 grams of protein.
  • Nutella:
    • Calories: ~200 per 2 tablespoons
    • Sugar: 21 grams
    • Nutella is closer to cookie butter in sugar content and serves more as a dessert spread, but lacks the spice flavor and uses hazelnuts as a base.

Is Cookie Butter Healthy

Cookie butter is not considered a health food. Its high sugar and fat content make it more of a treat or indulgence rather than a nutrient-dense spread. While delicious, it doesn’t offer the protein, vitamins, or healthy fats found in nut butters. It should be consumed in moderation, especially if you’re looking to maintain a balanced diet.

The Flavor Profile of Cookie Butter

Taste and Aroma

This spread offers a rich, sweet taste with warm, spiced notes. It often features hints of caramel, cinnamon, nutmeg, and gingerbread, creating a cozy, dessert-like flavor. The aroma is sweet and inviting, reminiscent of freshly baked spiced cookies.

What Gives Cookie Butter Its Unique Flavor?

The key to cookie butter’s unique flavor comes from the speculoos cookies or other spiced cookies used as the base. These cookies are infused with spices like cinnamon, cloves, and nutmeg, giving the spread a complex, warm taste. The crushed cookies are blended with sugar, oil, and sometimes vanilla, which enhances the sweetness and smooth texture.

How It Complements Various Foods

Cookie butter pairs well with a wide variety of foods due to its sweet and spiced profile:

  • Breads and Pastries: Spread on toast, bagels, croissants, or muffins for an indulgent treat.
  • Desserts: Adds a unique twist to cheesecakes, cookies, brownies, and cakes.
  • Fruit: Perfect as a dip for apples, bananas, or pears.
  • Pancakes and Waffles: Drizzle it over breakfast for a sweet and spiced kick.
  • Ice Cream: Mix it into or drizzle over ice cream for a flavorful topping.

Popular Ways to Use Cookie Butter

  1. As a Spread:
    • Toast: Spread cookie butter on warm toast for a sweet and spiced breakfast option.
    • Waffles and Pancakes: Drizzle or spread it on waffles and pancakes for an indulgent twist, replacing traditional syrups or butter.
  2. As a Dip:
    • Fruits: Use it as a dip for apples, bananas, and pears. The sweetness of the cookie butter pairs perfectly with the natural flavors of the fruit.
    • Pretzels: The salty crunch of pretzels complements the sweet, smooth texture of cookie butter, creating a sweet-salty snack.
    • Crackers: Spread it on crackers for a quick and easy snack.
  3. In Desserts:
    • Cookies: Incorporate cookie butter into cookie dough for added flavor, or use it as a filling for sandwich cookies.
    • Cakes and Pies: Use cookie butter in cake frosting, swirl it into batter, or mix it into pie fillings for a rich, spiced touch.
    • Milkshakes and Ice Cream: Blend it into milkshakes or mix it into ice cream for a unique, creamy dessert.

Cookie Butter in Baking

Incorporating Cookie Butter into Baked Goods:
This sweet spread can be used in various baked goods to add a rich, spiced flavor. It can be folded into batters, used as a filling, or swirled into cakes and breads. Its creamy texture and distinct taste enhance simple recipes, turning them into indulgent treats.

Cookies, Cupcakes, and Brownies with Cookie Butter:

  • Cookies: Mix cookie butter into the dough for a soft, flavorful cookie or use it as a filling in thumbprint or sandwich cookies. You can also drizzle it on top of baked cookies for extra sweetness.
  • Cupcakes: Swirl cookie butter into cupcake batter or use it in the frosting for a spiced, creamy topping.
  • Brownies: Add cookie butter to brownie batter to give a sweet, spiced layer of flavor. Swirling it into the top of the batter before baking creates a visually appealing and delicious topping.

Innovative Recipes:

  • Cookie Butter Cheesecake: Mix cookie butter into the cheesecake filling or use it to create a layer between the crust and filling for a creamy, spiced twist on traditional cheesecake.
  • Cookie Butter Fudge: Combine cookie butter with sweetened condensed milk and chocolate or white chocolate to create a smooth, indulgent fudge.
  • Cookie Butter Bars: Create layered bars by spreading cookie butter between layers of dough or use it as the base for no-bake dessert bars.

These recipes showcase cookie butter’s versatility in baking and its ability to transform ordinary desserts into something unique and flavorful. Whether adding a rich twist to crack cakes, a creamy filling to red velvet muffins, cookie butter proves to be a versatile and flavorful ingredient.

How to Make Homemade Cookie Butter

Essential Ingredients

  • Cookies: 1 cup of any spiced or flavored cookies (e.g., speculoos, gingersnaps, or even chocolate chip cookies).
  • Oil: ¼ cup of vegetable oil or melted butter (adjust for desired consistency).
  • Sugar: 2 tablespoons of granulated sugar (optional, depending on sweetness of the cookies).
  • Flavorings: Optional vanilla extract, cinnamon, or a pinch of salt for added depth.

Step-by-Step Guide

  1. Crush the Cookies:
    • Blend or process the cookies into a fine powder, ensuring there are no large crumbs.
  2. Add Oil and Sugar:
    • Gradually add the oil and sugar to the crushed cookies. Blend until you achieve a smooth, creamy consistency.
  3. Flavor Adjustments:
    • Taste the mixture and adjust by adding vanilla, cinnamon, or salt based on your flavor preference.
  4. Blend to Desired Consistency:
    • If the cookie butter feels too thick, add a little more oil or water. Blend until you get a smooth, spreadable consistency.
  5. Store:
    • Transfer the homemade cookie butter into an airtight jar and store it in the fridge for up to two weeks.

Tips for Experimenting with Different Cookie Flavors

  • Try Different Cookies: Use cookies like Oreos, chocolate chip, graham crackers, or shortbread for unique flavors.
  • Add Mix-ins: Swirl in chocolate chips, crushed nuts, or dried fruit for texture and extra flavor.
  • Adjust the Sweetness: Some cookies might already be sweet enough, so adjust the sugar accordingly, or omit it entirely for a less sweet version.

Experimenting with different cookies and flavors can create endless variations of homemade cookie butter!

The Future of Cookie Butter

New Trends and Innovations in the Market

The cookie butter market continues to evolve with exciting trends such as:

  • Flavored Variations: Brands may explore new flavors by infusing cookie butter with unique ingredients like chocolate, coffee, or seasonal spices (e.g., pumpkin spice cookie butter).
  • Crunchy and Textured Versions: Some products already include crunchy bits of cookies, but more textures could be introduced, such as cookie butter with added nuts, candy pieces, or fruit chunks.
  • Savory-Sweet Combinations: Experimenting with sweet and savory elements (like sea salt, chili, or herbs) to create new, bold flavors.

Potential Health-Conscious Versions

As health trends grow, cookie butter may see healthier alternatives:

  • Low-Sugar or Sugar-Free: Brands could introduce reduced sugar or sugar-free options using natural sweeteners like stevia or monk fruit.
  • Gluten-Free and Vegan Options: With increasing demand for dietary-friendly products, more cookie butters might cater to gluten-free, dairy-free, and vegan consumers.
  • Protein-Enriched Cookie Butter: Like peanut or almond butter, future versions could focus on protein content, blending cookie butter with protein-rich ingredients to appeal to health-conscious snackers.

Global Expansion

Cookie butter’s rise in popularity is likely to continue spreading across global markets:

  • New International Flavors: Brands could localize cookie butter flavors for different markets, incorporating regional spices and cookie types, such as ginger cookies in Asia or digestives in the UK.
  • Wider Retail Availability: As this sweet spread gains popularity, it will likely appear more frequently in grocery stores and cafes worldwide, along with new packaging formats for convenience, like single-serve packets or spreads incorporated into snacks.

These innovations open exciting possibilities for the future of this sweet spread, catering to both indulgent cravings and healthier lifestyles worldwide.

FAQs

What cookies are best for making cookie butter?

Speculoos cookies, like the ones used in Lotus Biscoff, are the most common choice due to their spiced flavor. However, you can use any type of cookie, such as gingersnaps, shortbread, Oreos, or chocolate chip cookies, depending on the flavor you want.

Can I use cookie butter as a substitute for peanut butter in recipes?

Yes, you can! This sweet, creamy spread can be used as a substitute for peanut butter in many recipes, like cookies, brownies, or as a spread. However, it doesn’t contain the protein and healthy fats found in peanut butter, making it more of a dessert option.

Is cookie butter gluten-free?

Most commercial cookie butters are not gluten-free because they are made from wheat-based cookies like speculoos. However, you can make homemade using gluten-free cookies for a safe option.

How long does cookie butter last?

Homemade versions typically last up to two weeks in the fridge when stored in an airtight container. Commercial varieties can last much longer, depending on the brand’s expiration date and proper storage in a cool, dry place.

Is cookie butter vegan?

Some brands are vegan, especially those made with speculoos cookies (like Lotus Biscoff). However, always check the ingredient list, as some versions may contain dairy or honey. Homemade vegan versions can be made by using dairy-free cookies and oils.

What’s the best way to store cookie butter?

Store commercial spreads in a cool, dry place, or refrigerate after opening to extend freshness. Homemade versions should always be refrigerated in an airtight jar and stirred occasionally if separation occurs.

Red Velvet Muffins: Tips and Global Twists

red velvet muffins

Red Velvet Muffins are a delightful variation of the classic red velvet cake, known for their rich, soft texture and signature red color. Typically topped with a swirl of cream cheese frosting, they make the perfect treat for breakfast or dessert. These muffins offer a denser and more satisfying bite than traditional cupcakes without being overly sweet.

What are Red Velvet Muffins?

Red Velvet Muffins combine the best elements of the classic red velvet cake and muffins. Their rich cocoa flavor pairs perfectly with the tangy notes from buttermilk or vinegar. The vibrant red color comes from added food coloring, enhancing their iconic appearance. Bakers often top them with cream cheese filling or crumbly toppings for added texture and flavor balance.

Historical Background of Red Velvet Recipes

Red velvet recipes originated in America during the early 19th century. Originally, the reddish hue in the cake came from the natural reaction between cocoa powder and acidic ingredients like vinegar or buttermilk. During World War II, bakers began using food coloring to intensify the red color. The recipe gained popularity in the 1920s when New York’s Waldorf-Astoria hotel featured it, securing its place in American baking traditions.

Popularity in Modern Baking

Red velvet desserts have become a staple in modern baking. Their visual appeal and unique flavor, combining sweet and tangy elements, continue to attract attention. Red velvet muffins, in particular, have gained popularity due to their convenient portion size, making them a great treat for sharing. Social media and food photography have helped boost their trendiness, keeping them relevant in today’s baking scene.

Key Ingredients of Red Velvet Muffins

Red Velvet Muffins rely on a few key ingredients that give them their distinct flavor, texture, and appearance. From classic elements to the choice of food coloring, each component plays a vital role in creating the perfect muffin.

Classic Ingredients

  • Flour: Provides the structure and body of the muffin. All-purpose flour is most commonly used.
  • Sugar: Granulated sugar sweetens the muffins and helps retain moisture.
  • Butter or Oil: Adds richness and keeps the muffins soft and tender. Some recipes use oil for a moist texture, while others opt for butter for its flavor.
  • Eggs: Bind the ingredients and help with leavening, giving the muffins a light, fluffy texture.
  • Buttermilk: Adds tanginess and acidity, which enhances the flavor and reacts with baking soda for rise.
  • Baking Soda: Works with the acidic ingredients to help the muffins rise and achieve a light texture.

Red Food Coloring: Natural vs Artificial

Red velvet recipes traditionally feature a bold red color, and the choice between natural and artificial coloring affects the final look and health considerations.

  • Artificial Red Food Coloring: Typically used for a vibrant, intense red color. A small amount goes a long way in achieving the desired hue. However, some people may prefer to avoid artificial dyes for health or personal reasons.
  • Natural Red Food Coloring: Made from beet juice or other plant-based sources, it provides a more subtle, earthy red. Though it’s a healthier option, it may not give as bright a color as artificial dyes.

Importance of Cocoa Powder

Cocoa powder is a key element in red velvet muffins, though it’s used in small amounts compared to regular chocolate-based desserts. It gives the muffins a mild chocolate flavor and enhances the depth of the red color when combined with acidic ingredients like buttermilk and vinegar. The cocoa also balances the sweetness, giving the muffins a more nuanced taste.

Cream Cheese Frosting Options

Cream cheese frosting is the classic topping for red velvet muffins. It adds richness and tang that complements the muffin’s sweet and mildly tangy flavors.

  • Classic Cream Cheese Frosting: Made from cream cheese, butter, powdered sugar, and vanilla extract. It’s smooth, creamy, and slightly tangy, balancing the flavors of the muffin.
  • Light Cream Cheese Frosting: A lower-fat version that uses less butter and cream cheese but retains the same tangy flavor.
  • Vegan Cream Cheese Frosting: A dairy-free option using plant-based cream cheese and butter substitutes, ideal for those with dietary restrictions.

The Science Behind Red Velvet Muffins

Understanding the science behind Red Velvet Muffins reveals how key ingredients interact to create the iconic texture, flavor, and rise. From the tangy combination of vinegar and buttermilk to the role of leavening agents, each element plays a critical part in crafting the perfect muffin.

The Role of Vinegar and Buttermilk

Vinegar and buttermilk are essential in Red Velvet Muffins, contributing both flavor and texture.

  • Vinegar: While it may seem unusual in baking, vinegar adds acidity, which reacts with baking soda to create carbon dioxide bubbles. These bubbles help the muffins rise, giving them a light and airy texture. Vinegar also helps intensify the red color when combined with cocoa powder and food coloring.
  • Buttermilk: Buttermilk serves a dual purpose. First, it adds a tangy flavor that balances the sweetness. Second, its acidic nature also reacts with baking soda to aid in leavening, making the muffins fluffy. The lactic acid in buttermilk helps tenderize the flour’s gluten, resulting in a softer, less dense texture.

Achieving the Perfect Texture: Moistness vs Crumbliness

The texture of Red Velvet Muffins depends on achieving a balance between moistness and crumbliness.

  • Moistness: Ingredients like oil or butter, eggs, and buttermilk contribute to the moisture in the muffins. Oil is often preferred for its ability to retain moisture without making the muffins heavy. Eggs provide structure and help lock in moisture, while buttermilk adds creaminess.
  • Crumbliness: While the muffins should be moist, a slightly crumbly texture gives them a desirable mouthfeel. Overmixing the batter can lead to tough, dry muffins because it overdevelops the gluten in the flour. The key is to mix the ingredients just until combined, avoiding overworking the batter.

The Science of Leavening Agents in Muffins

Leavening agents are responsible for making Red Velvet Muffins rise and giving them a light, airy texture. In these muffins, baking soda and the acidic ingredients (vinegar and buttermilk) work together in a chemical reaction.

  • Baking Soda: As an alkaline compound, baking soda reacts with the acidic vinegar and buttermilk to produce carbon dioxide. These gas bubbles get trapped in the batter, expanding during baking and causing the muffins to rise.
  • Timing: The reaction between the baking soda and acids begins as soon as they are mixed. That’s why it’s important to bake the muffins immediately after combining the wet and dry ingredients, ensuring maximum rise and a fluffy texture.

Equipment Needed to Make Red Velvet Muffins

To achieve perfect Red Velvet Muffins, having the right equipment is crucial. From essential baking tools to the choice of mixing method, using proper tools ensures consistent results and a smooth baking process.

Essential Baking Tools

  • Measuring Cups and Spoons: Accurate measurement is key to a successful bake. Dry and liquid ingredients should be measured with the appropriate tools to ensure the right balance of flavors and textures.
  • Whisk: A whisk helps combine dry ingredients and break up any lumps in the flour or cocoa powder, ensuring even distribution.
  • Spatula: A rubber or silicone spatula is perfect for folding the ingredients and scraping down the sides of the bowl. It ensures that the batter is mixed evenly without overworking it.
  • Cooling Rack: Once the muffins are baked, transferring them to a cooling rack allows air to circulate, preventing the muffins from getting soggy as they cool.

Non-stick Muffin Tins

A good-quality non-stick muffin tin is essential to ensure that the muffins bake evenly and release easily from the pan. Using non-stick tins reduces the need for excessive greasing, which can affect the texture of the muffins.

  • 12-cup Non-stick Muffin Tin: A standard size that allows for evenly sized muffins, ensuring uniform baking.
  • Paper Liners: These make cleanup easier and help prevent sticking. Plus, they give the muffins a more polished presentation.
  • Baking Spray or Oil: Even with non-stick pans, a light spray or coating of oil helps ensure easy release of the muffins.

Mixing Tools: Electric Mixer vs Hand Mixing

  • Electric Mixer (Stand or Hand Mixer): An electric mixer is great for creaming butter and sugar or mixing cream cheese frosting. It provides consistency and saves time when dealing with thick batters. For making Red Velvet Muffins, especially when combining wet ingredients like butter, sugar, and eggs, an electric mixer ensures a smooth, well-aerated batter.
  • Hand Mixing: While an electric mixer speeds up the process, hand mixing can work just as well for Red Velvet Muffins. A sturdy whisk or spatula can be used to gently combine ingredients without overmixing the batter, which is crucial to avoid tough muffins. Hand mixing also gives you more control over the batter, preventing the gluten from overdeveloping.

Step-by-Step Guide to Baking Red Velvet Muffins

Follow these steps to bake delicious Red Velvet Muffins, ensuring that each part of the process is smooth and results in perfectly moist and fluffy muffins.

1. Prepping the Ingredients

Before you start baking, it’s essential to prepare everything to make the process more efficient.

  • Preheat the oven to 350°F (175°C) and line a 12-cup muffin tin with paper liners or lightly grease the pan.
  • Measure all ingredients accurately. Sift together the dry ingredients (flour, cocoa powder, baking soda, and salt) in one bowl. In another bowl, whisk together the wet ingredients (buttermilk, eggs, vanilla extract, vinegar, and red food coloring).
  • Soften butter if using, or ensure oil is at room temperature to mix smoothly with other ingredients.

2. Mixing the Batter

  • Cream the butter and sugar: If using an electric mixer, beat the softened butter (or oil) with sugar until light and fluffy. This process creates air pockets in the batter, which contribute to a lighter muffin texture.
  • Add the eggs: Beat in the eggs one at a time, ensuring each one is fully incorporated before adding the next.
  • Combine wet and dry ingredients: Alternate adding the dry ingredients and buttermilk mixture to the butter and sugar mixture. Start and end with the dry ingredients, mixing gently with each addition. Be careful not to overmix—stop as soon as the batter comes together.
  • Fold in vinegar: Gently stir in the vinegar at the end to activate the baking soda for an extra lift.

3. Baking and Checking Doneness

  • Fill the muffin tin: Evenly distribute the batter into the prepared muffin tin, filling each cup about two-thirds full to allow room for the muffins to rise.
  • Bake: Place the muffins in the preheated oven and bake for 18–22 minutes. Check for doneness by inserting a toothpick into the center of a muffin—it should come out clean or with just a few moist crumbs.
  • Avoid opening the oven during the first 10–12 minutes of baking, as this could cause the muffins to deflate.

4. Cooling and Storing Muffins

  • Cool the muffins: Once baked, remove the muffins from the oven and let them cool in the pan for 5–10 minutes. Then, transfer them to a wire rack to cool completely.
  • Storing the muffins: Store Red Velvet Muffins in an airtight container at room temperature for up to 3 days. If you have added cream cheese frosting, they should be refrigerated. Muffins can also be frozen for up to 3 months—just thaw them at room temperature when ready to enjoy.

Tips for Baking the Perfect Red Velvet Muffins

To ensure your Red Velvet Muffins turn out perfect every time, follow these tips to avoid common pitfalls and get the best flavor and texture.

1. Avoiding Common Baking Mistakes

  • Don’t Overmix the Batter: Overmixing activates too much gluten, resulting in tough, dense muffins. Mix just until the ingredients are combined. A few small lumps are fine and will smooth out during baking.
  • Use Fresh Leavening Agents: Baking soda and baking powder lose effectiveness over time. Make sure yours are fresh to get a good rise. If you’re unsure, test a small amount of baking soda in vinegar—if it fizzes, it’s still good to use.
  • Measure Ingredients Accurately: Too much flour or not enough liquid can result in dry muffins. Use the spoon-and-level method for flour (spoon flour into the measuring cup, then level it off with a knife) and liquid measuring cups for wet ingredients.

2. Balancing Flavors

  • Don’t Overdo the Cocoa: Red velvet has a subtle chocolate flavor, so use only a small amount of cocoa powder. Too much can overpower the tangy buttermilk and the mild sweetness that makes red velvet unique.
  • Adjust the Sweetness: Taste the batter to ensure the right balance of sweetness and tanginess. If using natural food coloring (like beetroot), you might want to add a little more sugar, as natural colorings can impart a slightly earthy flavor.
  • Add a Pinch of Salt: Salt enhances the flavors of the muffins and balances the sweetness. A small amount goes a long way in creating depth in the taste profile.

3. Timing and Temperature Tips

  • Preheat the Oven Properly: Always preheat your oven before baking. Starting muffins in an oven that hasn’t reached the correct temperature can lead to uneven baking and flat muffins.
  • Bake at the Right Temperature: Red Velvet Muffins should typically bake at 350°F (175°C). Too high a temperature can cause the muffins to rise quickly and then collapse, while too low a temperature can result in undercooked, dense muffins.
  • Don’t Open the Oven Too Early: Opening the oven door too soon can cause a drop in temperature, which may lead to muffins that deflate. Wait until the last 3–5 minutes of baking before checking for doneness.

Red Velvet Muffins Around the World

Red Velvet Muffins have gained global popularity, with each region adding its own unique twist to the classic recipe. As the red velvet flavor crosses borders, cultural influences and local ingredients shape these delicious treats into something distinctive and meaningful in different parts of the world.

1. Global Variations and Local Twists

  • United States: The rich, vibrant red cakes and desserts in the Southern U.S. deeply inspire the origin of red velvet. People often top Red Velvet Muffins with a thick cream cheese frosting and fill them with hints of cocoa and buttermilk. They’re a staple in bakeries and are especially popular during holidays like Valentine’s Day and Christmas.
  • United Kingdom: In the UK, Red Velvet Muffins often come with a British twist, sometimes incorporating fruit or spices like cinnamon to add a unique flavor profile. Muffins might be less sweet, and frosting can be replaced with lighter toppings like whipped cream or a dusting of icing sugar.
  • Japan: Red velvet desserts have become a part of Japan’s love for visually appealing treats. Japanese Red Velvet Muffins are often smaller in size, with a delicate balance of sweetness. Instead of traditional cream cheese frosting, bakers might use light whipped cream or white chocolate ganache to complement the muffin’s texture.
  • Middle East: In the Middle East, you’ll often find Red Velvet Muffins incorporating local flavors such as rosewater or pistachios, blending the rich cocoa flavor with these traditional ingredients. They also may be less sugary and incorporate dates or honey as natural sweeteners.
  • Latin America: People across Latin America celebrate red velvet desserts, often adding more vibrant colors and flavors. Bakers incorporate local ingredients like dulce de leche or guava into the muffin filling, bringing a new dimension to the traditional flavor. Frosting might also feature these regional favorites.
  • India: In India, Red Velvet Muffins are gaining popularity, often spiced up with cardamom or saffron to add aromatic flavors. Local grains like semolina may also replace a portion of the flour, creating a more textured bite. Instead of cream cheese frosting, sometimes a cream-based glaze or even a paneer-based topping is used.

2. The Cultural Influence of Red Velvet in Different Countries

  • United States: Red velvet cake and muffins hold iconic status in American culture, particularly in the Southern states. The striking red color and rich flavor make them a symbol of celebration, often served during holidays, birthdays, and weddings. The vibrant color is also associated with luxury and decadence, making red velvet a top choice for special occasions.
  • South Korea: Red velvet desserts, including muffins, have become popular as part of South Korea’s growing café culture. The visual appeal plays a significant role, with social media influence driving the trend. Red Velvet Muffins are often featured in trendy cafés and bakeries, celebrated for their aesthetic as much as their taste.
  • Australia: In Australia, red velvet desserts have grown in popularity as part of the country’s increasing love for American-style baking. Red Velvet Muffins are a common sight in cafes and bakeries, where they’re enjoyed alongside a cup of coffee. Australian bakers sometimes give them a lighter touch, opting for less dense batters and more airy frostings.
  • France: In France, the influence of red velvet is seen in more delicate patisserie offerings. While muffins are not as common as traditional French pastries, red velvet flavors have inspired macarons, éclairs, and cakes. French bakers focus on subtlety, reducing the sweetness and relying on high-quality ingredients to create balanced and refined versions of red velvet.
  • Africa: In parts of Africa, red velvet desserts are becoming increasingly popular in urban areas, with a focus on vibrant colors and bold flavors. Bakers use local ingredients like coconut, tamarind, or hibiscus to enhance both the flavor and visual appeal of Red Velvet Muffins, fusing traditional African flavors with the Western-inspired treat.

Conclusion

Final Thoughts on Baking Perfect Red Velvet Muffins

Baking the perfect Red Velvet Muffins requires a balance of precision and creativity. From choosing the right ingredients, like buttermilk and cocoa powder, to mastering techniques such as proper mixing and timing, each step plays a crucial role in achieving a moist, fluffy, and flavorful muffin. Paying attention to texture, balancing flavors, and avoiding common mistakes will ensure your muffins turn out beautifully every time.

Encouragement to Experiment with Flavors

While traditional Red Velvet Muffins are beloved for their rich color and tangy cream cheese frosting, don’t hesitate to get creative. Experiment with new ingredients, like adding spices, nuts, or local flavors from your culture, to put your own twist on this classic treat. Baking is as much about having fun as it is about following recipes, so feel free to explore different variations and make Red Velvet Muffins uniquely yours.

For more recipes :

  • Ultimate Guide to Red Velvet Cake: The Ultimate Guide to Red Velvet Cake would be a great reference for more detailed insights into red velvet recipes, allowing readers to dive deeper into the specifics of red velvet as a flavor and baking category.
  • Red Velvet Loaf Cake: Another related recipe for readers who enjoy red velvet desserts could be the Red Velvet Loaf Cake, providing variety in terms of shape and serving style while maintaining the same flavor profile.

Delicious Garlic Chicken Thigh Recipes for Flavorful Meals

Garlic chicken thigh recipes

Chicken thighs are a versatile and flavorful cut of poultry that are perfect for a variety of mouthwatering recipes. When combined with the robust taste of garlic, chicken thighs become an irresistible protein that’s easy to prepare and packed with flavor. This article will explore a range of delicious garlic chicken thigh recipes that are perfect for busy weeknights or weekend gatherings. From easy baked garlic chicken thighs to skillet meals and grilled options, you’ll find plenty of inspiration to elevate your chicken dinner game.

Key Takeaways

  • Chicken thighs are a flavorful and affordable protein option for home cooks.
  • Garlic adds a robust, savory flavor that complements chicken thighs beautifully.
  • Discover a variety of delicious garlic chicken thigh recipes, including baked, skillet, and grilled options.
  • Garlic chicken thighs are versatile and can be served with a variety of side dishes.
  • Meal prepping garlic chicken thighs can save time and make for easy, flavorful weeknight meals.

Introduction to Garlic Chicken Thigh Recipes

Chicken thighs are a popular choice for many home cooks due to their rich, juicy flavor and affordable price point. Compared to chicken breasts, thighs contain more fat and connective tissue, which helps them retain moisture and develop a delicious, tender texture when cooked.

Why Chicken Thighs are a Flavorful Choice

The higher fat content and connective tissue in chicken thighs make them a more flavorful and juicy option compared to chicken breasts. This results in a more succulent and tender final dish, making them a popular choice for a variety of recipes.

The Benefits of Garlic in Cooking

Garlic is a versatile ingredient that adds a robust, savory flavor to a variety of dishes. It’s known for its antioxidant properties and potential health benefits, making it a great addition to chicken recipes. The unique flavor of garlic can enhance the overall taste of chicken thighs, creating a mouthwatering combination.

Easy Garlic Chicken Thigh Bake

One of the simplest and most delicious ways to enjoy easy baked garlic chicken thighs is by baking them in the oven. This garlic chicken thigh bake recipe requires just a few basic ingredients, including chicken thighs, garlic, olive oil, and seasonings. The step-by-step instructions guide you through the process of preparing the how to bake garlic chicken thighs, seasoning it with a flavorful garlic-infused mixture, and baking it until the skin is crispy and the meat is cooked through.

Ingredients for the Bake

  • 8 chicken thighs, skin-on and bone-in
  • 6 cloves of garlic, minced
  • 2 tablespoons of olive oil
  • 1 teaspoon of dried thyme
  • 1 teaspoon of paprika
  • Salt and pepper to taste

Step-by-Step Instructions

  1. Preheat your oven to 400°F (200°C).
  2. Pat the chicken thighs dry with paper towels and place them in a large baking dish.
  3. In a small bowl, combine the minced garlic, olive oil, thyme, paprika, salt, and pepper. Mix well to create a flavorful marinade.
  4. Rub the garlic-herb mixture evenly over the chicken thighs, making sure to coat them thoroughly.
  5. Bake the chicken in the preheated oven for 35-40 minutes, or until the skin is crispy and the internal temperature reaches 165°F (75°C).
  6. Remove the baked garlic chicken thighs from the oven and let them rest for 5 minutes before serving.

Serving Suggestions

Serve the easy baked garlic chicken thighs with your choice of sides, such as roasted vegetables, mashed potatoes, or a fresh salad, for a complete and satisfying meal. The garlic chicken thigh bake recipe is a great option for a weeknight dinner or a weekend gathering, as it’s both delicious and easy to prepare.

Garlic Chicken Thigh Recipes

Elevate your chicken dinner game with a mouthwatering selection of garlic chicken thigh recipes. From classic baked dishes to flavorful skillet meals and grilled options, this section showcases the delightful combination of juicy chicken thighs and the robust taste of garlic.

Explore a diverse range of chicken thigh recipes with garlic that are perfect for busy weeknights or weekend gatherings. Each recipe highlighted in this section provides detailed instructions on ingredients, preparation methods, and serving suggestions, empowering you to create mouthwatering garlic chicken thigh dishes that will impress your family and friends.

Recipe Cooking Method Flavor Profile
Easy Baked Garlic Chicken Thighs Oven-baked Crispy skin, tender and juicy meat with a robust garlic flavor
Creamy Garlic Chicken Thighs Skillet Seared chicken thighs simmered in a creamy garlic sauce
Grilled Marinated Garlic Chicken Thighs Grilled Smoky, charred flavor with a garlicky marinade
Instant Pot Garlic Chicken Thighs Pressure Cooker Tender, juicy chicken thighs infused with garlic in a fraction of the time

Discover the best garlic chicken thigh recipes that will elevate your chicken-based meals to new levels of flavor and satisfaction. Whether you prefer baked, skillet, grilled, or Instant Pot preparations, this section has you covered with a diverse selection of delicious options.

Garlic Herb Roasted Chicken Thighs

Elevate your chicken dinner with this delectable recipe for garlic herb roasted chicken thighs. The key to this dish lies in the flavorful herb butter that’s rubbed under the skin of the chicken, infusing it with a savory-herbal aroma as it roasts to perfection.

Preparing the Herb Butter

To make the herb butter, combine minced garlic, fresh chopped rosemarythyme, and parsley with a touch of softened butter. Mix the ingredients until well-blended, then gently loosen the skin of the chicken thighs and spread the herb butter evenly underneath.

Roasting Instructions

Preheat your oven to 400°F (200°C). Arrange the garlic herb roasted chicken thighs on a baking sheet, making sure the skin side is facing up. Roast the chicken for 35-40 minutes, or until the skin is crispy and the internal temperature reaches 165°F (75°C). Baste the chicken with the pan juices halfway through the cooking time to ensure even browning and moisture.

Serve the herb-infused, juicy chicken thighs alongside your favorite roasted vegetables, mashed potatoes, or a fresh green salad for a complete and satisfying meal. The aromatic garlic and herb flavors will be the star of the show, elevating your dinner to new heights.

Creamy Garlic Chicken Thighs

This creamy garlic chicken thigh recipe is a one-pan wonder that’s perfect for a quick and satisfying weeknight meal. The creamy garlic chicken thighs are seared to achieve a golden-brown crust, then simmered in a rich and flavorful sauce made with garlic, heavy cream, and Parmesan cheese. The resulting dish is incredibly tender, juicy, and bursting with garlic-infused creaminess. Serve the garlic chicken thighs in sauce over a bed of pasta, mashed potatoes, or alongside a fresh salad for a complete and comforting meal.

The skillet garlic chicken thighs come together effortlessly, making this recipe a go-to option for busy weeknights. The combination of seared chicken, creamy sauce, and the aromatic flavor of garlic creates a dish that’s both indulgent and satisfying. Whether you’re looking for a quick and easy dinner or a flavorful meal to impress your guests, this creamy garlic chicken thigh recipe is sure to become a new family favorite.

Garlic Chicken Thigh Skillet Meal

This garlic chicken thigh skillet meal is a versatile and easy-to-prepare option that can be customized with a variety of vegetables. The recipe starts by searing the chicken thighs to develop a flavorful crust, then sautéing them with garlic, onions, and your choice of fresh or frozen vegetables, such as broccoli, bell peppers, or asparagus. The skillet is then finished in the oven, allowing the chicken to cook through and the flavors to meld together. This one-pan dish is a great way to enjoy tender, juicy garlic chicken thighs with a side of nutrient-rich veggies for a complete and satisfying meal.

Veggie Options for the Skillet

The beauty of this garlic chicken thigh skillet is that it can be easily customized to suit your taste preferences and what’s in season. Some delicious vegetable options to consider include:

  • Broccoli florets
  • Bell peppers, sliced
  • Asparagus spears
  • Diced zucchini or yellow squash
  • Cherry tomatoes, halved
  • Spinach or kale, roughly chopped

Cooking Tips

To ensure your one-pan garlic chicken thighs turn out perfectly, here are a few helpful tips:

  1. Sear the chicken thighs in batches to achieve a nice, crispy skin.
  2. Don’t overcrowd the skillet when sautéing the vegetables to allow them to brown properly.
  3. Finish the dish in the oven to ensure the chicken thighs are cooked through and the flavors have time to meld together.
  4. Serve the easy garlic chicken thigh skillet meal immediately for maximum freshness and flavor.

Instant Pot Garlic Chicken Thighs

For those who love the convenience of the Instant Pot, this recipe for instant pot garlic chicken thighs is a must-try. The pressure cooker function of the Instant Pot allows the chicken to cook quickly while retaining its moisture and tenderness. The recipe starts by searing the chicken thighs to develop a flavorful crust, then pressure cooking them with a garlic-infused broth. The result is juicy, tender chicken that’s packed with garlic flavor.

Pressure Cooker Benefits

The Instant Pot’s pressure cooker function offers several benefits when it comes to cooking pressure cooker garlic chicken thighs. The high heat and sealed environment help to lock in the natural juices and flavors of the chicken, resulting in a moist and tender final dish. Additionally, the pressure cooking process significantly reduces the overall cooking time, making this a great option for busy weeknights or when you need a quick and easy easy instant pot garlic chicken meal.

Instant Pot Recipe Steps

To prepare the Instant Pot garlic chicken thighs, start by searing the chicken thighs in the Instant Pot to develop a crispy, golden-brown crust. Then, add a flavorful garlic-infused broth to the pot and set it to pressure cook. Once the cooking time is up, the chicken will be fall-off-the-bone tender, ready to be served with your choice of sides like fluffy rice, mashed potatoes, or a fresh salad for a complete and satisfying meal.

  1. For those who enjoy outdoor cooking, try our mastering camping recipes lunch.

These links will enhance the user experience by providing additional relevant recipes and tips, making your article more valuable and engaging.

Grilled Garlic Chicken Thighs

For those who love the smoky, charred flavor of grilled chicken, this recipe for grilled garlic chicken thighs is a must-try. The key to success is marinating the chicken in a flavorful mixture of garlic, olive oil, and seasonings before grilling. This helps to infuse the meat with the robust taste of garlic and ensures that the chicken stays moist and tender during the grilling process.

Marinating for Flavor

Marinating the grilled garlic chicken thighs is an essential step that enhances the overall flavor and texture of the dish. By allowing the chicken to soak in a marinade made with fresh garlic, olive oil, and a blend of herbs and spices, you can create a deeply flavorful and marinated garlic chicken thigh that will impress your guests.

Grilling Techniques

The grilling techniques outlined in this recipe, including tips on how to achieve a crispy skin and juicy interior, will help you master the art of grilling garlic chicken thighs. From properly preheating the grill to using indirect heat and monitoring the internal temperature, these techniques will ensure that your grilled garlic chicken thighs come out perfectly cooked every time.

Garlic Chicken Thigh Meal Prep Ideas

Garlic chicken thighs are not only delicious, but they also make for great meal prep options. Whether you’re looking to save time during the busy workweek or want to have a flavorful protein on hand for quick and easy meals, incorporating garlic chicken thigh meal prep into your routine can be a game-changer.

Meal Planning Tips

When it comes to how to meal prep garlic chicken thighs, the key is to batch cook the chicken in advance. Start by seasoning a large batch of chicken thighs with your favorite garlic-based marinade or seasoning blend. Bake, grill, or sauté the chicken until it’s cooked through and the skin is crispy. Once cooled, portion the garlic chicken thighs into individual servings or meal-sized containers for easy grab-and-go meals throughout the week.

Storage and Reheating

Proper storage and reheating of your garlic chicken thighs is crucial to ensure the chicken stays flavorful and juicy. Store the cooked chicken in an airtight container in the refrigerator for up to 4 days. When ready to reheat, simply place the chicken in the microwave or oven until it’s heated through. You can also slice or shred the chicken and add it to salads, wraps, or rice bowls for a quick and easy protein-packed meal.

Meal Prep Tip Benefit
Batch cook garlic chicken thighs Saves time during the week
Portion into individual servings Provides easy grab-and-go meals
Store cooked chicken properly Maintains flavor and juiciness
Reheat chicken in the microwave or oven Heats up quickly without drying out

By incorporating garlic chicken thigh meal prep into your routine, you can enjoy the delicious flavors of garlic-infused chicken throughout the week with minimal effort. Whether you’re looking to save time, have a protein-packed option on hand, or simply want to enjoy the incredible taste of garlic chicken thighs, this meal prep strategy is a fantastic solution.

Conclusion

In conclusion, garlic chicken thighs are a versatile and flavorful protein that can be prepared in a variety of delicious ways. From easy baked dishes to skillet meals, grilled options, and Instant Pot recipes, this article has provided a comprehensive guide to creating mouthwatering garlic chicken thigh recipes that are perfect for busy weeknights or weekend gatherings. By leveraging the rich flavor of chicken thighs and the robust taste of garlic, you can elevate your chicken dinner game and impress your family and friends with these flavorful and easy-to-prepare dishes.

Whether you prefer the crispy-skinned, herb-infused baked garlic chicken thighs, the creamy and comforting skillet version, or the smoky, charred grilled option, this article has offered a wide range of garlic chicken thigh recipes to suit your taste preferences and cooking preferences. By incorporating these recipes into your meal planning, you can enjoy the convenience and deliciousness of garlic-infused chicken thighs any night of the week.

In summary, garlic chicken thighs are a fantastic choice for flavorful and satisfying meals. With the guidance provided in this article, you can now confidently explore the world of garlic chicken thigh recipes and elevate your chicken dinner game to new heights. Bon appétit!

FAQ

Why are chicken thighs a flavorful choice?

Chicken thighs are a popular choice for many home cooks due to their rich, juicy flavor and affordable price point. Compared to chicken breasts, thighs contain more fat and connective tissue, which helps them retain moisture and develop a delicious, tender texture when cooked.

What are the benefits of using garlic in cooking?

Garlic is a versatile ingredient that adds a robust, savory flavor to a variety of dishes. It’s known for its antioxidant properties and potential health benefits, making it a great addition to chicken recipes.

What are the key steps for baking garlic chicken thighs?

The step-by-step instructions for baking garlic chicken thighs guide you through the process of preparing the chicken, seasoning it with a flavorful garlic-infused mixture, and baking it until the skin is crispy and the meat is cooked through.

How do you make creamy garlic chicken thighs in a skillet?

This creamy garlic chicken thigh recipe is a one-pan wonder that’s perfect for a quick and satisfying weeknight meal. The chicken thighs are seared to achieve a golden-brown crust, then simmered in a rich and flavorful sauce made with garlic, heavy cream, and Parmesan cheese.

What are the benefits of using an Instant Pot to make garlic chicken thighs?

The pressure cooker function of the Instant Pot allows the chicken to cook quickly while retaining its moisture and tenderness. The recipe starts by searing the chicken thighs to develop a flavorful crust, then pressure cooking them with a garlic-infused broth.

How can you infuse garlic flavor into grilled chicken thighs?

The key to success is marinating the chicken in a flavorful mixture of garlic, olive oil, and seasonings before grilling. This helps to infuse the meat with the robust taste of garlic and ensures that the chicken stays moist and tender during the grilling process.

What are some tips for meal prepping with garlic chicken thighs?

This section will provide tips and ideas on how to incorporate garlic chicken thighs into your meal planning routine, including suggestions on how to batch cook and portion the chicken for easy grab-and-go meals throughout the week, as well as storage and reheating methods to ensure the chicken stays flavorful and juicy.

Is Aldi Lunch Meat Gluten-Free? A Quick Guide

Gluten-free Aldi lunch meats

Aldi is a top spot for those looking for great prices and a lot of different products. But, people who can’t eat gluten may wonder if Aldi’s lunch meats are safe for them. This guide looks into whether Aldi’s lunch meat is gluten-free and how to spot the safe options.

Is Aldi lunch meat gluten-free?

Key Takeaways

  • Aldi offers a variety of gluten-free deli meat options, including popular brands like Olli Salumeria, Applegate Naturals, and Hormel Natural Choice.
  • Aldi’s LiveGFree product line provides a range of certified gluten-free items, including baking mixes, snacks, and frozen meals.
  • Aldi’s gluten-free products are clearly labeled, and the company emphasizes transparency around allergen information.
  • Shoppers can find gluten-free deli meats at Aldi, as well as other retailers like Walmart, Amazon, and Whole Foods.
  • Checking for gluten-free labels and reviewing ingredient lists is essential to identify safe lunch meat options at Aldi.

What is lunch meat?

Lunch meat, or cold cuts, is pre-cooked or cured meat. It’s cut thin and packed for sale. People use it for making sandwiches, snacking, or serving on charcuterie boards. Think of meats like ham, turkey, roast beef, salami, and bologna.

They are easy for quick meals and snacks because they come pre-sliced. Aldi, a well-known grocery store, offers many types, including their own brands.

Lunch Meat Price per Pound
Aldi Black Forest Deli Ham $3.49
Aldi Kirkland Frozen Turkey Breast $3.84 (after factoring in gravy weight)
Homemade Lunch Meat $5.61

Choosing Aldi’s lunch meat can be smart and affordable. But, customers should still look at what’s in it and if it fits their dietary needs. For those who need to avoid gluten, Aldi has products with very little gluten, only 20 ppm.

Shoppers must always read labels when buying lunch meat. This way, they know if it’s gluten-free or if it matches their diet. This helps people choose the right lunch meats for them.

Are Aldi Lunch Meats Gluten-Free?

Most of Aldi’s lunch meat products are gluten-free. This includes cold cuts, which are processed in ways similar to cured meats. These processes usually don’t involve gluten.

But, some of Aldi’s lunch meats might have fillers or additives with gluten. It’s vital to check the labels and ingredients of the meats. Make sure they’re truly gluten-free before buying them.

Identifying Gluten-Free Aldi Lunch Meats

To spot a gluten-free Aldi lunch meat, do the following:

  • Look for a gluten-free label or disclaimer on the package.
  • Check the ingredients list for any gluten from wheat, rye, or barley.
  • If it’s not clear the meat is gluten-free, reach out to Aldi for more info.

This way, you can be sure you’re picking Aldi meats that meet your gluten-free diet.

Aldi doesn’t only offer gluten-free lunch meats. They also have a line called LiveGFree. This line includes baking mixes, snacks, and pasta. It’s all certified gluten-free, providing many options.

“Aldi’s LiveGFree product line is a game-changer for gluten-free consumers, making it easier than ever to find high-quality, certified gluten-free options that fit their lifestyle.”

Look out for the LiveGFree label when you shop at Aldi. Also, watch for any other gluten-free marks on products. They help you find what’s safe for your gluten-free diet at the store. This includes lunch meats.

How to determine if a lunch meat product is gluten-free?

When looking for gluten-free lunch meat at Aldi, start by checking the label. Look for a statement saying it’s gluten-free or certified as such. This is the easiest way to know.

Also, watch for a gluten-free label on the package. These labels are often from groups like GFCO or CSA. They show the product was carefully tested for gluten.

Last, always read the ingredients. Even though most lunch meats are gluten-free, some might not be. Avoid anything with wheat, barley, or rye listed.

By checking the label and ingredients, you can find safe lunch meats at Aldi. Brands like Applegate Farms and Butterball state they are dairy-free too. This is good news for those with several diet limits.

Remember to be a smart label reader at Aldi. With a bit of focus, you can pick out the right products. Aldi’s thorough safety precautions also help you shop with confidence.

“Identifying gluten-free lunch meat options doesn’t have to be a daunting task. By looking for clear labeling and scrutinizing the ingredients, you can easily find Aldi products that meet your dietary needs.”

Tips for identifying a gluten-free lunch meat product:

In Aldi’s deli section, finding gluten-free lunch meat is easy with the right tips. First off, check for a clear gluten-free label or note on the packaging. This tells you the product is safe for gluten-free diets.

Also, always read the ingredients list closely. Avoid meats with wheat, barley, or rye. Even though most lunch meats are gluten-free, some might have fillers made from gluten. This ensures you won’t have a bad reaction.

Don’t forget about third-party certifications. The USDA, not the FDA, oversees meat products, which means allergen labeling might be lacking. A lunch meat might say it’s gluten-free, but it’s better if it’s certified by a trusted source.

Gluten-free lunch meat

Show a close-up of slices of gluten-free lunch meat arranged neatly on a white plate, with droplets of water glistening on the surface. The slices should look fresh and appetizing, with a variety of colors and textures visible. The plate should be placed on a wooden table, with a blurred background of a kitchen or dining area to suggest that the lunch meat is part of a larger meal.


Choosing trusted brands can also help. Look for Boar’s Head, Dietz & Watson, and Jones Dairy Farm. These brands go through careful tests to meet strict gluten-free guidelines. This offers extra assurance for those avoiding gluten.

With these insights, shopping for gluten-free lunch meat at Aldi will be a breeze. You’ll confidently choose options that fit your dietary needs.

What to look for:

When checking out gluten-free lunch meats at Aldi, how it’s packaged matters a lot. Make sure you look for a true gluten-free label. Certifications like GFCO or GFCP show the meat has less than 20 parts per million of gluten.

Next, scan the ingredients to confirm it’s truly gluten-free. Keep an eye out for wheat, barley, and rye. By doing this, you’ll know which Aldi meats fit a gluten-free diet.

The LiveGFree range from Aldi has tasty cold cuts that are gluten-free, like turkey and ham. They are marked gluten-free for easy shopping. Aldi also has other deli meats that are gluten-free, so don’t forget to look carefully.

Looking for the best gluten-free cold cuts at Aldi? Focus on clear gluten-free labels. Make sure to check the packaging well. This way, you can pick out mouth-watering lunch options that match a gluten-free diet.

Aldi’s LiveGFree Gluten-Free Product Line

In 2018, Aldi started their LiveGFree line for those who can’t have gluten. This line has a lot of gluten-free foods like baking mixes, snacks, and pasta. They are all certified gluten-free.

The LiveGFree line is known for being both good-quality and not too expensive. People really like their LiveGFree bread because it tastes good and it’s the same size as regular bread. For a quick start in the morning, their cinnamon-raisin LiveGFree bagels are perfect. The LiveGFree pasta doesn’t turn into mush and people enjoy its texture.

But Aldi’s gluten-free range is not just about bread and pasta. It also includes other foods that meet different dietary needs. For example, the Simply Nature tomato-and-basil pasta sauce doesn’t have sugar added. They also have gluten-free mac-and-cheese, which is a cozy meal option. Their wraps are soft and can be used in many ways, just like regular tortillas.

Aldi doesn’t stop with the LiveGFree line. They also have other gluten-free products for those with dietary restrictions. Some examples include keto-friendly wraps and blue-corn tortilla chips. They also offer crispy-rice cereal without any malt.

Whether you’re looking for snacks, baked goods, or easy meals, Aldi has something for you. Their LiveGFree line supports people who want to eat well but have to avoid gluten. This means you can find tasty and affordable options without sacrificing on quality.

Show a range of Aldi LiveGFree products, including gluten-free lunch meat, arranged neatly on a white background with natural lighting. The focus should be on the packaging and the vibrant colors of the products.


Gluten-Free Labeling and Certifications at Aldi

Aldi works hard to make sure their gluten-free items are safe. This includes the offerings under the LiveGFree name. They use respected third-party checks to confirm the gluten-free status of these products.

Trusted Gluten-Free Certifications

Organizations like the Gluten-Free Certification Organization (GFCO), the Gluten-Free Certification Program (GFCP), and the Celiac Sprue Association (CSA) approve Aldi’s gluten-free goods. They guarantee these items meet strict rules and have less than 20 parts per million of gluten, as the FDA demands.

Gluten-Free Labeling Outside the LiveGFree Line

Even if it’s not from LiveGFree, Aldi’s gluten-free marked goods follow the FDA’s rules. This confirms they have very little gluten, making them a secure pick for shoppers.

Aldi is fully onboard with offering safe food to those avoiding gluten. They make sure their gluten-free items are thoroughly tested and okayed by outside groups. This effort gives customers peace about the food they buy.

Aldi’s Gluten-Free Seasonal and Limited-Time Offerings

Aldi offers many everyday gluten-free items. They also provide unique gluten-free choices as “Aldi Finds.” These are available during Celiac Awareness Month in May. It’s a great chance for those avoiding gluten to try new products.

Among Aldi’s special gluten-free products were a cheesecake sampler for $8.99. They also had frozen meals for $4.99, ravioli for $3.99, and empanadas for $4.99. These items created a lot of excitement in the gluten-free community.

Aldi’s Commitment to Gluten-Free Offerings

Aldi is committed to offering easily accessible and affordable gluten-free choices. Their LiveGFree line started in 2018. It includes various gluten-free items such as baking mixes, snacks, and pasta.

All these LiveGFree products meet strict standards. They have gluten at levels below 10 parts per million. Aldi makes certain that all their gluten-free items follow FDA rules. These must have less than 20 parts per million of gluten.

This approach assures customers that Aldi’s gluten-free options are reliable. Shoppers can feel confident in what they buy, knowing Aldi takes quality seriously.

Aldi shows its care for the gluten-free community in many ways. They work with groups like GFCO and CSA for quality assurance. This makes shopping for gluten-free products at Aldi a trustworthy experience.

With a growing gluten-free product line, Aldi is a go-to for those living without gluten. They offer both staples and special, fleeting treats. Aldi’s gluten-free range pleases and meets the needs of many.

Suggested Internal Links:

  1. Are rice cakes healthy for you? An in-depth analysis
  2. Why can you not microwave rice cakes? An in-depth exploration

Conclusion – Is Aldi Lunch Meat Gluten-Free?

Many of Aldi’s lunch meats are gluten-free. They are usually cured without gluten ingredients. But, it’s crucial that those eating gluten-free carefully check the labels and lists of ingredients. This ensures the Aldi lunch meat they pick out is safe for them. By searching for gluten-free labels and reviewing ingredients, Aldi customers can find safe choices for their diet.

Aldi is working to meet the demand for gluten-free items, selling many through their LiveGFree collection. While most of Aldi’s lunch meats are okay, customers should still check each product’s details. Aldi strives to be clear and make their customers happy, aiding gluten-free shoppers in finding good lunch meat options.

In sum, Aldi is a great place for those looking for affordable, gluten-free lunch meats. But, it’s up to the shoppers to carefully read what’s on the package. By staying sharp and informed, customers at Aldi can get their hands on various lunch meat options suitable for their diet. Aldi’s efforts to expand its gluten-free range show that it will keep getting easier to find these products there.

FAQ

Is Aldi Lunch Meat Gluten-Free?

Most Aldi lunch meats are gluten-free. They’re cured the same as other cured meats, which usually avoid gluten. But, some could have fillers with gluten. Always check the labels and ingredients.

What is Lunch Meat?

Lunch meat is also called cold cuts. It’s pre-cooked or cured meat cut thin and sold in packs. People use them in sandwiches, snacks, or on charcuterie boards. Types include ham, turkey, roast beef, salami, and bologna.

How Can I Determine if an Aldi Lunch Meat Product is Gluten-Free?

To check if Aldi lunch meat is gluten-free, look for clear labels. These might say it’s gluten-free. Also, examine the ingredients to ensure they don’t have gluten.

What Tips Can I Use to Identify Gluten-Free Lunch Meat at Aldi?

When searching for gluten-free lunch meat at Aldi, first look for the label. Then, go through the ingredients list. If it’s gluten-free, the package may say so.

What is Aldi’s LiveGFree Gluten-Free Product Line?

Aldi introduced the LiveGFree line in 2018. It offers different certified gluten-free products. These include baking mixes, snacks, pasta, and more.

How Does Aldi Ensure the Gluten-Free Claims of Their Products?

Aldi confirms its gluten-free claims with third-party certifications. These include the GFCO, GFCP, and CSA. Also, all FDA-regulated gluten-free products at Aldi must have less than 20 parts per million of gluten.

Does Aldi Offer Seasonal or Limited-Time Gluten-Free Products?

Yes, Aldi introduces special gluten-free items through the “Aldi Finds” program. This often happens in May for Celiac Awareness Month. Such products may include a cheesecake sampler, frozen meals, ravioli, and empanadas.