Introduction to BBQ Beef Ribs
What Are BBQ Beef Ribs?
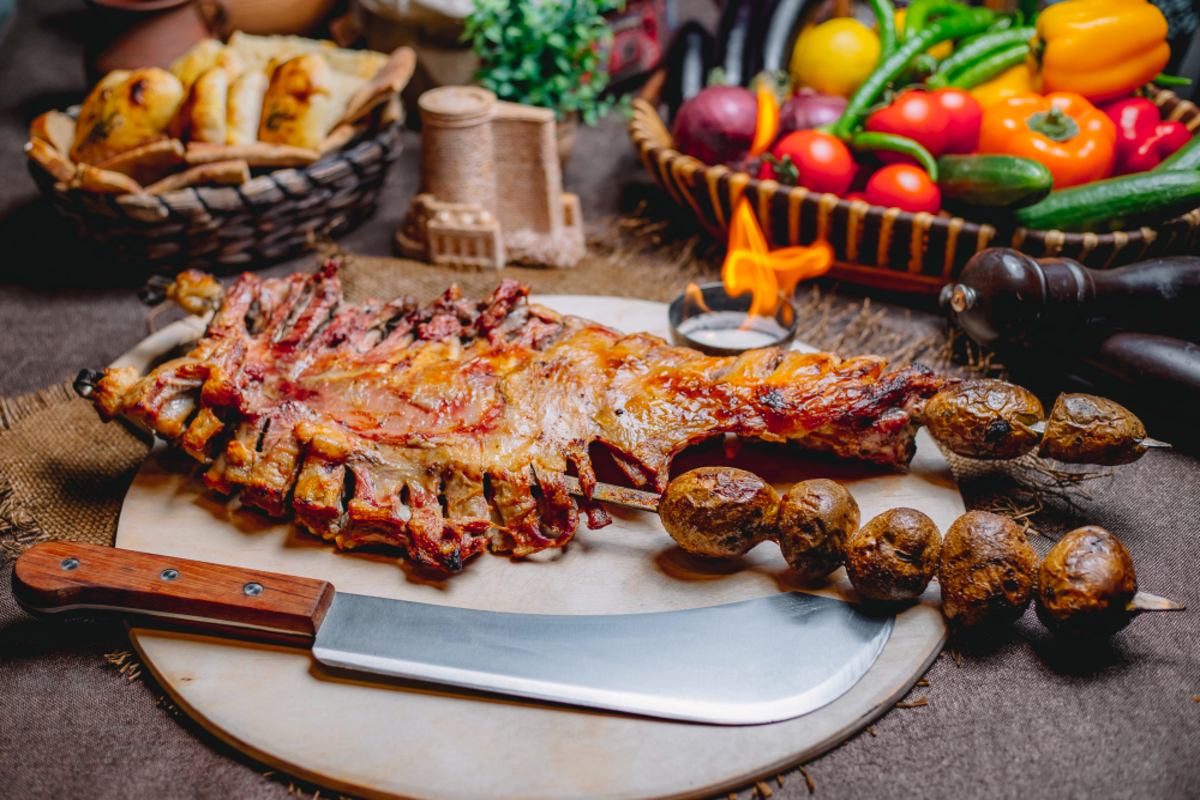
bbq beef ribs recipe oven ribs are a popular and flavorful dish known for their tender meat and rich, smoky flavor. These ribs come from the rib section of the cow, specifically the rib primal cut, which includes both short ribs and back ribs. The meat is marinated or dry-rubbed with a blend of spices, then slow-cooked to perfection, often over a grill or in an oven, until it becomes tender and juicy. BBQ beef ribs are typically basted with a tangy barbecue sauce during cooking, which caramelizes on the meat, creating a delicious, sticky glaze.
History of BBQ Beef Ribs
The history of BBQ beef ribs is deeply rooted in American culinary traditions, particularly in the Southern United States. Barbecuing meat has been a practice for centuries, with indigenous peoples and early settlers using open-fire cooking methods. The tradition of barbecuing ribs specifically gained popularity in the 19th century, especially in regions like Texas and Kansas City, where beef was abundant. Over time, each region developed its unique style of barbecue, incorporating different techniques, spices, and sauces. Texas BBQ, for example, is known for its emphasis on beef and dry rubs, while Kansas City BBQ features a thick, sweet, tomato-based sauce. Today, BBQ beef ribs are enjoyed nationwide and have become a staple at cookouts, family gatherings, and barbecue competitions.
Why Cook Ribs in the Oven?
While grilling is the traditional method for cooking BBQ beef ribs, using an oven offers several advantages:
- Controlled Cooking Environment: The oven provides a consistent and controlled temperature, ensuring that the ribs cook evenly without the risk of flare-ups or hot spots common with grilling.
- Convenience: Cooking ribs in the oven is convenient, especially for those who do not have access to a grill or prefer to cook indoors. It allows for year-round preparation, regardless of weather conditions.
- Tenderness: Slow-cooking ribs in the oven at a low temperature helps break down the collagen in the meat, resulting in incredibly tender and juicy ribs. This method ensures that the meat easily falls off the bone.
- Flavor Development: Baking ribs in the oven allows the flavors of the marinade or dry rub to penetrate deeply into the meat. Additionally, finishing the ribs under the broiler can create a caramelized, crispy exterior similar to grilling.
- Versatility: The oven method allows for a variety of cooking techniques, such as braising or using foil packets, which can infuse the ribs with additional flavors from herbs, spices, and liquids like broth or beer.
Types of Beef Ribs
Short Ribs
Short ribs are a type of beef rib cut from the lower part of the cow’s ribcage, specifically from the plate and brisket sections. They are known for their rich, meaty flavor and substantial marbling, which contributes to their tenderness and juiciness when cooked. Short ribs are typically cut into individual pieces, each containing a section of rib bone and a thick layer of meat. They are often cooked using slow-cooking methods such as braising, smoking, or slow roasting, which helps break down the connective tissue and renders the fat, resulting in succulent, melt-in-your-mouth ribs.
Popular Cooking Methods for Short Ribs:
- Braising: Cooking in a liquid over low heat for an extended period.
- Smoking: Slow-cooking over wood smoke for deep, smoky flavor.
- Slow Roasting: Cooking at a low temperature in the oven.
Back Ribs
Back ribs, also known as beef back ribs or dinosaur ribs, come from the upper part of the cow’s ribcage, near the spine, specifically from the rib primal cut. They are the ribs left after the boneless ribeye or prime rib roast has been removed. Back ribs are characterized by their longer bones and less meat compared to short ribs, but the meat is still tender and flavorful. They are often grilled or smoked, making them a popular choice for barbecue enthusiasts.
Popular Cooking Methods for Back Ribs:
- Grilling: Cooking over direct heat for a charred, smoky flavor.
- Smoking: Slow-cooking over wood smoke to enhance flavor.
- Oven Roasting: Cooking at a higher temperature for a crispy exterior.
Differences Between Short Ribs and Back Ribs
While both short ribs and back ribs come from the cow’s ribcage, they differ significantly in terms of cut, meat content, and cooking methods.
- Cut Location:
- Short Ribs: Cut from the lower part of the ribcage (plate and brisket sections).
- Back Ribs: Cut from the upper part of the ribcage (rib primal, near the spine).
- Meat Content:
- Short Ribs: Have a thick layer of meat on top of the bones, with substantial marbling that makes them rich and juicy.
- Back Ribs: Have less meat between the bones and more on top, with longer bones and leaner meat.
- Texture and Flavor:
- Short Ribs: Known for their rich, beefy flavor and tender, melt-in-your-mouth texture when cooked slowly.
- Back Ribs: Have a slightly lighter, yet still flavorful taste, with a tender texture that benefits from grilling or smoking.
- Cooking Methods:
- Short Ribs: Best suited for slow-cooking methods such as braising, smoking, or slow roasting to achieve maximum tenderness.
- Back Ribs: Often grilled or smoked to enhance their natural beefy flavor and achieve a crispy exterior.
Preparing Your Ribs
Trimming Excess Fat
Trimming excess fat from your ribs is an essential step in the preparation process to ensure the final dish is flavorful without being overly greasy. Here’s how to do it:
- Identify the Fat: Place the ribs on a clean cutting board. Look for thick layers of fat on the surface of the meat.
- Use a Sharp Knife: Use a sharp knife to carefully trim away the thick layers of fat. Be sure to leave some fat on the meat, as it helps keep the ribs moist and adds flavor during cooking.
- Trim Evenly: Aim for an even trim to ensure uniform cooking. Avoid cutting too deeply into the meat.
Removing the Membrane
The membrane, also known as the silver skin, is a tough layer on the underside of the ribs. Removing it helps the seasoning penetrate better and makes the ribs more tender. Follow these steps:
- Locate the Membrane: Turn the ribs so the bone side is facing up. You will see a thin, silver skin covering the ribs.
- Loosen the Membrane: Use a knife to gently slide under the membrane at one end of the rack. Once you have a section lifted, you can use your fingers to pull it up.
- Remove the Membrane: Grip the loosened membrane with a paper towel (for better grip) and pull it off in one piece. It may take a few tries to get it all, but removing as much as possible will improve the texture of your ribs.
Seasoning Your Ribs
Seasoning is crucial for infusing your ribs with flavor before cooking. Here’s a basic guide to seasoning your ribs:
- Choose Your Seasoning: You can use a dry rub, a marinade, or a combination of both. Dry rubs are a mixture of spices and herbs, while marinades often include liquids like vinegar, oil, or soy sauce.
- Dry Rub:
- Ingredients: Common ingredients include salt, pepper, paprika, garlic powder, onion powder, brown sugar, and cayenne pepper.
- Application: Generously sprinkle the dry rub over both sides of the ribs. Use your hands to press the rub into the meat to ensure it sticks.
- Marinade:
- Ingredients: Marinades might include ingredients like soy sauce, Worcestershire sauce, apple cider vinegar, olive oil, garlic, and honey.
- Application: Place the ribs in a large resealable bag or a shallow dish. Pour the marinade over the ribs, ensuring they are well-coated. Seal the bag or cover the dish and refrigerate for at least 2 hours, or overnight for best results.
- Combination:
- Some chefs prefer to marinate their ribs first, then apply a dry rub before cooking. This method provides layers of flavor and ensures a well-seasoned meat.
- Resting: After seasoning, let the ribs rest for a while to allow the flavors to penetrate the meat. If using a dry rub, let the ribs sit for at least 30 minutes. If using a marinade, ensure they marinate for the appropriate time mentioned above.
Making a Homemade BBQ Rub
Ingredients for BBQ Rub
Creating your own BBQ rub allows you to customize the flavor profile to your liking. Here’s a basic recipe for a versatile and delicious BBQ rub:
- Brown Sugar (1/4 cup): Adds sweetness and helps create a caramelized crust.
- Paprika (1/4 cup): Provides a mild, smoky flavor. You can use smoked paprika for an extra smoky taste.
- Black Pepper (1 tablespoon): Adds a bit of heat and sharpness.
- Salt (1 tablespoon): Enhances all the flavors in the rub.
- Chili Powder (1 tablespoon): Adds a mild heat and depth of flavor.
- Garlic Powder (1 tablespoon): Provides a savory, aromatic quality.
- Onion Powder (1 tablespoon): Adds sweetness and complexity.
- Cayenne Pepper (1 teaspoon): Adds a bit of heat. Adjust according to your spice preference.
- Ground Mustard (1 teaspoon): Adds a tangy, slightly pungent flavor.
- Ground Cumin (1 teaspoon): Adds a warm, earthy flavor.
How to Apply the Rub
- Prepare the Ribs: Ensure your ribs are properly trimmed of excess fat and the membrane is removed from the underside of the ribs.
- Mix the Rub: In a bowl, combine all the ingredients for the BBQ rub. Mix thoroughly to ensure an even distribution of all the spices.
- Pat Dry: Pat the ribs dry with paper towels. This helps the rub adhere better to the meat.
- Apply the Rub Generously:
- Coating: Sprinkle the rub generously over both sides of the ribs. Use your hands to press the rub into the meat, ensuring it adheres well and covers all surfaces.
- Massage: Gently massage the rub into the meat, making sure to get into all the nooks and crannies. This helps to maximize the flavor.
- Let It Sit: For best results, let the seasoned ribs sit at room temperature for about 30 minutes before cooking. This allows the flavors to penetrate the meat. Alternatively, you can wrap the ribs in plastic wrap and refrigerate them for a few hours or overnight for even more intense flavor.
- Cooking: Once the ribs are seasoned and rested, they are ready to be cooked. You can grill, smoke, or bake the ribs according to your preferred method. During cooking, the rub will form a flavorful crust on the outside of the meat.
Marinating Your Ribs
Why Marinate?
Marinating is a crucial step in preparing beef ribs for several reasons:
- Flavor Enhancement: Marinades infuse the meat with a variety of flavors, creating a more complex and enjoyable taste. Ingredients like herbs, spices, and acidic components penetrate the meat, making each bite flavorful.
- Tenderization: Acidic components in marinades, such as vinegar, citrus juice, or wine, help break down the tough muscle fibers in the meat. This process results in a more tender texture, making the ribs easier to chew and enjoy.
- Moisture Retention: Marinades help retain moisture in the meat during the cooking process. This prevents the ribs from drying out and ensures they remain juicy and succulent.
- Improved Browning: Ingredients like sugar and honey in marinades contribute to caramelization during cooking, resulting in a rich, brown crust that enhances both flavor and appearance.
Best Marinades for Beef Ribs
Here are some popular marinade recipes that work exceptionally well with beef ribs:
- Classic BBQ Marinade:
- Ingredients: 1/2 cup soy sauce, 1/2 cup Worcestershire sauce, 1/4 cup apple cider vinegar, 1/4 cup brown sugar, 2 tablespoons olive oil, 4 cloves garlic (minced), 1 tablespoon smoked paprika, 1 teaspoon black pepper.
- Flavor Profile: Sweet, smoky, and savory.
- Asian-Inspired Marinade:
- Ingredients: 1/2 cup soy sauce, 1/4 cup hoisin sauce, 1/4 cup rice vinegar, 2 tablespoons honey, 2 tablespoons sesame oil, 4 cloves garlic (minced), 1 tablespoon grated ginger, 1 teaspoon chili flakes.
- Flavor Profile: Sweet, savory, and slightly spicy with umami notes.
- Herb and Garlic Marinade:
- Ingredients: 1/2 cup olive oil, 1/4 cup red wine vinegar, 2 tablespoons lemon juice, 4 cloves garlic (minced), 2 tablespoons fresh rosemary (chopped), 2 tablespoons fresh thyme (chopped), 1 tablespoon Dijon mustard, 1 teaspoon black pepper.
- Flavor Profile: Fresh, aromatic, and slightly tangy.
Marinating Techniques
- Preparation:
- Trim and Clean: Ensure the ribs are properly trimmed of excess fat and the membrane is removed.
- Pat Dry: Pat the ribs dry with paper towels to allow the marinade to adhere better.
- Marinating Process:
- Mix Marinade: In a large bowl or resealable plastic bag, combine all the marinade ingredients and mix well.
- Submerge Ribs: Place the ribs in the bowl or bag, ensuring they are fully submerged in the marinade. Massage the marinade into the meat for even coverage.
- Marinating Time:
- Short Marination: For a quick marinade, let the ribs sit for at least 2 hours in the refrigerator.
- Long Marination: For more intense flavor, marinate the ribs overnight or up to 24 hours in the refrigerator.
- Storage:
- Refrigeration: Always marinate the ribs in the refrigerator to prevent bacterial growth.
- Container: Use a non-reactive container (glass, stainless steel, or food-safe plastic) to avoid any reaction with the acidic components of the marinade.
- Pre-Cooking:
- Remove Excess Marinade: Before cooking, remove the ribs from the marinade and let any excess drip off. Pat the ribs dry with paper towels to ensure a good sear.
- Discard Used Marinade: For safety reasons, discard any used marinade that has come into contact with raw meat.
By understanding the importance of marinating, choosing the right marinade, and following proper marinating techniques, you’ll enhance the flavor and tenderness of your beef ribs, resulting in a delicious and satisfying dish.
Cooking Methods for Oven-Baked Ribs
Slow Cooking vs. High Heat
When baking ribs in the oven, you can choose between slow cooking and high heat, each offering distinct advantages.
- Slow Cooking:
- Temperature: Cook at a low temperature, typically around 250°F (120°C) to 300°F (150°C).
- Duration: Bake for 2.5 to 3.5 hours, depending on the size and type of ribs.
- Advantages:
- Tenderness: Slow cooking allows the collagen in the ribs to break down gradually, resulting in incredibly tender, fall-off-the-bone meat.
- Flavor Development: The longer cooking time allows the flavors to meld and penetrate deeply into the meat.
- Ideal For: Short ribs or other cuts with higher fat content that benefit from extended cooking times to achieve optimal tenderness.
- High Heat:
- Temperature: Cook at a higher temperature, around 400°F (200°C) to 450°F (230°C).
- Duration: Bake for 45 minutes to 1.5 hours, depending on the size and type of ribs.
- Advantages:
- Crispy Exterior: The higher heat helps create a caramelized, crispy exterior.
- Quick Cooking: Reduces overall cooking time, making it a convenient option for quicker meals.
- Ideal For: Back ribs or other leaner cuts that cook faster and can benefit from a shorter cooking time.
Using a Foil Pack
Cooking ribs in a foil pack is a popular method for oven-baking, as it helps retain moisture and flavor.
- Preparation:
- Season Ribs: Apply your chosen dry rub or marinade to the ribs.
- Preheat Oven: Preheat your oven to the desired temperature (usually around 300°F for slow cooking or 400°F for high heat).
- Wrapping:
- Foil Sheets: Place a large sheet of aluminum foil on a baking sheet. Lay the ribs on the foil, bone side down.
- Seal: Fold the edges of the foil over the ribs to create a sealed packet. Ensure the packet is tightly sealed to trap steam and juices.
- Cooking:
- Bake: Place the foil-wrapped ribs in the oven. Bake according to the temperature and duration suitable for your chosen cooking method.
- Finish: For a crispy exterior, open the foil pack during the last 15-20 minutes of cooking and brush the ribs with your favorite BBQ sauce. Increase the oven temperature or use the broiler to caramelize the sauce.
Using a Roasting Pan
Using a roasting pan is another effective method for oven-baking ribs, providing even heat distribution and easy handling.
- Preparation:
- Season Ribs: Apply your chosen dry rub or marinade to the ribs.
- Preheat Oven: Preheat your oven to the desired temperature.
- Roasting Pan Setup:
- Rack: Place a roasting rack inside the pan. If you don’t have a roasting rack, you can use a layer of sliced onions or vegetables to elevate the ribs.
- Liquid: Add a small amount of liquid (water, broth, or apple juice) to the bottom of the roasting pan. This creates steam, keeping the ribs moist during cooking.
- Cooking:
- Cover: Cover the roasting pan with aluminum foil to trap steam and retain moisture.
- Bake: Place the pan in the oven and bake according to your chosen method.
- Finish: Remove the foil during the last 15-20 minutes of cooking, brush with BBQ sauce, and increase the oven temperature or use the broiler to achieve a caramelized finish.
Making a Homemade BBQ Sauce
Ingredients for BBQ Sauce
Creating a homemade BBQ sauce allows you to customize the flavor to your liking. Here’s a basic recipe for a tangy, sweet, and slightly spicy BBQ sauce:
- Ketchup (2 cups): Provides a tomato base and natural sweetness.
- Brown Sugar (1/2 cup): Adds sweetness and helps thicken the sauce.
- Apple Cider Vinegar (1/2 cup): Adds tanginess and balances the sweetness.
- Worcestershire Sauce (1/4 cup): Adds a savory, umami depth.
- Honey (1/4 cup): Enhances sweetness and helps with caramelization.
- Smoked Paprika (2 tablespoons): Adds a smoky flavor.
- Garlic Powder (1 tablespoon): Adds a savory, aromatic quality.
- Onion Powder (1 tablespoon): Adds sweetness and complexity.
- Ground Mustard (1 tablespoon): Adds a tangy, slightly pungent flavor.
- Black Pepper (1 teaspoon): Adds a bit of heat and sharpness.
- Cayenne Pepper (1/2 teaspoon): Adds a bit of heat (optional, adjust to taste).
- Salt (1 teaspoon): Enhances all the flavors in the sauce.
Cooking the Sauce
- Combine Ingredients: In a medium saucepan, combine all the ingredients.
- Heat the Sauce: Place the saucepan over medium heat and stir the mixture to combine.
- Bring to a Simmer: Once the mixture starts to bubble, reduce the heat to low and let it simmer. Stir occasionally to prevent sticking and burning.
- Simmer: Allow the sauce to simmer for 20-30 minutes, or until it thickens to your desired consistency. The longer it simmers, the more the flavors will meld and develop.
- Adjust Seasoning: Taste the sauce and adjust the seasoning if needed, adding more salt, sugar, or spices according to your preference.
- Cool: Once the sauce has thickened and the flavors have developed, remove it from the heat and let it cool slightly before using.
How to Apply Sauce to Ribs
- Pre-Cook the Ribs: Cook the ribs using your preferred method (slow cooking, high heat, foil pack, or roasting pan) until they are nearly done.
- First Coating:
- Brush: During the last 15-20 minutes of cooking, brush a generous layer of BBQ sauce on the ribs using a basting brush.
- Flip and Coat: If using a grill or roasting pan, flip the ribs and brush the other side with sauce as well.
- Caramelize the Sauce:
- Grill: If grilling, continue to cook the ribs over direct heat for a few minutes on each side, allowing the sauce to caramelize and create a sticky glaze.
- Oven: If baking, increase the oven temperature to 400°F (200°C) or use the broiler. Place the ribs under the broiler for a few minutes, watching carefully to prevent burning. This will help the sauce caramelize and develop a rich, flavorful crust.
- Final Coating:
- Rest and Brush: Once the ribs are cooked and caramelized, remove them from the heat. Let them rest for a few minutes, then brush on an additional layer of BBQ sauce for extra flavor and shine.
- Serve: Slice the ribs into individual portions and serve with extra BBQ sauce on the side for dipping.
By following these steps, you’ll create a delicious homemade BBQ sauce that perfectly complements your ribs, adding a burst of flavor and a beautiful caramelized finish.
Step-by-Step Cooking Instructions
Preheating the Oven
- Set the Temperature:
- For slow-cooking: Preheat your oven to 300°F (150°C). This low temperature allows the ribs to cook slowly and become tender.
- For high-heat cooking: Preheat your oven to 400°F (200°C). This higher temperature cooks the ribs more quickly and can create a caramelized exterior.
Preparing the Baking Tray
- Choose the Right Tray:
- Use a baking tray or roasting pan large enough to fit the ribs without overcrowding them. A roasting pan with a rack is ideal, but a regular baking sheet will also work.
- Foil Lining:
- Line the baking tray with aluminum foil. This makes cleanup easier and helps reflect heat evenly around the ribs.
- If using a roasting pan, you can line the bottom of the pan with foil and place a rack on top to elevate the ribs.
- Add a Layer of Liquid (Optional):
- For additional moisture, pour a small amount of liquid (such as water, broth, or apple juice) into the bottom of the tray or pan. This helps create steam, keeping the ribs moist during cooking.
- Arrange the Ribs:
- Place the prepared ribs on the tray or rack, bone side down. Ensure they are evenly spaced for uniform cooking.
Cooking Time and Temperature
- Slow-Cooking Method:
- Temperature: 300°F (150°C)
- Cooking Time: Bake the ribs for 2.5 to 3.5 hours, depending on the size and type of ribs. Check for tenderness by inserting a fork or knife; the meat should be tender and pull away from the bone easily.
- Final Steps: During the last 15-20 minutes, brush the ribs with BBQ sauce and increase the oven temperature to 400°F (200°C) or use the broiler to caramelize the sauce.
- High-Heat Method:
- Temperature: 400°F (200°C)
- Cooking Time: Bake the ribs for 45 minutes to 1.5 hours, depending on the size and type of ribs. Check for doneness by inserting a fork or knife; the meat should be cooked through and starting to pull away from the bone.
- Final Steps: During the last 10-15 minutes, brush the ribs with BBQ sauce and continue baking until the sauce is caramelized and the ribs are crispy on the outside.
- Using a Foil Pack (Optional):
- Temperature: 300°F (150°C) for slow-cooking or 400°F (200°C) for high-heat cooking.
- Preparation: Place the seasoned ribs on a large sheet of aluminum foil. Wrap tightly to create a sealed packet.
- Cooking Time: Follow the same cooking times as above. For the last 15-20 minutes, open the foil pack and brush the ribs with BBQ sauce. Increase the oven temperature or use the broiler to caramelize the sauce.
- Using a Roasting Pan:
- Temperature: 300°F (150°C) for slow-cooking or 400°F (200°C) for high-heat cooking.
- Preparation: Place the ribs on a rack in the roasting pan. Add a small amount of liquid to the bottom of the pan if desired.
- Cooking Time: Follow the same cooking times as above. For the last 15-20 minutes, brush the ribs with BBQ sauce and increase the oven temperature or use the broiler to caramelize the sauce.
Checking for Doneness
Visual Signs
- Meat Pulls Away from the Bone:
- The ribs are done when the meat has pulled back from the ends of the bones by about 1/4 to 1/2 inch. This is a good indication that the collagen and fat have broken down, making the meat tender.
- Tenderness:
- Insert a fork or knife into the meat. If it slides in easily and the meat feels tender and almost falls off the bone, the ribs are done.
- Color:
- The ribs should have a nice, rich brown color. If you’ve used a BBQ sauce, it should be caramelized and sticky.
- Crust:
- Look for a slightly crispy exterior. If you’ve used a high-heat method or finished under the broiler, the sauce should have formed a nice glaze.
Using a Meat Thermometer
Using a meat thermometer is the most accurate way to check for doneness.
- Internal Temperature:
- Insert the thermometer into the thickest part of the meat, avoiding the bone. For ribs, the internal temperature should reach about 190°F to 203°F (88°C to 95°C). This range ensures that the collagen has melted, and the meat is tender.
- Checking Multiple Spots:
- Check the temperature in a few different spots to ensure even cooking. Avoid touching the bone with the thermometer, as this can give an inaccurate reading.
- Resting the Ribs:
- After removing the ribs from the oven, let them rest for about 10 minutes. This allows the juices to redistribute throughout the meat, making them even more tender and flavorful.
Resting Your Ribs
Why Resting is Important
Resting your ribs after cooking is a crucial step for several reasons:
- Juice Redistribution:
- During cooking, the juices in the meat move towards the surface due to the heat. Resting allows these juices to redistribute throughout the meat, ensuring that every bite is moist and flavorful.
- Improved Tenderness:
- Resting helps the meat fibers relax, which makes the ribs more tender. Cutting into the ribs immediately after cooking can cause the juices to escape, resulting in drier meat.
- Enhanced Flavor:
- Allowing the ribs to rest helps the flavors meld and develop further. The meat continues to cook slightly from residual heat, improving the overall taste and texture.
How Long to Rest Your Ribs
- Resting Time:
- Let the ribs rest for about 10 to 15 minutes after removing them from the oven or grill. This period is sufficient for the juices to redistribute and for the meat to reach its optimal tenderness.
- Covering the Ribs:
- Loosely cover the ribs with aluminum foil during the resting period. This helps retain heat without trapping too much steam, which can make the exterior soggy.
By understanding the importance of resting and allowing your ribs to rest for the appropriate amount of time, you’ll ensure that your ribs are juicy, tender, and packed with flavor when you serve them.
One of the keys to a successful lunch is variety and balance. Consider incorporating some of the ideas from the ultimate guide to crafting the perfect pepper lunch recipe for a flavorful and satisfying meal. Additionally, mastering camping recipes for lunch can be a fun way to enjoy your midday meal outdoors.
Serving Suggestions
Best Side Dishes for BBQ Beef Ribs
- Coleslaw:
- A classic side dish, coleslaw adds a refreshing crunch and tangy flavor that complements the rich, smoky taste of BBQ beef ribs. Use a vinegar-based or creamy dressing based on your preference.
- Baked Beans:
- Sweet and savory baked beans are a perfect match for BBQ beef ribs. They add a hearty, comforting element to the meal.
- Cornbread:
- Soft, buttery cornbread pairs wonderfully with the smoky flavor of the ribs. Serve it warm with a drizzle of honey or a pat of butter.
- Potato Salad:
- Creamy potato salad provides a cool contrast to the hot, smoky ribs. Add ingredients like hard-boiled eggs, pickles, and mustard for extra flavor.
- Grilled Vegetables:
- Grilled vegetables such as corn on the cob, zucchini, and bell peppers add a healthy and colorful touch to your BBQ spread. The charred flavors complement the ribs nicely.
- Macaroni and Cheese:
- Rich and creamy macaroni and cheese is a comfort food favorite that pairs well with BBQ beef ribs. The cheesy sauce balances the smoky meat.
- Green Salad:
- A light, crisp green salad with a tangy vinaigrette can balance the richness of the ribs. Add ingredients like tomatoes, cucumbers, and avocado for extra flavor.
- Roasted Potatoes:
- Crispy roasted potatoes with herbs and garlic provide a satisfying, savory side dish that complements the tenderness of the ribs.
Garnishing Ideas
- Fresh Herbs:
- Sprinkle chopped fresh herbs such as parsley, cilantro, or chives over the ribs for a burst of color and fresh flavor.
- Sliced Green Onions:
- Add thinly sliced green onions for a subtle onion flavor and a pop of color.
- Lemon or Lime Wedges:
- Serve with lemon or lime wedges for a zesty finish. A squeeze of citrus can brighten the flavors of the ribs.
- Pickled Vegetables:
- Garnish with pickled vegetables like jalapeños, red onions, or pickles. The tanginess cuts through the richness of the meat.
- Extra BBQ Sauce:
- Serve a side of extra BBQ sauce for dipping. Drizzle some over the ribs before serving for a glossy, saucy finish.
- Crumbled Cheese:
- Add a sprinkle of crumbled cheese like blue cheese or feta for a rich, savory touch.
Storing Leftover Ribs
How to Properly Store Leftovers
- Cool the Ribs:
- Allow the ribs to cool to room temperature before storing. This helps prevent condensation, which can lead to sogginess and spoilage.
- Portioning:
- Cut the ribs into individual portions. This makes it easier to store and reheat only the amount you need.
- Packaging:
- Use airtight containers or heavy-duty aluminum foil to wrap the ribs tightly. If using containers, ensure they are sealed properly to prevent air from getting in.
- Refrigeration:
- Store the ribs in the refrigerator if you plan to eat them within 3-4 days. Label the containers with the date to keep track of their freshness.
- Freezing:
- For longer storage, place the ribs in freezer-safe bags or containers. Remove as much air as possible before sealing. Frozen ribs can be stored for up to 2-3 months.
- Label the packages with the date and contents for easy identification.
Reheating Tips
- Thawing (if frozen):
- Thaw the ribs in the refrigerator overnight. This ensures they reheat evenly and safely.
- Oven Method:
- Preheat Oven: Preheat your oven to 250°F (120°C).
- Wrap Ribs: Place the ribs on a baking sheet and cover them with aluminum foil to retain moisture.
- Heat: Reheat the ribs in the oven for 20-30 minutes, or until they reach an internal temperature of 165°F (74°C). You can brush them with additional BBQ sauce before reheating to enhance flavor.
- Crisping: If you prefer a crispy exterior, uncover the ribs for the last 5-10 minutes of heating.
- Microwave Method:
- Arrange Ribs: Place the ribs in a microwave-safe dish and cover with a microwave-safe lid or wrap.
- Moisture: Add a small amount of water or broth to the dish to keep the ribs moist.
- Heat: Microwave on medium power for 2-3 minutes, then check the temperature. Continue to microwave in 1-minute intervals until the ribs are heated through.
- Note: Be careful not to overheat, as microwaving can dry out the ribs.
- Grill Method:
- Preheat Grill: Preheat your grill to medium heat.
- Wrap Ribs: Wrap the ribs in aluminum foil to retain moisture.
- Heat: Place the wrapped ribs on the grill and heat for about 10-15 minutes, turning occasionally.
- Crisping: For a grilled finish, unwrap the ribs and place them directly on the grill for the last few minutes, brushing with BBQ sauce if desired.
- Skillet Method:
- Preheat Skillet: Heat a skillet over medium heat and add a small amount of oil or butter.
- Reheat Ribs: Place the ribs in the skillet and cover with a lid. Heat for 5-7 minutes, turning occasionally, until they are heated through.
- Finish: You can brush the ribs with BBQ sauce and cook for an additional 1-2 minutes to caramelize the sauce.
Health Benefits of Beef Ribs
Nutritional Value
Beef ribs offer a variety of essential nutrients that contribute to a balanced diet. Here’s a look at the nutritional value of beef ribs:
- Calories:
- Beef ribs are calorie-dense, providing a substantial amount of energy. The exact calorie count can vary depending on the cut and preparation method.
- Proteins:
- A significant portion of beef ribs is composed of high-quality protein, which is essential for muscle growth, repair, and overall body function.
- Fats:
- Beef ribs contain a mix of saturated and unsaturated fats. While saturated fat should be consumed in moderation, the unsaturated fats in beef can be beneficial for heart health.
- Vitamins:
- Minerals:
- They provide important minerals like zinc, phosphorus, and selenium, which play vital roles in immune function, bone health, and antioxidant activity.
Protein and Iron Content
- Protein:
- Muscle Development and Repair: Protein is essential for building and repairing muscle tissues. Beef ribs, being rich in protein, can be particularly beneficial for athletes and individuals engaged in regular physical activity.
- Enzyme and Hormone Production: Proteins are the building blocks of enzymes and hormones, which regulate various bodily functions.
- Satiety: High-protein foods like beef ribs can help increase feelings of fullness and reduce overall calorie intake, which can be helpful for weight management.
- Iron:
- Hemoglobin Formation: Iron is a critical component of hemoglobin, the protein in red blood cells that transports oxygen throughout the body. Adequate iron intake helps prevent anemia and maintains energy levels.
- Immune Function: Iron supports the immune system by promoting the growth and differentiation of immune cells.
- Cognitive Function: Sufficient iron levels are important for cognitive development and function, as iron helps deliver oxygen to the brain.
Additional Nutrients:
- Zinc: Essential for immune health, wound healing, and DNA synthesis.
- Phosphorus: Important for the formation of bones and teeth, and involved in energy metabolism.
- Selenium: Acts as an antioxidant, protecting cells from damage.
FAQs
How long to cook beef ribs at 350 degrees?
Cooking beef ribs at 350 degrees Fahrenheit typically takes about 2 to 2.5 hours. Here’s a basic guideline:
- Preparation: Preheat your oven to 350°F (175°C). Season the ribs with your favorite rub or marinade.
- Cooking: Place the ribs on a baking sheet or in a roasting pan. Cover the pan with aluminum foil to retain moisture.
- Baking: Bake in the preheated oven for about 2 to 2.5 hours. Check for doneness by ensuring the meat is tender and pulls away easily from the bones.
- Finishing: For the last 15-20 minutes, you can remove the foil, brush the ribs with BBQ sauce, and continue baking until the sauce is caramelized.
How do you keep beef ribs moist in the oven?
To keep beef ribs moist in the oven, follow these tips:
- Cover with Foil: Covering the ribs with aluminum foil traps steam and moisture, preventing the meat from drying out.
- Add Liquid: Add a small amount of liquid (such as water, broth, or apple juice) to the bottom of the baking tray or roasting pan. This creates steam during cooking, helping to keep the ribs moist.
- Slow Cook: Cooking the ribs at a lower temperature for a longer period (e.g., 300°F for 3-3.5 hours) helps maintain moisture.
- Resting: Allow the ribs to rest after cooking. This lets the juices redistribute throughout the meat, ensuring they stay moist and tender.
Do you put BBQ sauce on ribs before baking?
It’s best to apply BBQ sauce to the ribs during the last 15-20 minutes of baking, not before. Here’s why:
- Caramelization: Applying BBQ sauce towards the end allows it to caramelize without burning. The sugars in the sauce can burn if cooked for too long at high temperatures.
- Flavor Enhancement: Brushing the sauce on at the end gives the ribs a glossy finish and concentrated flavor.
- Moisture Retention: Adding sauce too early can prevent the ribs from forming a nice crust, which helps lock in moisture.
How are beef ribs supposed to be cooked?
Beef ribs can be cooked using various methods, each offering unique flavors and textures. Here are the main methods:
- Oven-Baking:
- Slow Cooking: Bake at 300°F (150°C) for 2.5 to 3.5 hours. This method ensures tender, fall-off-the-bone meat.
- High Heat: Bake at 400°F (200°C) for 45 minutes to 1.5 hours. This method creates a crispy exterior while cooking the meat through.
- Grilling:
- Indirect Heat: Cook the ribs over indirect heat on a grill at medium-low temperature for 2-3 hours. Finish with direct heat for a few minutes to caramelize the sauce.
- Smoking: Smoke the ribs at 225°F (107°C) for 5-6 hours using wood chips for added flavor. This method infuses a deep smoky flavor and tender texture.
- Slow Cooker:
- Low and Slow: Place seasoned ribs in a slow cooker with a small amount of liquid. Cook on low for 6-8 hours or on high for 4-5 hours until tender.
- Instant Pot:
- Pressure Cooking: Cook the ribs in an Instant Pot with a cup of liquid for about 25-30 minutes on high pressure. Finish under the broiler or on the grill with BBQ sauce for a crispy exterior.