
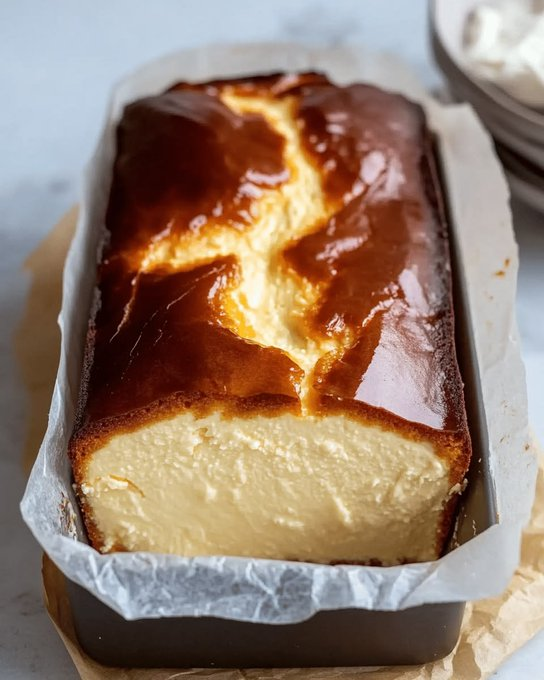
Easy Burnt Basque Cheesecake in a Loaf Pan (Small Batch Recipe)
While classic Basque cheesecake recipes yield massive 9-inch cakes that require multiple pounds of cream cheese, this streamlined version is made specifically for a standard loaf pan. It delivers that exact same velvety, custard-like center and deeply roasted flavor profile in a smaller, more accessible batch size that is ideal for small families, casual gatherings, or cozy weeknight indulgences.
In this comprehensive baking guide, we will break down everything you need to know about making a flawless small-batch Burnt Basque Cheesecake in a loaf pan. From achieving the perfect signature jiggle to mastering the art of parchment lining, you are just a few simple steps away from dessert perfection.
What Makes Basque Cheesecake So Unique?
The original recipe was created in the 1990s by Chef Santiago Rivera at his bar, La Viña, in San Sebastián’s Old Town. Unlike traditional New York-style cheesecakes—which rely on low baking temperatures, water baths, and flourless crusts to maintain a pale finish—the Basque version embraces high heat.
The extreme temperature bakes the exterior rapidly, causing the sugars and proteins in the dairy to undergo the Maillard reaction. This creates a natural, caramelized “crust” without needing any crushed cookies or butter, while keeping the center incredibly soft, rich, and almost molten in texture. Adapting this recipe for a loaf pan allows home bakers to recreate this iconic Spanish treat without needing a springform pan or a fridge full of ingredients.
Why Bake Basque Cheesecake in a Loaf Pan?
- No Special Equipment Needed: You don’t need a springform pan or a roasting pan for a water bath. A standard 8.5×4.5 or 9×5-inch loaf pan is all you need!
- Perfect Small-Batch Size: Traditional recipes call for 2 to 3 pounds of cream cheese. This recipe uses just two standard blocks (16 ounces), making it budget-friendly and less wasteful.
- Foolproof Crustless Technique: Skipping the crust saves prep time and makes the entire baking process practically effort-free.
- Incredible Contrast of Flavors: The bittersweet, toasted sugar flavor on the surface perfectly balances the tangy, sweet, creamy custard center inside.
Ingredients Overview
One of the greatest joys of a Basque cheesecake is its minimal ingredient list. Because there are so few components, quality matters. Here is a breakdown of what you need:
- 16 oz (2 blocks) Cream Cheese: Must be full-fat block cream cheese, fully softened to room temperature. Avoid spreadable cream cheese in tubs, as it contains excess water.
- 3/4 cup Granulated Sugar: Sweetens the cheesecake and provides the essential sugars needed for the top layer to caramelize under high heat.
- 3 Large Eggs: Room-temperature eggs bind the batter together and create that light, custardy lift as it bakes.
- 1 cup Heavy Cream: Provides the high fat content necessary for that melt-in-your-mouth, silky texture. Do not substitute with milk or half-and-half.
- 1 teaspoon Pure Vanilla Extract: Enhances the sweet dairy notes with warm, aromatic flavor.
- 1/4 teaspoon Fine Salt: Cuts through the richness and balances the sweet, caramelized notes.
- 1 tablespoon All-Purpose Flour: Just a tiny amount of flour gives the cheesecake enough structural integrity to hold its shape when sliced without losing its soft center.
Step-by-Step Baking Instructions
Step 1: Prep the Oven and Pan
Proper pan lining is the key to removing your cheesecake effortlessly after it cools.
- Preheat your oven to 425°F (220°C). Position your oven rack in the middle position.
- Take a large sheet of parchment paper and crinkle it up into a tight ball in your hands, then flatten it back out. Crinkling softens the paper so it fits easily into the sharp corners of your loaf pan.
- Line your loaf pan with the parchment paper, pressing it firmly into the bottom and sides. Ensure there is at least 1 to 2 inches of parchment paper hanging over the edges to act as handles later.
Step 2: Beat Cream Cheese and Sugar
Creating a completely smooth base at this stage prevents lumps in your finished cake.
- In a large mixing bowl (or the bowl of a stand mixer fitted with the paddle attachment), add 16 oz of softened cream cheese and 3/4 cup granulated sugar.
- Beat on medium speed for 2 to 3 minutes until the sugar is fully dissolved and the cream cheese is completely smooth, creamy, and lump-free. Scrape down the sides and bottom of the bowl with a rubber spatula.
Step 3: Incorporate the Eggs
Adding eggs slowly prevents over-aerating the batter, keeping the cheesecake dense and silky.
- Add the 3 eggs one at a time, mixing on low speed after each addition just until incorporated.
- Scrape down the bowl again to ensure no unmixed cream cheese remains at the bottom.
Step 4: Add Liquids and Flour
Bringing everything together into a silky, pourable batter.
- Pour in 1 cup of heavy cream, 1 teaspoon vanilla extract, and 1/4 teaspoon fine salt. Mix on low speed until combined.
- Sift in 1 tablespoon of all-purpose flour. Stir gently with a spatula or whisk until the batter is completely smooth and free of flour pockets.
- Pour the silky batter into your prepared parchment-lined loaf pan. Tap the pan gently on the counter twice to release any trapped air bubbles.
Step 5: Bake to Caramelized Perfection
Watch the oven closely toward the end of the bake time to achieve the ideal color and texture.
- Bake at 425°F (220°C) for 35 to 45 minutes. The top should puff up and turn a deep mahogany, golden-brown color.
- To check if it is done, give the pan a gentle shake. The edges should look set, but the center should still have a distinct, gentle jiggle. (It will continue to set as it cools).
Step 6: Cool and Chill
Patience during cooling is critical for developing the signature texture.
- Remove the pan from the oven and set it on a wire rack. Allow it to cool completely at room temperature for about 1 hour. As it cools, the puffed top will naturally collapse inward, creating rustic wrinkled edges.
- Once cooled to room temp, transfer the loaf pan to the refrigerator and chill for at least 4 hours, or ideally overnight, for the cream cheese to fully set.
- To serve, use the parchment overhang handles to lift the cheesecake out of the loaf pan. Slice using a sharp knife dipped in hot water and dried between cuts.
Chef’s Tips for the Best Loaf Pan Cheesecake
- Room Temperature Ingredients Are Mandatory: Cold cream cheese or eggs will result in a lumpy batter. Take your ingredients out of the fridge at least 1 to 2 hours before baking.
- Embrace the “Burn”: Don’t panic when the top turns dark brown or bronze! That dark color is where the rich, complex caramel flavor comes from. It should look dark golden-mahogany, not completely pitch black.
- Crinkle Your Parchment Paper: Scrunching your parchment paper into a tight ball before lining the pan gives it those iconic, rustic folds along the sides of the cheesecake.
- Don’t Overbake: If you wait until the center is firm in the oven, your cheesecake will end up dry instead of creamy. Trust the jiggle!
Gluten-Free & Flavor Variations
This simple recipe adapts easily to different dietary needs and flavor preferences:
- Gluten-Free Basque Cheesecake: Simply replace the 1 tablespoon of all-purpose flour with cornstarch or a 1-to-1 gluten-free baking flour blend.
- Citrus Twist: Add 1 teaspoon of freshly grated lemon or orange zest to the sugar before beating it into the cream cheese for a bright, aromatic undertone.
- Espresso Infused: Dissolve 1 teaspoon of instant espresso powder into the heavy cream before adding it to the batter for a rich mocha flavor profile.
Frequently Asked Questions (FAQs)
Why did my Basque cheesecake sink in the middle?
Cheesecakes naturally puff up in the oven as steam expands the batter and then sink back down as they cool. This is completely normal and expected for a Basque cheesecake, creating its signature rustic, dense center.
Can I eat Basque cheesecake warm?
While you can eat it warm if you prefer a very loose, lava-cake-like texture, chilling it for at least 4 hours allows the flavors to deepen and yields that legendary smooth, custardy bite.
How should I store leftovers?
Keep any leftover slices wrapped tightly in plastic wrap or stored in an airtight container in the refrigerator for up to 4 days. You can serve it straight from the fridge or let it sit on the counter for 15 minutes to soften slightly before eating.