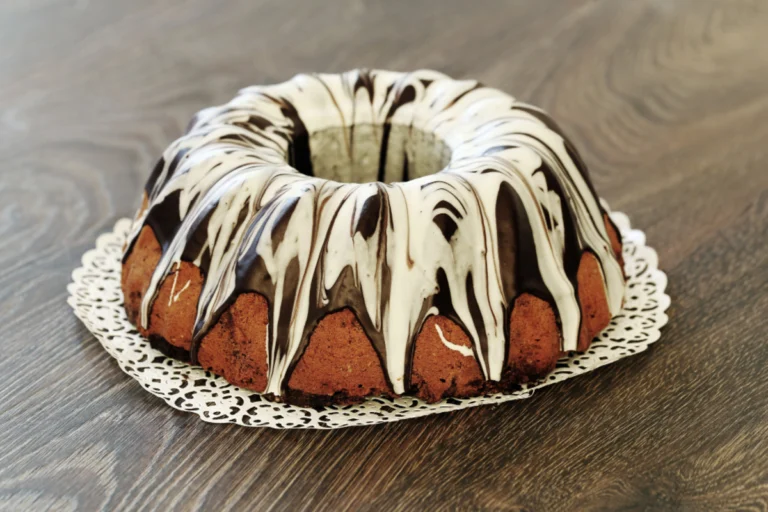
Blackstone Griddle Cooking FAQs: Your Ultimate Guide

Blackstone griddle cooking

Introduction to Blackstone Recipes for Dinner

The Blackstone griddle has revolutionized outdoor cooking, offering a versatile and expansive surface that caters to a plethora of culinary creations. From the sizzle of steaks to the delicate flipping of pancakes, this cooking platform allows for an array of dishes that promise to elevate your dinner game. This article is dedicated to exploring the boundless possibilities of dinner recipes that you can prepare on your Blackstone griddle, ensuring every meal is not just cooked but crafted with expertise and passion.

Essential Equipment and Ingredients

Cooking on a Blackstone griddle offers a unique and enjoyable way to prepare meals, blending the ease of kitchen cooking with the flavor of outdoor grilling. To make the most out of your Blackstone cooking experience, it’s essential to have the right tools and ingredients on hand. Here’s a guide to the must-have equipment and key ingredients for creating flavorful meals on your Blackstone griddle.

Must-Have Tools
  1. Spatulas: A set of high-quality, heat-resistant spatulas is crucial for flipping burgers, turning vegetables, and moving food around the griddle surface. Look for spatulas with a thin edge for easy food handling.
  2. Scrapers: A sturdy scraper will help you clean the griddle surface both during and after cooking. It’s essential for removing food residue and maintaining the griddle’s condition.
  3. Oil Bottles: Refillable oil bottles or squirt bottles are perfect for applying oil to the griddle surface. They provide control over the amount of oil used, ensuring an even coat for non-stick cooking.
  4. Squeeze Bottles for Sauces and Condiments: Squeeze bottles for your favorite sauces and condiments make it easy to add flavor to your dishes. They’re great for applying finishing touches or dressing up a meal.
  5. Thermometer: A digital meat thermometer ensures that meats are cooked to the proper temperature, guaranteeing both safety and desired doneness.
  6. Basting Cover: A basting cover can help melt cheese quickly and evenly on burgers or sandwiches and is also useful for steaming vegetables on the griddle.
  7. Griddle Cleaning Kit: A kit with a handle, cleaning pads, and a scraper designed specifically for the Blackstone can make cleanup easier and more effective.
Key Ingredients for a Flavorful Meal
  1. High-Quality Proteins: Choose fresh meats like chicken, beef, pork, or seafood as the centerpiece of your meal. Marinating these proteins in advance can add depth of flavor.
  2. Fresh Vegetables: Vegetables like bell peppers, onions, mushrooms, and zucchini grill beautifully on a Blackstone. They can be seasoned simply with salt and pepper or marinated for extra flavor.
  3. Seasonings and Spices: A selection of your favorite seasonings, including salt, pepper, garlic powder, paprika, and specialty blends, can enhance the natural flavors of your ingredients.
  4. Oils and Fats: High smoke point oils such as canola, vegetable, or avocado oil are ideal for griddling. They help prevent sticking and add a subtle flavor to the food.
  5. Sauces and Marinades: Preparing or purchasing a variety of sauces and marinades can transform a simple meal into a gourmet experience. Think barbecue sauce, teriyaki, chimichurri, or a simple balsamic glaze.
  6. Breads and Buns: For sandwiches, burgers, or tacos, have a selection of high-quality breads, buns, or tortillas on hand. Toasting them on the griddle adds a delightful crunch and flavor.
  7. Cheeses: A variety of cheeses can add richness and creaminess to your dishes. Choose from options like cheddar, mozzarella, or specialty cheeses depending on your recipe.

Equipping yourself with these essential tools and ingredients will ensure that your Blackstone griddle cooking experience is both enjoyable and delicious. With the right setup, you can explore a wide range of recipes and techniques to create memorable meals for family and friends.

Signature Blackstone Dinner Recipes

Cooking on a Blackstone griddle allows for the creation of a wide array of delicious meals. Here are three signature dinner recipes that showcase the versatility and flavor potential of your Blackstone griddle: The Ultimate Blackstone Burger, Sizzling Steak Fajitas, and Gourmet Griddled Pizza. Each recipe is designed to make the most of the Blackstone’s large, flat cooking surface and even heating.

The Ultimate Blackstone Burger

Ingredients:

  • 1.5 lbs ground beef (80/20 blend for juiciness)
  • Salt and pepper to taste
  • 4 hamburger buns
  • 4 slices of cheddar cheese
  • Lettuce, tomato, and onion slices for topping
  • Condiments of choice (e.g., ketchup, mustard, mayonnaise)

Instructions:

  1. Preheat your Blackstone griddle over medium-high heat.
  2. Divide the ground beef into 4 equal portions and form into patties. Season both sides with salt and pepper.
  3. Place the patties on the hot griddle and cook for about 4-5 minutes on each side or until they reach the desired level of doneness.
  4. A minute before the burgers are done, place a slice of cheddar cheese on each patty and cover with a basting cover to melt the cheese.
  5. Toast the hamburger buns on the griddle until lightly golden.
  6. Assemble the burgers with the cooked patties, toasted buns, and your choice of toppings and condiments.

Sizzling Steak Fajitas

Ingredients:

  • 1.5 lbs flank or skirt steak
  • 2 bell peppers, sliced
  • 1 large onion, sliced
  • Fajita seasoning mix
  • Olive oil
  • Flour tortillas

Marinade:

  • 1/4 cup lime juice
  • 1/4 cup olive oil
  • 2 garlic cloves, minced
  • 1 tsp cumin
  • Salt and pepper to taste

Instructions:

  1. Combine the marinade ingredients in a bowl and add the steak, ensuring it is fully coated. Marinate for at least 1 hour or overnight in the refrigerator.
  2. Preheat your Blackstone griddle over medium-high heat.
  3. Remove the steak from the marinade and cook for 5-7 minutes on each side or until it reaches the desired doneness. Remove from the griddle and let it rest.
  4. In the meantime, toss the bell peppers and onion with a bit of olive oil and fajita seasoning. Cook on the griddle until they are soft and charred.
  5. Slice the steak against the grain into thin strips.
  6. Serve the steak and vegetables on warm flour tortillas. Add your favorite toppings, such as sour cream, guacamole, or salsa.

Gourmet Griddled Pizza

Ingredients:

  • Pizza dough (store-bought or homemade)
  • Pizza sauce
  • Mozzarella cheese, shredded
  • Toppings of choice (e.g., pepperoni, mushrooms, bell peppers, onions)
  • Olive oil
  • Italian seasoning (optional)

Instructions:

  1. Preheat your Blackstone griddle to medium heat.
  2. Roll out your pizza dough to the desired thickness and size.
  3. Lightly oil the griddle surface. Place the dough on the griddle and cook for 2-3 minutes or until it starts to bubble and the bottom is golden.
  4. Flip the dough over, then quickly spread a layer of pizza sauce over the cooked side. Sprinkle mozzarella cheese on top, followed by your chosen toppings.
  5. Cover the pizza with a basting cover or aluminum foil to help melt the cheese and cook the toppings, about 5-7 minutes.
  6. Once the cheese is melted and the bottom of the pizza is crispy, remove from the griddle. Sprinkle with Italian seasoning if desired.
  7. Slice and serve hot.

These signature Blackstone recipes are perfect for any dinner occasion, combining simplicity with delicious results. Enjoy exploring these dishes and the endless possibilities that cooking on a Blackstone griddle offers.

Vegetarian Delights on the Blackstone

Cooking vegetarian meals on a Blackstone griddle is not only easy but also allows for a wonderful blend of flavors and textures. The griddle’s large, flat surface is perfect for charring vegetables and creating delicious, meat-free dishes. Here are two vegetarian delights that are sure to please: Grilled Veggie Tacos and Zesty Zucchini Planks.

Grilled Veggie Tacos

Ingredients:

  • 2 bell peppers (any color), sliced
  • 1 large onion, sliced
  • 1 cup corn kernels (fresh or frozen)
  • 1 zucchini, sliced
  • 1 tablespoon olive oil
  • 1 teaspoon cumin
  • 1 teaspoon paprika
  • Salt and pepper to taste
  • 8 small corn or flour tortillas
  • Optional toppings: avocado slices, lime wedges, fresh cilantro, shredded cheese, sour cream

Instructions:

  1. Preheat your Blackstone griddle over medium-high heat.
  2. In a large bowl, toss the bell peppers, onion, corn, and zucchini with olive oil, cumin, paprika, salt, and pepper until evenly coated.
  3. Spread the vegetables on the hot griddle and cook for about 5-7 minutes, stirring occasionally, until they are tender and have some charred edges.
  4. Warm the tortillas on the griddle for about 30 seconds on each side.
  5. Assemble the tacos by placing a generous amount of the grilled veggies on each tortilla. Add your favorite toppings, such as avocado, lime juice, cilantro, cheese, or sour cream.
  6. Serve immediately and enjoy your flavorful grilled veggie tacos.

Zesty Zucchini Planks

Ingredients:

  • 4 medium zucchinis, cut lengthwise into 1/4 inch thick planks
  • 2 tablespoons olive oil
  • 1 teaspoon garlic powder
  • 1 teaspoon Italian seasoning
  • Salt and pepper to taste
  • Grated Parmesan cheese (optional)
  • Lemon wedges for serving

Instructions:

  1. Preheat your Blackstone griddle to medium heat.
  2. In a small bowl, mix together the olive oil, garlic powder, Italian seasoning, salt, and pepper.
  3. Brush both sides of each zucchini plank with the olive oil mixture.
  4. Place the zucchini planks on the griddle and cook for 3-4 minutes on each side, or until they are tender and have grill marks.
  5. Once cooked, optionally sprinkle grated Parmesan cheese over the zucchini planks while they are still hot.
  6. Serve the zesty zucchini planks with lemon wedges on the side for a refreshing, tangy finish.

These vegetarian recipes showcase the versatility of the Blackstone griddle, proving that it’s not just for meat-eaters. Whether you’re a vegetarian or just looking to incorporate more vegetables into your diet, these dishes offer a delicious way to enjoy the flavors of grilled vegetables.

Seafood Specials: A Blackstone Dinner

Cooking seafood on a Blackstone griddle provides a delicious, smoky flavor that is hard to achieve with other cooking methods. The griddle’s even heating and spacious cooking surface make it perfect for searing shrimp and salmon to perfection. Here are two seafood specials that will elevate your Blackstone dinner experience: Garlic Butter Shrimp and Blackstone Grilled Salmon.

Garlic Butter Shrimp

Ingredients:

  • 1 lb large shrimp, peeled and deveined
  • 4 tablespoons unsalted butter
  • 4 garlic cloves, minced
  • 1 teaspoon paprika
  • Salt and pepper to taste
  • Juice of 1 lemon
  • 2 tablespoons chopped fresh parsley
  • Lemon wedges for serving

Instructions:

  1. Preheat your Blackstone griddle to medium-high heat.
  2. In a large bowl, toss the shrimp with paprika, salt, and pepper.
  3. Add butter to the griddle. Once melted, add the minced garlic and cook for about 1 minute until fragrant, being careful not to burn it.
  4. Add the seasoned shrimp to the griddle. Cook for 2-3 minutes on each side or until the shrimp turn pink and opaque.
  5. Squeeze lemon juice over the cooked shrimp and sprinkle with chopped parsley.
  6. Serve immediately with additional lemon wedges on the side.

Blackstone Grilled Salmon

Ingredients:

  • 4 salmon fillets (about 6 oz each), skin on
  • 2 tablespoons olive oil
  • Salt and pepper to taste
  • 1 teaspoon garlic powder
  • 1 teaspoon dried dill (or 1 tablespoon fresh dill, chopped)
  • Lemon slices for garnish
  • Dill sauce or lemon butter sauce for serving (optional)

Instructions:

  1. Preheat your Blackstone griddle over medium heat.
  2. Brush both sides of the salmon fillets with olive oil and season with salt, pepper, garlic powder, and dill.
  3. Place the salmon fillets skin-side down on the griddle. Cook for about 4-5 minutes or until the skin is crisp and the salmon releases easily from the griddle.
  4. Carefully flip the salmon fillets and cook for an additional 3-4 minutes or until the desired doneness is reached.
  5. Remove the salmon from the griddle and let it rest for a few minutes.
  6. Serve the grilled salmon with lemon slices and your choice of sauce on the side.

These seafood specials are not only delicious but also quick and easy to prepare, making them perfect for a special dinner or a casual outdoor gathering. The Blackstone griddle ensures that your seafood dishes come out flavorful and perfectly cooked every time. Enjoy these delightful seafood recipes that are sure to impress your family and friends.

World Cuisines on Your Blackstone

Exploring world cuisines on your Blackstone griddle is a fantastic way to enjoy global flavors right from your backyard. The versatility of the Blackstone allows you to cook a wide range of dishes, from quick stir-fries to hearty lasagnas. Here are two recipes that bring the essence of Asian and Italian cuisines to your griddle: an Asian-Inspired Stir Fry and an Italian Classic Griddled Lasagna.

Asian-Inspired Stir Fry

Ingredients:

  • 1 lb chicken breast or thigh, thinly sliced
  • 2 tablespoons soy sauce
  • 1 tablespoon oyster sauce
  • 1 tablespoon sesame oil
  • 2 cloves garlic, minced
  • 1 teaspoon ginger, minced
  • 1 bell pepper, sliced
  • 1 cup broccoli florets
  • 1 carrot, julienned
  • 1 onion, sliced
  • 1 tablespoon vegetable oil
  • Additional soy sauce, to taste
  • Green onions and sesame seeds for garnish

Instructions:

  1. In a bowl, marinate the chicken with soy sauce, oyster sauce, and sesame oil for at least 30 minutes.
  2. Preheat your Blackstone griddle to medium-high heat and add vegetable oil.
  3. Add garlic and ginger to the griddle, sautéing briefly until fragrant.
  4. Add the marinated chicken to the griddle and cook until it’s no longer pink, about 5-7 minutes.
  5. Push the chicken to one side of the griddle. Add the bell pepper, broccoli, carrot, and onion to the other side. Stir-fry the vegetables for about 5 minutes or until tender-crisp.
  6. Mix the chicken and vegetables together on the griddle. Adjust seasoning with additional soy sauce if needed.
  7. Serve hot, garnished with green onions and sesame seeds.

Italian Classic: Griddled Lasagna

Ingredients:

  • 1 lb ground beef or Italian sausage
  • 1 jar (24 oz) marinara sauce
  • 9 lasagna noodles, cooked and drained
  • 15 oz ricotta cheese
  • 1 egg, beaten
  • 1 tablespoon Italian seasoning
  • 3 cups shredded mozzarella cheese
  • 1 cup grated Parmesan cheese
  • Salt and pepper to taste
  • Fresh basil for garnish

Instructions:

  1. Preheat your Blackstone griddle to medium heat. Cook the ground beef or sausage until fully browned. Drain excess fat.
  2. Stir in the marinara sauce with the cooked meat and simmer for 5 minutes. Remove from the griddle and set aside.
  3. In a bowl, mix ricotta cheese, egg, Italian seasoning, and a pinch of salt and pepper.
  4. Build the lasagna directly on a low-heat section of the griddle or in a griddle-safe pan: Start with a layer of meat sauce, then noodles, followed by the ricotta mixture, mozzarella, and Parmesan. Repeat the layers, finishing with cheese on top.
  5. Cover the lasagna with a basting cover or aluminum foil and cook on low heat for about 20 minutes, or until the cheese is melted and bubbly.
  6. Let the lasagna rest for a few minutes before slicing. Garnish with fresh basil before serving.

These recipes bring the rich flavors of Asia and Italy to your outdoor cooking, showcasing the Blackstone griddle’s ability to handle a diverse array of culinary styles. Enjoy the process of creating these dishes and sharing them with family and friends for a global dining experience at home.

Tips for Perfect Blackstone Cooking

Mastering the art of cooking on a Blackstone griddle involves understanding the nuances of temperature control and adhering to best practices for cleaning and maintenance. Here are essential tips to ensure you get the best results every time you cook and keep your griddle in top condition for years to come.

Temperature Control

  • Preheating: Always preheat your Blackstone griddle before cooking. A properly preheated griddle ensures even cooking and helps to prevent food from sticking. For most recipes, preheating for 10-15 minutes on medium heat will suffice.
  • Zonal Cooking: Utilize the griddle’s large surface by creating different temperature zones. This technique is particularly useful for cooking multiple items at once or when an item needs to be moved to a cooler part of the griddle after searing. For instance, you can keep one side of the griddle on low for gentle cooking or warming, while the other side can be set to high for searing.
  • Managing Flare-Ups: If you’re cooking fatty foods and experience flare-ups, move the food to a cooler part of the griddle. Adjusting the heat downwards temporarily can also help manage excessive smoke or flare-ups.
  • Use of Lid or Basting Cover: For foods that benefit from a bit of steaming (like melting cheese on burgers or cooking vegetables), use a basting cover. This helps to cook food evenly and retain moisture, especially for thicker cuts of meat.

Cleaning and Maintenance

  • Cleaning After Each Use: It’s essential to clean your Blackstone griddle after every use. Once the griddle cools down but is still warm, use a metal scraper to remove food particles and excess grease. Wipe the surface clean with a paper towel or cloth.
  • Seasoning: Regular seasoning of your Blackstone griddle is crucial to maintain its non-stick surface and protect it from rust. After cleaning, apply a thin layer of cooking oil (high smoke point oils like canola or flaxseed work well) across the entire surface. Heat the griddle until the oil begins to smoke, then turn it off and let it cool. This process helps to build up a protective and non-stick layer.
  • Rust Prevention and Removal: If rust appears, it’s important to remove it promptly to prevent further damage. Use a griddle scraper or fine-grit sandpaper to scrub away rust spots, clean the surface thoroughly, and then re-season the griddle.
  • Proper Storage: When not in use, ensure your Blackstone griddle is covered with a weather-resistant cover to protect it from the elements. Store the griddle in a dry, protected area if possible.
  • Regular Inspection: Regularly check for any loose parts, wear and tear, or potential gas leaks if your griddle uses propane. Ensuring everything is in working order before each use is crucial for safety and performance.

By following these tips for temperature control and cleaning and maintenance, you’ll be able to enjoy delicious meals cooked on your Blackstone griddle while ensuring its longevity and performance.

Pairing Sides and Drinks with Your Dinner

Pairing the right sides and drinks with your dinner can elevate the dining experience, enhancing the flavors of the main dish and rounding out the meal. Whether you’re serving a hearty steak, a light seafood dish, or a vegetarian feast, here are some ideas for refreshing beverages and complementary side dishes that will match beautifully with your dinner.

Refreshing Beverages

  1. For Grilled Meats (Steaks, Burgers):
    • Red Wine: A full-bodied red wine, such as Cabernet Sauvignon or Malbec, can complement the richness of red meats.
    • Craft Beer: A hoppy IPA or a smooth lager pairs well with the smoky flavors of grilled meats.
    • Iced Tea with Lemon: A non-alcoholic option that offers a refreshing contrast to the savory flavors of the meat.
  2. For Seafood Dishes:
    • White Wine: A crisp white wine like Sauvignon Blanc or Pinot Grigio pairs wonderfully with seafood, enhancing its delicate flavors.
    • Sparkling Water with Citrus: A bubbly, refreshing choice that cleanses the palate between bites of seafood.
    • Cucumber Mint Cooler: A light and refreshing mocktail that complements the lightness of seafood dishes.
  3. For Vegetarian Dishes:
    • Rosé Wine: The versatility of rosé makes it a delightful match for a variety of vegetarian dishes.
    • Fruit-Infused Sparkling Water: A hydrating and flavorful option that pairs well with the freshness of vegetables.
    • Lemonade: A classic choice that adds a sweet and tangy contrast to vegetarian meals.

Complementary Side Dishes

  1. For Grilled Meats:
    • Grilled Vegetables: A mix of bell peppers, asparagus, and mushrooms grilled to perfection.
    • Caesar Salad: A classic side that offers a crisp, creamy contrast to rich meats.
    • Roasted Potatoes: Seasoned and roasted until crispy, they’re a hearty complement to any meat dish.
  2. For Seafood Dishes:
    • Quinoa Salad: A light and healthy side that pairs well with the delicate flavors of seafood.
    • Steamed Green Beans: Tossed with a bit of butter and almonds, they offer a crunchy contrast to soft seafood textures.
    • Couscous with Lemon and Herbs: A fluffy and flavorful side that complements the lightness of fish or shrimp.
  3. For Vegetarian Dishes:
    • Caprese Salad: Fresh tomatoes, mozzarella, and basil drizzled with balsamic glaze.
    • Sweet Potato Fries: Baked or grilled for a sweet and savory side.
    • Rice Pilaf: A fragrant and flavorful dish that can accompany a wide range of vegetarian main courses.

Choosing the right combination of sides and drinks not only enhances the flavors of your main dishes but also turns a simple meal into a memorable feast. Feel free to mix and match these suggestions based on your personal preferences and the specific flavors of your dinner dishes.

FAQs: Everything You Need to Know

Here we address some common questions related to cooking on a Blackstone griddle, as well as general culinary inquiries. This should help clarify any doubts and provide useful insights to enhance your cooking experience.

Can I cook every type of meal on a Blackstone griddle?

Yes, a Blackstone griddle is incredibly versatile and can be used to cook a wide variety of meals, from breakfast items like pancakes and eggs to lunch and dinner dishes such as burgers, steaks, seafood, vegetables, and even pizzas. The even heat distribution and large surface area make it suitable for almost any type of meal.

How do I prevent food from sticking to the griddle?

To prevent food from sticking, ensure your griddle is well-seasoned and preheat it before adding any food. Use a light coating of oil on both the griddle surface and the food. High smoke point oils like canola, vegetable, or avocado oil are recommended. Regular maintenance and seasoning of the griddle surface will improve its non-stick properties over time. For more details on griddle care, visit Cleaning & Care Accessories.

What is the best way to clean my Blackstone griddle?

After cooking, while the griddle is still warm, use a metal scraper to remove food particles and excess grease. Wipe it down with a paper towel, then apply a thin layer of cooking oil to protect the surface. For deeper cleaning, warm water and a mild detergent can be used, followed by thorough drying and reseasoning to prevent rust. To find the right products for griddle care, explore Cleaning & Care Accessories.

How often should I season my Blackstone griddle?

It’s best to season your griddle before the first use and after each deep cleaning. However, applying a light coat of oil after each use can help maintain the seasoning and protect the surface. If you notice food starting to stick more frequently or the surface looking dry or rusted, it’s time for a new seasoning layer.

Can I leave my Blackstone griddle outside?

While Blackstone griddles are designed for outdoor use, it’s important to protect them from the elements to prevent rust and deterioration. Use a weather-resistant cover when not in use, and if possible, store the griddle in a dry, covered area. For suitable covers, see Covers & Carry Bags.

How do I know when my griddle is at the right temperature for cooking?

A water droplet test can help gauge the temperature. Sprinkle a few drops of water on the griddle; if they dance and evaporate quickly, it’s hot and ready for cooking. For precise cooking, using an infrared thermometer can provide an exact temperature reading.

Is it possible to bake on a Blackstone griddle?

Yes, with the right setup. Using a basting cover or a dome can create an oven-like environment, allowing you to bake items like biscuits, bread, or even pizza. Keep in mind that this requires careful temperature control and monitoring.

Can I cook frozen foods on a Blackstone griddle?

Yes, you can cook frozen foods directly on the griddle, but it’s important to adjust cooking times accordingly. Foods like frozen burgers, vegetables, and even some seafood can be cooked to perfection with proper heat management

Creative Ways to Enjoy Cottage Cheese: From Snacks to Desserts

Enjoying Cottage Cheese

Introduction to Cottage Cheese

Cottage cheese, with its mild flavor and unique texture, has long been a staple in many diets around the world. The Rise of Cottage Cheese section delves into its journey from a simple farmer’s food to a beloved ingredient in kitchens globally. Nutritional Benefits highlight its rich profile in proteins, vitamins, and minerals, making it a favorite among health enthusiasts.

What is the Most Popular Way to Eat Cottage Cheese?

Cottage cheese is celebrated for its versatility, creamy texture, and mild taste. It integrates seamlessly into both traditional and contemporary culinary practices. Here’s a breakdown of traditional ways to savor cottage cheese, proving its adaptability and staple status in diverse diets.

Plain with Salt and Pepper

A classic and straightforward method to enjoy cottage cheese is simply seasoned with salt and pepper. This approach accentuates its inherent, gentle flavor.

With Fresh Fruit

Cottage cheese topped with fresh fruit, such as peaches, pineapple, berries, and bananas, creates a delightful sweet and savory combination, cherished by many.

In Salads

For a protein boost, cottage cheese is a great addition to salads. Whether mixed with greens and vegetables or substituting mayonnaise in potato salad or coleslaw, it’s a nutritious choice.

As a Dip or Spread

When blended smooth, cottage cheese transforms into a versatile base for dips and spreads, often enhanced with herbs, garlic, or chives, and paired with veggies or crackers.

In Baked Goods

Its role in baking is to impart moisture and richness to pancakes, muffins, breads, and also as a filling in pastries and pies, showcasing its utility beyond the raw form.

With Toast

Spreading cottage cheese on toast, then topping with avocado, tomato, or cucumber, presents a fulfilling snack or meal, merging nutrition with taste.

In Cooking

Cottage cheese finds its way into cooked dishes like lasagna, stuffed pasta, casseroles, and scrambled eggs, contributing protein and texture.

As a Dessert

Transformed with honey, cinnamon, or vanilla, cottage cheese becomes a light dessert. It’s also a base for cheesecakes or a component in smoothies.

These traditional consumption methods highlight cottage cheese’s flexibility in blending with both sweet and savory elements, making it an essential item in culinary traditions.

Cottage Cheese for Breakfast

Incorporating cottage cheese into breakfast smoothie bowls is a fantastic way to enjoy a nutritious, protein-packed meal that’s both delicious and easy to prepare. Cottage cheese adds a creamy texture and a boost of protein, making your smoothie bowl more satisfying and beneficial for your health. Here’s a simple way to create a cottage cheese smoothie bowl for breakfast:

Ingredients

  • 1/2 cup cottage cheese: The main ingredient that provides creaminess and protein.
  • 1 cup frozen fruits: Choose your favorites like berries, mango, banana, or a mix for natural sweetness and vitamins.
  • 1/4 cup milk or a milk alternative: Adjust the quantity to achieve your desired smoothie consistency.
  • Optional sweetener: Honey, maple syrup, or agave, adjusted to taste.
  • Toppings: Fresh fruits, nuts, seeds, granola, or coconut flakes for added texture and flavor.

Instructions

  1. Blend the Base: In a blender, combine the cottage cheese, frozen fruits, and a splash of milk or milk alternative. Blend until smooth and creamy. If the smoothie is too thick, gradually add more liquid until you reach your preferred consistency. Taste and add a sweetener if desired, blending again to mix.
  2. Prepare the Bowl: Pour the smoothie mixture into a bowl. The consistency should be thick enough to support your toppings without sinking.
  3. Add Toppings: Customize your smoothie bowl with a variety of toppings for crunch and flavor. Options include sliced fresh fruits, a sprinkle of granola, a handful of nuts or seeds, and a scattering of coconut flakes. For an extra touch of sweetness, drizzle with honey or dot with nut butter.
  4. Enjoy: Dive into your cottage cheese smoothie bowl immediately to enjoy the best texture and freshness.

Tips for a Perfect Smoothie Bowl

  • Use Frozen Fruits: They help create a thick, ice-cream-like texture in the smoothie bowl.
  • Mix Flavors: Don’t be afraid to experiment with different fruit combinations to find your perfect blend.
  • Nutritional Boost: Add a handful of spinach or kale for extra nutrients. These greens blend well and won’t overpower the taste of your smoothie bowl.
  • Protein Power: Cottage cheese is already high in protein, but for an extra boost, you can add a scoop of your favorite protein powder.

This breakfast option is not only filling and nutritious but also highly versatile, allowing you to tailor the ingredients to your dietary preferences and nutritional needs. It’s a delightful way to start your day with a balanced meal that’s rich in proteins, healthy fats, and carbohydrates.

Cottage Cheese in Savory Dishes

Cottage cheese is a versatile ingredient that can enhance savory dishes, especially salads, by adding a creamy texture and a protein boost without overwhelming other flavors. Its mild taste pairs well with a variety of ingredients, making it an excellent addition to both simple and complex salad recipes. Here’s how you can incorporate cottage cheese into your salads:

Cottage Cheese Garden Salad

Ingredients:

  • 1 cup cottage cheese: The star ingredient, providing creaminess and protein.
  • Mixed greens: A base of lettuce, spinach, arugula, or a spring mix.
  • Vegetables: Sliced cucumbers, tomatoes, bell peppers, and red onions for crunch and color.
  • Fresh herbs: Chopped parsley, dill, or basil for added flavor.
  • Dressing: Olive oil and lemon juice or vinegar, seasoned with salt and pepper to taste.

Instructions:

  1. Prepare the Vegetables: Wash and chop your vegetables and herbs. Aim for a variety of colors and textures to make the salad visually appealing and nutritionally balanced.
  2. Mix the Salad: In a large bowl, combine the mixed greens, prepared vegetables, and fresh herbs. Toss gently to distribute the ingredients evenly.
  3. Add Cottage Cheese: Spoon the cottage cheese over the salad. You can either mix it in for a more integrated texture or leave it as dollops on top for a visual and textural contrast.
  4. Dress the Salad: Drizzle with olive oil and lemon juice or vinegar. Season with salt and pepper to taste. Toss lightly to coat the ingredients without breaking down the cottage cheese too much.
  5. Serve: Enjoy your cottage cheese garden salad immediately, or chill it briefly in the refrigerator before serving for a refreshing meal.

Tips for Using Cottage Cheese in Salads

  • Drain if Needed: If your cottage cheese is particularly wet, you might want to drain it before adding it to the salad to prevent excess moisture.
  • Season Well: Cottage cheese is mild, so make sure to season your salad well to bring out the flavors of the other ingredients.
  • Experiment with Flavors: Cottage cheese pairs well with a wide range of ingredients, so don’t hesitate to try it in different types of salads, including those with grains like quinoa or bulgur, or legumes like chickpeas or black beans.
  • Add a Crunch: Include ingredients with a variety of textures, such as nuts, seeds, or crispy croutons, to complement the creaminess of the cottage cheese.

Incorporating cottage cheese into salads not only boosts the nutritional profile by adding calcium and protein but also introduces an element of creaminess that can replace heavier dressings or cheeses. Experiment with different combinations of ingredients to discover your favorite cottage cheese salad creations.

Cottage cheese is a versatile ingredient that can be used in a variety of desserts, including cheesecakes, where it offers a lighter alternative to traditional cream cheese. Its high protein content and lower fat levels make it an appealing choice for those looking for a healthier dessert option. Here’s a general approach to incorporating cottage cheese into cheesecake recipes:

Incorporating Cottage Cheese into Cheesecakes

  • Blend for Smoothness: To achieve a creamy texture, it’s crucial to blend the cottage cheese until smooth before incorporating it into your cheesecake batter. This ensures a uniform consistency without lumps.
  • Richness and Flavor: Despite its lower fat content compared to cream cheese, cottage cheese can still provide a rich, satisfying base for cheesecakes. Enhancing the flavor with vanilla extract, lemon zest, or other flavorings can help elevate the overall taste of the dessert.
  • Combining Ingredients: Cottage cheese cheesecakes typically include eggs, sugar, and a thickener like flour or cornstarch, along with the blended cottage cheese. These ingredients help to create a stable, flavorful filling that sets well when baked or chilled.
  • Variations: You can create various flavors of cottage cheese cheesecake by adding fruit purees, chocolate, spices, or citrus zest to the filling. Toppings such as fresh fruits, whipped cream, or fruit compotes can add an extra layer of flavor and texture.

Recipe Inspiration

Here are some ideas for using cottage cheese in cheesecake recipes:

  • Classic Baked Cottage Cheese Cheesecake: Start with a simple graham cracker crust, fill it with a smooth mixture of blended cottage cheese, eggs, sugar, and vanilla, and bake until set.
  • No-Bake Cottage Cheese Cheesecake: Combine blended cottage cheese with dissolved gelatin, sweetener, and whipped cream for a light, airy filling that sets in the fridge, no oven required.
  • Flavored Cheesecakes: Mix in ingredients like pumpkin puree, chocolate chips, or berry compotes into the cottage cheese filling to create a variety of flavored cheesecakes suited to any taste preference.

Tips for Success

  • Ensure Smoothness: For the smoothest texture, strain blended cottage cheese through a fine-mesh sieve to remove any remaining lumps.
  • Adjust Sweetness: Cottage cheese is naturally less sweet than cream cheese, so you may want to adjust the sugar in your recipe according to taste.
  • Chill Thoroughly: Especially for no-bake versions, ensure the cheesecake has ample time to set in the refrigerator, typically several hours or overnight, to achieve the perfect texture.

Cottage cheese cheesecakes offer a delightful blend of nutrition and indulgence, making them a great choice for dessert lovers looking for a healthier option. With a bit of creativity and some basic baking skills, you can create delicious cheesecakes that are sure to impress.

Global Variations

European cuisine offers a rich tapestry of flavors and traditions, with each country presenting its own unique delights. From savory to sweet, traditional European dishes reflect the continent’s diverse cultures, histories, and ingredients. Here are some notable European delights that capture the essence of various regions:

Western Europe

  • France: French cuisine is renowned worldwide, with classic dishes like Coq au Vin (chicken cooked in wine), Bouillabaisse (a Provencal fish stew), and desserts such as Crème Brûlée and Tarte Tatin.
  • Italy: Italian food is beloved for its regional diversity, from Pasta and Pizza to Risotto and Gelato. Each region boasts its own specialties, like Neapolitan pizza or Tuscan Bistecca alla Fiorentina (Florentine steak).

Eastern Europe

  • Russia: Russian cuisine offers hearty dishes like Borscht (beet soup), Pelmeni (dumplings), and Blini (thin pancakes), often accompanied by sour cream and caviar.
  • Poland: Polish food is known for Pierogi (filled dumplings), Bigos (hunter’s stew), and the sweet treat of Paczki (Polish doughnuts).

Northern Europe

  • Sweden: Swedish cuisine features dishes like Köttbullar (Swedish meatballs), Gravlax (cured salmon), and the iconic Smörgåsbord (a buffet of various hot and cold dishes).
  • Norway: Norwegian food traditions include Fårikål (mutton stew with cabbage), Lutefisk (dried fish treated with lye), and Krumkake (cone-shaped sweet pastry).

Southern Europe

  • Spain: Spanish cuisine is famous for Tapas (small plates), Paella (saffron rice dish), and Churros con Chocolate. The concept of Tapas allows for a variety of dishes to be enjoyed in one sitting.
  • Greece: Greek food offers flavorsome dishes like Moussaka (eggplant or potato-based dish), Souvlaki (grilled meat skewers), and Baklava (sweet dessert pastry).

Central Europe

  • Germany: German cuisine is known for its Bratwurst (sausages), Sauerkraut (fermented cabbage), and Pretzels, alongside hearty dishes like Schweinshaxe (pork knuckle).
  • Austria: Austrian food delights with Wiener Schnitzel (breaded veal cutlet), Apfelstrudel (apple strudel), and Sachertorte (chocolate cake).

These dishes only scratch the surface of the culinary diversity found across Europe. Each country and region brings its own traditions, techniques, and flavors to the table, creating a rich mosaic of European cuisine that continues to evolve and inspire. Whether through the refined techniques of French cooking, the comforting simplicity of Eastern European meals, or the vibrant flavors of the Mediterranean, European cuisine offers something for every palate.

Health Benefits

Cottage cheese is widely recognized for its health benefits, particularly in the areas of weight management and muscle recovery. Its high protein content, low calorie count, and valuable nutrients make it an excellent food choice for those looking to maintain or lose weight, as well as for athletes or anyone looking to support muscle repair after exercise.

Weight Management

  • High in Protein, Low in Calories: Cottage cheese is packed with protein, which can help you feel fuller for longer. This feeling of satiety can lead to reduced calorie intake over the course of the day, supporting weight loss or maintenance efforts. Protein is also essential for maintaining muscle mass, especially important during weight loss to ensure the body loses fat instead of muscle.
  • Versatility: Its versatility allows it to be included in various meals and snacks, making it easier to stick to a healthy eating plan without feeling deprived.

Muscle Recovery

  • Protein for Muscle Repair: The protein in cottage cheese is crucial for muscle recovery after workouts. Protein provides the amino acids necessary for muscle repair and growth, making cottage cheese an excellent post-workout snack. Specifically, it contains casein, a slow-digesting protein that provides a steady supply of amino acids over time, making it ideal for muscle recovery and growth, especially when consumed before bed.
  • Rich in Essential Nutrients: Beyond protein, cottage cheese is also a good source of calcium, phosphorus, and B vitamins, which play vital roles in bone health, energy production, and overall wellness.

Incorporating cottage cheese into your diet can be a simple way to support your health goals, whether you’re looking to manage your weight or improve muscle recovery. Its nutritional profile supports various bodily functions, making it a beneficial addition to a balanced diet.

DIY Cottage Cheese Recipes

Making cottage cheese at home is a surprisingly simple process that allows for customization in terms of flavor and texture. Below is a general approach to making your own cottage cheese, followed by some ideas for flavor variations that can enhance this versatile dairy product.

Making Cottage Cheese at Home

Basic Steps:

  1. Heat Milk: Start by gently heating milk in a large pot. Avoid boiling; just get it warm enough that it’s hot to the touch.
  2. Add Acid: Once the milk is heated, add an acidic substance like lemon juice or vinegar. This will cause the milk to curdle, separating into curds and whey.
  3. Cut & Cook Curds: After the milk has fully curdled, cut into the curds with a knife and cook for a few more minutes to strengthen them.
  4. Drain: Remove the pot from heat and strain the curds from the whey using a cheesecloth or fine mesh strainer. You can save the whey for other recipes.
  5. Rinse & Season: Rinse the curds under cold water to remove any lingering acidity and season with salt or other flavors as desired.
  6. Press (Optional): For firmer cottage cheese, press the curds to remove more whey.

Flavor Variations

Adding flavors to homemade cottage cheese can transform it from a simple dairy product into a gourmet ingredient. Here are some ideas:

  • Herbs & Spices: Mix in fresh or dried herbs such as dill, chives, or parsley for a refreshing taste. Spices like black pepper or paprika can add warmth and depth.
  • Fruit: For a sweet twist, fold in fresh or dried fruit like berries, peaches, or raisins. A drizzle of honey or maple syrup can sweeten the deal.
  • Savory Mix-ins: Incorporate chopped olives, sun-dried tomatoes, or roasted red peppers for a savory flavor profile.
  • Sweetened Flavors: Vanilla extract, cinnamon, and a bit of sugar can create a dessert-like cottage cheese perfect for topping with fresh fruit or granola.

When making cottage cheese at home, the key is to start with good-quality milk and experiment with different levels of acidity and curdling times to find the texture and flavor you prefer. The ability to add various mix-ins or flavors makes homemade cottage cheese a versatile component in both savory and sweet dishes.

For detailed recipes and more specific instructions, consider exploring cooking websites or cookbooks that specialize in dairy products or homemade cheeses.

Pairing Cottage Cheese with Other Foods

Pairing cottage cheese with other foods can elevate its taste and nutritional value, making it a versatile addition to any meal. Here’s how you can pair cottage cheese with fruits, nuts, herbs, and spices for delicious and nutritious combinations.

Fruits and Nuts

  • Sweet and Crunchy: The natural sweetness of fruits like berries, peaches, pineapple, and pears complements the mild flavor of cottage cheese. Adding nuts such as almonds, walnuts, or pecans introduces a delightful crunch and boosts the dish’s nutritional content with healthy fats and proteins. For more inspiration, check out our guide on cottage cheese breakfast recipes.
  • Tropical Twist: Mix cottage cheese with slices of mango or papaya and sprinkle with coconut flakes and cashews for a tropical-inspired treat. Explore the health benefits of cottage cheese to understand why this is a great choice.
  • Apple Cinnamon Delight: Combine cottage cheese with diced apples, a dash of cinnamon, and a sprinkle of granola or chopped walnuts for a comforting snack or breakfast. Discover 7 healthy and delicious ways to start your day with cottage cheese for more ideas.

Herbs and Spices

  • Savory Seasonings: Elevate the flavor of cottage cheese with fresh herbs like chives, dill, or basil. Add a pinch of salt and black pepper to enhance the taste further. This can transform cottage cheese into a savory spread perfect for whole-grain toast or crackers.
  • Spicy Kick: For those who enjoy a bit of heat, mix cottage cheese with a dash of paprika, cayenne pepper, or freshly cracked black pepper. This can create a spicy spread perfect for whole-grain toast or crackers.
  • Mediterranean Flavors: Incorporate dried oregano, thyme, and a drizzle of olive oil into your cottage cheese for a Mediterranean flair. Add chopped olives or sundried tomatoes for an extra layer of flavor.

Combining cottage cheese with these ingredients not only adds variety to your meals but also increases your intake of vitamins, minerals, and other essential nutrients. The key is to experiment with different combinations to find the flavors you love the most. Whether you’re looking for a sweet snack, a savory spread, or a protein-packed addition to your meals, cottage cheese can be easily adapted to suit your taste preferences and dietary needs.

Expert Tips and Tricks

When selecting and storing cottage cheese, several expert tips and tricks can ensure you choose the best type for your needs and keep it fresh as long as possible.

Selecting the Right Type

  1. Consider Fat Content: Cottage cheese comes in various fat percentages, including nonfat, 1%, 2%, and 4% (regular). Lower-fat options are beneficial for those watching their calorie intake, while full-fat versions may offer a richer taste and texture​​.
  2. Curd Size Matters: The size of the curds can affect the texture and overall mouthfeel of the cottage cheese. Large curds tend to be softer and creamier, whereas small curds offer a denser texture. Personal preference usually dictates the choice here​​.
  3. Look for Live Cultures: Some cottage cheeses are fortified with probiotics, indicated by “live and active cultures” on the label. These can offer additional health benefits, such as improved gut health​​.
  4. Flavor Additions: Plain cottage cheese is versatile, but flavored varieties are also available. Be mindful of added sugars in fruit-flavored options. Always check the ingredient list for added flavors or sweeteners to ensure they align with your dietary preferences​​.

Storage and Preservation

  1. Refrigeration Is Key: Cottage cheese must be stored in the refrigerator. Keep it in its original container with the lid tightly sealed to prevent it from absorbing flavors from other foods and to maintain its freshness​​.
  2. Mind the Expiry Date: Pay attention to the “use by” date on the packaging, but also trust your senses. If the cottage cheese smells sour or the texture seems off, it’s best to discard it​​.
  3. Freezing Isn’t Ideal: While you can freeze cottage cheese for later use, be prepared for changes in texture. Frozen and thawed cottage cheese becomes crumbly and is best used in cooked dishes, rather than enjoyed on its own​​.

By following these expert tips, you can select the cottage cheese that best suits your taste and dietary needs, and ensure it stays fresh and delicious until you’re ready to enjoy it. For more detailed insights, consider exploring resources like The Dairy Dish and Eat Right for comprehensive guides on choosing, using, and storing cottage cheese.

Conclusion

Cottage cheese, a nutritious and versatile dairy product, caters to a wide range of tastes, from savory to sweet. It’s a staple in health-focused diets and a favored ingredient worldwide. Here’s a recap of some popular ways to enjoy cottage cheese.

7 Secrets to Crafting the Perfect Pound Cake Crack

Pound Cake Crack

Introduction to Pound Cake Perfection

Pound cake, a beloved classic, has delighted taste buds for centuries with its simple yet irresistible charm. At the heart of its allure is the perfect crack—a golden, tender split that graces its top, symbolizing both tradition and baking excellence. This article delves into the nuanced art of achieving that coveted crack, offering a blend of science, skill, and a touch of magic. From selecting the right ingredients to mastering oven temperatures, we’ll guide you through the steps to elevate your pound cake from good to sublime.

Essential Ingredients for the Perfect Crack

Creating the perfect pound cake, often referred to as “the perfect crack” for the desirable slight cracking on its surface as it bakes, involves a harmonious blend of essential ingredients. Each component plays a crucial role in achieving the dense yet tender texture that pound cakes are famous for. Let’s delve into the key ingredients and their functions in crafting this beloved dessert.

Flour Types: The Foundation

Flour acts as the structural backbone of pound cake, determining its texture and firmness. While all-purpose flour is commonly used for its reliability and balanced protein content, which offers a tender crumb, bakers also experiment with cake flour for an even finer, softer texture. The choice of flour can significantly affect the cake’s density, with cake flour yielding a lighter, more delicate crumb compared to the slightly denser texture achieved with all-purpose flour.

Sugar & Eggs: The Texture Enhancers

Sugar is not just a sweetener; it’s crucial for the cake’s texture and moisture. It helps tenderize the cake by inhibiting gluten formation, ensuring a fine, soft crumb. Moreover, sugar contributes to the browning and flavor of the cake.

Eggs are indispensable for their dual role as a binder and a leavening agent. They provide structure, richness, and moisture to the cake. The emulsifying properties of eggs help to integrate the fat evenly throughout the batter, contributing to a smooth, uniform texture. Beating eggs with sugar until light and fluffy introduces air into the batter, aiding in the cake’s rise and contributing to its lightness.

Butter & Cream: For Moisture and Richness

Butter is the heart of pound cake, offering unparalleled flavor, richness, and tenderness. Its role extends beyond mere taste; it contributes to the cake’s texture and moistness. The creaming process of butter and sugar is pivotal, creating a network of tiny air pockets that expand during baking, giving the cake its characteristic volume and softness.

In some recipes, cream or milk is added to adjust the batter’s consistency and enhance moisture. The fat content in cream enriches the cake’s flavor and contributes to a creamy, melt-in-your-mouth texture, making the cake even more indulgent.

Conclusion

The perfect pound cake is a symphony of these essential ingredients, each playing its part to achieve the desired balance of flavor, texture, and richness. Flour provides the foundation, sugar and eggs enhance texture and moisture, and butter, possibly supplemented with cream, adds richness and tenderness. Mastery of these components allows bakers to create a pound cake that not only tastes exquisite but also boasts the perfect crack and texture, making it a timeless favorite in the world of desserts.

The Science Behind the Crack

The iconic crack on the surface of a pound cake, along with its perfect rise, is the result of precise chemical reactions and careful control of baking temperature and timing. Understanding the science behind these elements can help bakers achieve the coveted texture and appearance in their pound cake creations.

Chemical Reactions for the Perfect Rise

  1. Leavening: While traditional pound cakes rely on air incorporated during the creaming of butter and sugar, as well as the eggs, for leavening, modern recipes often include chemical leaveners like baking powder or baking soda. These ingredients release carbon dioxide when they come into contact with moisture and heat, causing the batter to rise and creating a light, airy structure. The balance between the amount of leavening agent and the acidity in the batter is crucial for achieving the right rise without affecting the cake’s flavor.
  2. Maillard Reaction: This reaction between amino acids and reducing sugars occurs at higher baking temperatures, contributing to the cake’s golden brown crust. It’s not just about color; the Maillard reaction also enhances the flavor complexity of the pound cake.
  3. Starch Gelatinization and Protein Coagulation: As the cake bakes, heat causes the starch in the flour to absorb moisture and swell, forming a gel-like structure that sets the cake’s framework. Simultaneously, proteins in the eggs and flour coagulate, providing additional structure and firmness. This combination of gelatinization and coagulation solidifies the cake’s crumb as it cools down, ensuring it holds its shape.

Temperature and Timing: The Key Factors

  1. Oven Temperature: Starting the baking process at a higher temperature can help achieve a good rise by setting the edges of the cake quickly and creating a steam build-up inside, which pushes upwards, causing the cake to rise and the characteristic crack to form. However, the temperature should not be too high, as it could cause the cake to rise too quickly and then collapse. A moderate temperature ensures the cake cooks evenly, allowing the center to rise and crack beautifully as the outer edges set.
  2. Baking Timing: The baking time must be precisely calibrated to ensure the cake has enough time to rise and set without becoming dry or overcooked. Too short, and the cake might collapse or remain undercooked in the center. Too long, and the cake could lose moisture, leading to a dry texture. The perfect timing allows the cake to achieve its maximum volume and a moist crumb, with the crack forming naturally as the surface stretches to accommodate the rising batter.

Understanding and controlling these scientific principles and baking variables can transform a simple pound cake into a masterpiece of texture and taste. The perfect crack atop a beautifully risen pound cake is a testament to the delicate balance of chemistry, temperature, and timing in the art of baking.

Mixing Techniques That Matter

The art of making the perfect pound cake not only lies in the choice of ingredients but also in the techniques used to mix them. Two pivotal mixing methods that significantly impact the cake’s texture and rise are the creaming method and the technique of folding in flavors. Mastering these methods ensures a cake that’s both airy and full of flavor without compromising its delicate structure.

The Creaming Method: Ensuring Airiness

The creaming method is foundational in creating a light and airy pound cake. This technique involves beating the butter and sugar together until light, fluffy, and pale in color. The key to perfect creaming lies in:

  1. Room Temperature Butter: Starting with butter that’s at the right temperature (soft but not melted) facilitates the incorporation of air. The sugar crystals cut into the butter, creating air pockets that lighten the batter.
  2. Gradual Addition of Sugar: Adding sugar gradually to the butter ensures better dissolution and more efficient air incorporation. This step is crucial for creating a fine crumb and a soft texture in the finished cake.
  3. Sufficient Beating Time: The mixture should be beaten until it’s noticeably lighter in color and fluffy. This process might take several minutes but is essential for introducing enough air into the batter, which expands during baking, contributing to the cake’s rise.

Fold in Flavors: Adding without Deflating

Incorporating additional flavors or ingredients, such as fruit purees, zest, or chocolate chips, requires a gentle hand to avoid deflating the batter. Folding is the method of choice here:

  1. Use a Spatula: A flexible spatula is the best tool for folding, allowing for a gentle, sweeping motion that incorporates ingredients without crushing the air bubbles created during creaming.
  2. Add Ingredients Gradually: Whether folding in dry ingredients like flour or flavorful additions like lemon zest or cocoa powder, do it gradually and in batches. This minimizes the deflation of the batter and ensures even distribution without overmixing.
  3. Fold, Don’t Stir: The action is a gentle fold rather than a vigorous stir. Cut through the batter with the spatula, gently turn it over, and repeat until the ingredient is just incorporated. The goal is to maintain as much air in the batter as possible, which is crucial for a light, airy cake.

These mixing techniques, when applied correctly, can significantly influence the texture and flavor of a pound cake. The creaming method introduces the necessary air for a tender crumb, while the folding technique ensures that added flavors enhance without compromising the cake’s structure. Together, they are essential skills in the repertoire of any baker aiming to create pound cakes that are as delightful to eat as they are to behold.

Oven Mastery for Pound Cake

Achieving the perfect pound cake is as much about oven mastery as it is about the ingredients and mixing techniques. Two critical aspects of this mastery are preheating and positioning within the oven. Understanding these concepts can significantly impact the cake’s overall texture, rise, and evenness of baking.

Preheating: A Crucial Step

Preheating the oven before baking is essential for several reasons:

  • Immediate Rise: A preheated oven ensures that the pound cake starts to rise as soon as it’s placed inside. The initial high heat activates the leavening agents (if used) and causes the air and vapor bubbles created during the creaming process to expand rapidly, contributing to a good rise.
  • Even Baking: When the oven reaches the desired temperature before the cake is introduced, it promotes even heat distribution. This uniformity helps the cake to cook evenly throughout, preventing undercooked centers or overbrowned edges.
  • Texture and Crust Formation: The correct starting temperature is crucial for achieving the desired texture and crust. It influences the rate at which the cake sets, which in turn affects the crumb structure and the development of a golden crust through the Maillard reaction.

Positioning: Middle Rack Magic

The position of the cake within the oven also plays a pivotal role in ensuring it bakes evenly:

  • Heat Circulation: Placing the cake on the middle rack allows for optimal air and heat circulation around the pan. This position prevents the top or bottom of the cake from baking too quickly, which can happen on the top or bottom racks due to direct heat exposure.
  • Uniform Color and Rise: The middle rack position helps in achieving a uniform color across the surface of the cake and contributes to an even rise. Since heat is more evenly distributed in the center of the oven, the edges and center of the cake bake at a more consistent rate, reducing the risk of a domed or cracked top.
  • Avoiding Direct Heat: By avoiding the direct heat from the top or bottom elements of the oven, the middle rack placement helps in preventing the crust from becoming too dark or the cake from drying out before it’s fully baked through.

Mastering these oven techniques—preheating and positioning—can significantly enhance the quality of your pound cake, ensuring it rises beautifully, bakes evenly, and achieves the perfect texture and crust. These steps, although simple, are foundational to the art of baking and underscore the importance of precision and attention to detail in creating the ideal pound cake.

How to Make Pound Cake Crack?

Creating the perfect pound cake with that desirable crack on top is a hallmark of skilled baking. The crack, a sign of a well-risen cake, adds to the visual appeal and texture. Here’s a step-by-step guide to achieving this effect, along with tips to avoid common mistakes.

Step-by-Step Guide to Make Pound Cake Crack

  1. Prepare Ingredients: Ensure all ingredients, especially butter, eggs, and dairy, are at room temperature. This facilitates better mixing and a smoother batter.
  2. Cream Butter and Sugar: Use a mixer to cream the butter and sugar together until the mixture is light and fluffy. This process incorporates air into the batter, which is crucial for achieving the crack as the cake bakes.
  3. Add Eggs: Beat in the eggs one at a time, ensuring each is fully incorporated before adding the next. This step is essential for structure and leavening.
  4. Sift Dry Ingredients: Sift together the flour and any leavening agents (if used) to avoid clumps. This promotes a uniform texture.
  5. Alternate Dry and Wet Ingredients: Gradually add the dry ingredients to the butter mixture, alternating with any wet ingredients (like milk or cream), beginning and ending with the dry ingredients. Mix until just combined to keep the batter light.
  6. Prepare Pan and Preheat Oven: Grease and flour your baking pan to prevent sticking. Preheat your oven to the recommended temperature to ensure a good rise.
  7. Fill Pan and Smooth Top: Pour the batter into the prepared pan, filling it no more than ¾ full to allow room for rising. Smooth the top with a spatula.
  8. Bake: Place the pan in the preheated oven. Start checking for doneness a few minutes before the recipe’s suggested time. A perfect crack usually forms naturally as the cake rises and the surface expands.

Common Mistakes to Avoid

  • Overmixing the Batter: This can develop the gluten in the flour, leading to a tough cake. Mix until just combined once you start adding flour.
  • Incorrect Oven Temperature: An oven that’s too hot or too cool can affect how the cake rises and cracks. Use an oven thermometer to verify the temperature.
  • Opening the Oven Door Too Early: Resist the urge to check on the cake too early in the baking process. Sudden temperature changes can cause the cake to fall, preventing a crack from forming.
  • Improper Creaming: Not creaming the butter and sugar adequately can result in a dense cake that doesn’t rise well. Cream until the mixture is light in color and fluffy.
  • Not Using Room Temperature Ingredients: Cold ingredients do not mix well and can affect the rise of the cake. Always use room temperature ingredients unless specified otherwise.

By following this guide and being mindful of common pitfalls, you’ll be well on your way to baking a pound cake with the perfect crack. This classic sign of a well-made pound cake not only adds to its beauty but is a testament to the baker’s skill and attention to detail.

Decorating and Serving Suggestions

Decorating and serving a pound cake can transform this classic dessert into a centerpiece that is as delightful to look at as it is to eat. Whether you’re aiming for an elegant presentation or an Instagram-worthy shot, here are some tips on glaze, toppings, and presentation techniques to elevate your pound cake to the next level.

Glaze and Toppings: Enhancing Flavor

  • Simple Glaze: A basic glaze made from confectioners’ sugar and milk or lemon juice can add a sweet and slightly tangy finish to your cake. Drizzle it over the top and let it cascade down the sides for a visually appealing effect. Adjust the thickness by adding more sugar or liquid to suit your preference.
  • Flavored Glazes: Infuse glazes with flavors like vanilla, almond, orange, or bourbon to complement the cake’s flavor. A flavored glaze can add an extra dimension of taste that elevates the overall experience.
  • Fresh Fruit: Topping your pound cake with fresh berries, sliced peaches, or citrus segments can add a refreshing contrast to the dense cake. It not only introduces a burst of color but also adds a natural sweetness and slight acidity that can enhance the cake’s richness.
  • Nuts and Crumbles: For added texture, sprinkle chopped nuts (such as pecans, walnuts, or almonds) or a streusel crumble over the glaze before it sets. This introduces a crunchy element that contrasts nicely with the cake’s tender crumb.

Presentation: Making It Instagram-Worthy

  • Dusting and Layering: A light dusting of powdered sugar can give your cake a sophisticated finish. For a more decadent approach, layer slices with whipped cream, mascarpone, or a fruit compote before serving.
  • Serving Platters: Choose a platter or cake stand that complements the cake’s appearance. Vintage plates can add charm, while sleek, modern stands can give your presentation a contemporary edge.
  • Garnishes: Edible flowers, mint leaves, or citrus zest can add a pop of color and an artisanal touch that makes your cake stand out. Arrange these garnishes strategically for a beautiful composition.
  • Photography: When capturing your cake for social media, consider the lighting and background. Natural light works best for highlighting the textures and colors of your cake. Use a neutral background to make the cake the focal point, or add elements like a cup of coffee or scattered ingredients to create a story around your cake.

By focusing on glaze, toppings, and presentation, you can enhance the flavor and visual appeal of your pound cake, making it not only a delicious treat but also a work of art worthy of any Instagram feed.

Expert Tips for Consistent Results

Achieving consistent results in baking, especially with classics like pound cake, requires more than just following a recipe. Two critical factors that significantly influence the outcome are the quality of ingredients and the equipment used. Here are some expert tips to ensure your baking is always top-notch.

Ingredient Quality: Non-negotiable

  • Butter: Use high-quality butter with a higher fat content for a richer flavor and tender crumb. The quality of butter can dramatically affect the taste and texture of your cake.
  • Flour: Opt for good-quality all-purpose or cake flour, depending on the recipe. Cake flour is milled to a finer texture and treated to lower protein content, resulting in a softer, lighter cake.
  • Eggs: Fresh, organic eggs can contribute to a better structure and flavor. They should be at room temperature to mix more thoroughly into the batter.
  • Sugar: While granulated sugar is standard, consider the source and processing. Some bakers prefer organic or minimally processed sugars for their nuanced flavors.
  • Leaveners: Ensure that any baking powder or soda is fresh for the best rise. Old leaveners lose their effectiveness and can lead to dense cakes.

Equipment: The Right Tools for the Job

  • Oven Thermometer: Oven temperatures can be inaccurate. An oven thermometer ensures you’re baking at the correct temperature for the perfect rise and texture.
  • Quality Bakeware: Invest in heavy-duty, light-colored baking pans. Dark or thin pans can cause uneven baking and overbrowning. The size and material of the pan can affect baking time and the cake’s texture.
  • Stand Mixer or Hand Mixer: A good mixer ensures that ingredients are thoroughly and evenly incorporated. The creaming process, crucial for light and airy cakes, is much easier with a powerful mixer.
  • Measuring Tools: Accurate measuring is crucial. Use spoons and cups specifically designed for baking, and consider a kitchen scale for precision. Ingredients like flour should be spooned into measuring cups and leveled off, not scooped, to avoid over-measuring.
  • Spatulas and Whisks: Silicone spatulas are ideal for scraping every bit of batter from the bowl, while whisks are essential for mixing dry ingredients or beating eggs.

Adhering to these expert tips on ingredient quality and equipment can make a significant difference in your baking. High-quality ingredients ensure your cake has the best flavor and texture, while the right tools contribute to consistent results and ease of preparation. Together, they set the foundation for baking success, allowing your skills and creativity to shine through in every delicious slice.

Troubleshooting Common Issues

Troubleshooting common baking issues, especially with pound cakes, is essential for achieving the perfect balance in texture and appearance. Here are some tips for addressing issues related to cracks that are too big or small and combating dryness or overbaking.

Cracks Too Big or Small: Finding Balance

  • Cracks Too Big: If the crack on your pound cake is more like a chasm, it might be due to overmixing the batter, which incorporates too much air. This air expands in the oven, causing a large crack. Another cause could be baking at too high a temperature, causing the cake to rise too quickly. To prevent this, ensure you mix the batter until just combined once the dry ingredients are added, and always preheat your oven to the correct temperature.
  • Cracks Too Small or Non-Existent: A minimal or absent crack might indicate undermixing, which doesn’t incorporate enough air for the cake to rise properly, or an oven temperature that’s too low, leading to a slow rise without sufficient expansion at the top. To fix this, ensure proper mixing and verify your oven temperature with an oven thermometer.

Dryness and Overbaking: Prevention and Fixes

  • Preventing Dryness: Dry pound cake often results from too much flour or baking for too long. To prevent this, measure your flour accurately by spooning it into a measuring cup and leveling it off, rather than scooping directly from the container, which can compact the flour. Also, start checking for doneness a few minutes before the recipe suggests. A toothpick inserted into the cake should come out with a few moist crumbs attached, not completely clean.
  • Fixing a Dry Cake: If your cake turns out dry, try brushing it with a simple syrup (equal parts water and sugar, heated until the sugar dissolves). This can add moisture back into the cake. For serving, consider pairing it with a moist component, like whipped cream or a fruit compote, to help offset the dryness.
  • Preventing Overbaking: Use an oven thermometer to ensure the accuracy of your oven’s temperature settings. Overbaking is often the result of the oven running hotter than indicated. Additionally, understanding your specific oven’s quirks (such as hot spots) can help you better judge baking times.
  • Fixes for Overbaked Cake: While you can’t undo overbaking, serving strategies can mitigate its effects. Similar to addressing dryness, employing syrups, creams, or sauces can help re-introduce moisture to the cake when served.

By understanding and addressing these common issues, you can significantly improve the quality of your pound cakes, achieving the desired texture and appearance. Remember, successful baking is as much about technique and precision as it is about quality ingredients and passion.

The Cultural Significance of Pound Cake

The pound cake, with its simple elegance and rich history, holds a special place in the culinary traditions of many cultures around the world. Its cultural significance extends far beyond its basic ingredients, embodying centuries of baking traditions, regional adaptations, and shared moments across countless family tables.

Historical Insights

The origins of the pound cake can be traced back to Europe in the early 1700s. The cake’s name comes from its traditional recipe, which called for one pound each of flour, butter, eggs, and sugar. This simple formula made it easy to remember and resulted in a rich, dense cake that could feed many people. Initially, the cake was a luxury, as the ingredients were costly and not readily available to the average person.

As the ingredients became more accessible, the popularity of pound cake spread. It became a staple for celebrations and family gatherings, appreciated for both its delicious taste and its ability to be made in large quantities. The pound cake also served as a canvas for bakers to add their personal touches, incorporating local flavors and available ingredients.

Regional Variations: A World of Pound Cakes

As the pound cake recipe migrated across continents, it adapted to local tastes and ingredients, leading to a delightful variety of regional variations.

  • American South: The Southern United States is renowned for its pound cakes, often infused with flavors like lemon, vanilla, and almond. Sour cream or buttermilk is commonly added for moisture and tang, and glazes or icings frequently top these cakes.
  • France: The French “quatre-quarts,” meaning “four quarters,” closely resembles the traditional pound cake, with equal parts (by weight) flour, sugar, eggs, and butter. It often includes fruit or nut additions and is known for its buttery flavor.
  • Germany: The German “Sandkuchen” is a variation of the pound cake, known for its sandy texture. It often includes flavors such as lemon or almond and might be dusted with powdered sugar.
  • Italy: Italy offers the “Pan di Spagna,” a lighter version of the pound cake made with separated eggs whipped to incorporate air, resulting in a sponge-like texture. It’s often used as a base for layered cakes soaked with syrups or liqueurs.
  • Mexico: The Mexican “panqué” is a beloved version of the pound cake, commonly enhanced with nuts or dried fruits and enjoyed as a breakfast cake or with afternoon coffee.

These regional variations showcase the versatility of the pound cake and its ability to incorporate local flavors and traditions. From its humble beginnings to its global variations, the pound cake symbolizes the comfort of home baking and the joy of sharing food with loved ones. Its enduring popularity underscores its simplicity and adaptability, making it a cherished dessert in many cultures around the world.

conclusion

The pound cake’s journey from a simple European dessert to a global culinary staple highlights its universal appeal and significant role in the culinary traditions worldwide. Its evolution from the basic, rich formula to the myriad of regional variations exemplifies the beauty of baking and its ability to adapt across cultures and tastes.

Each version of the pound cake, from the French “quatre-quarts” to the Mexican “panqué,” not only offers a glimpse into local culinary preferences but also showcases the creativity and innovation inherent in baking. These adaptations underline the cake’s versatility and its place in celebrations, gatherings, and everyday life across different societies.

Furthermore, the pound cake represents more than just a dessert; it’s a medium for sharing, connection, and cultural expression. Its enduring popularity across generations speaks to the joy and comfort found in the act of baking and sharing food. Whether it serves as a base for experimenting with new flavors or a traditional recipe passed down through families, the pound cake remains a beloved symbol of culinary tradition and innovation.

5 Must-Know Facts About Gluten-Free Lunch Meat

gluten free lunch meat

Introduction to Gluten-Free Lunch Meat

Embarking on a gluten-free journey can be a challenging yet rewarding endeavor, especially when it comes to navigating the world of processed foods. Among these, lunch meats are a staple in many diets, offering convenience and variety.

However, for those with celiac disease, gluten sensitivity, or anyone choosing to eliminate gluten from their diet, finding suitable options can pose a significant hurdle. This article aims to shed light on gluten-free lunch meats, delving into what makes a lunch meat gluten-free, the importance of choosing these options for health and dietary reasons, and highlighting the various types available on the market. We’ll also provide practical tips for selecting and enjoying gluten-free lunch meat, ensuring you can make informed choices without compromising on taste or quality. Whether you’re new to the gluten-free lifestyle or looking to expand your dietary options, this guide seeks to empower you with knowledge and confidence in selecting the best gluten-free lunch meats for your meals.

What Makes Lunch Meat Gluten-Free?

In recent years, the shift towards gluten-free diets has extended beyond those with celiac disease to include individuals with gluten sensitivity and those who choose a gluten-free lifestyle for its perceived health benefits. This trend has significantly impacted the food industry, leading to a surge in demand for gluten-free products, including lunch meats. Understanding what makes lunch meat gluten-free is crucial for consumers who need or choose to avoid gluten. This article will explore the ingredients to look for in gluten-free lunch meats and the common gluten contaminants found in processed meats.

Ingredients to Look For

When it comes to identifying gluten-free lunch meat, the key lies in the ingredients list. Gluten-free lunch meats should be free from wheat, barley, rye, and any derivatives of these grains. Here are some ingredients that indicate a lunch meat is gluten-free:

  • Meat: Naturally, meat is gluten-free. Whether it’s turkey, chicken, beef, or ham, the primary ingredient itself does not contain gluten. However, the processing and additives can introduce gluten.
  • Salt and Sugar: Used for curing meat, both salt and sugar are gluten-free.
  • Natural Spices: Pure spices are generally gluten-free, but it’s essential to ensure they haven’t been processed with gluten-containing ingredients.
  • Vinegar: Distilled vinegar is gluten-free, but malt vinegar, derived from barley, is not.

Additionally, look for labels that explicitly state the product is gluten-free. Many brands have begun to recognize the importance of catering to the gluten-free market and are labeling their products accordingly.

Common Gluten Contaminants in Processed Meat

Despite the inherent gluten-free nature of meat, cross-contamination is a significant concern, particularly in processed meats. Here are some common gluten contaminants in processed lunch meats:

  • Fillers and Binders: Some lunch meats use fillers and binders to improve texture or extend shelf life. Wheat-based fillers are a common source of gluten.
  • Flavorings and Seasonings: While pure spices are gluten-free, pre-mixed seasonings and flavorings may contain gluten as a hidden ingredient. Soy sauce, for example, often contains wheat.
  • Broths and Marinades: Some processed meats are flavored with broths or marinated for tenderness and taste. These liquid additives can contain gluten unless specified otherwise.
  • Cross-Contamination: This can occur during the manufacturing process, especially if the facility also processes gluten-containing products. Equipment and surfaces can retain gluten particles, contaminating gluten-free items.

For those with celiac disease or gluten sensitivity, consuming gluten-free lunch meat is essential to avoid adverse health effects. Always read labels carefully, look for gluten-free certifications, and when in doubt, contact the manufacturer for clarification. As the demand for gluten-free products continues to rise, more brands are likely to provide clearer labeling and safer processing practices to accommodate this growing segment of the population.

Benefits of Gluten-Free Lunch Meat

Opting for gluten-free lunch meat offers significant benefits, particularly for those with celiac disease, gluten sensitivities, or anyone looking to improve their overall health and diet. Here are the main advantages:

Health Benefits

  • Improved Digestive Health: For individuals sensitive to gluten, switching to gluten-free lunch meat can lead to better digestive health, reducing symptoms such as bloating, gas, and diarrhea.
  • Increased Energy Levels: Gluten sensitivity can cause fatigue. Gluten-free diets often lead to a boost in energy levels.
  • Weight Management: While not a direct consequence of eliminating gluten, choosing gluten-free options can lead to a more mindful approach to diet and nutrition, potentially aiding in weight management.
  • Reduced Inflammation: For some, gluten can trigger inflammation. A gluten-free diet can help reduce this, alleviating discomfort and potential long-term health issues.

Dietary Inclusion for Celiac Disease Sufferers

  • Safe Nutritional Options: Gluten-free lunch meats provide a safe alternative for those with celiac disease, ensuring they can enjoy a wider variety of foods without health risks.
  • Prevention of Complications: By adhering to a gluten-free diet, individuals with celiac disease can prevent serious complications such as intestinal damage, nutrient deficiencies, and increased risk of certain gastrointestinal cancers.
  • Enhanced Quality of Life: With more gluten-free options available, including lunch meats, individuals with celiac disease can enjoy a more diverse and enjoyable diet, improving their overall quality of life.

Choosing gluten-free lunch meat is more than a dietary restriction; it’s a step towards better health, especially for those with celiac disease or gluten sensitivity. It allows for dietary inclusion, ensuring that individuals can enjoy delicious, varied meals without compromising their health. As awareness and demand increase, the availability and variety of gluten-free lunch meats continue to grow, making it easier than ever to incorporate these products into a healthy, gluten-free diet.

Choosing the Right Gluten-Free Lunch Meat

It seems there was an error in retrieving information directly related to choosing the right gluten-free lunch meat, including reading labels correctly and identifying trusted brands and products. Instead, information was provided on gluten-free makeup brands, which is not relevant to your request.

However, I can still provide guidance on choosing the right gluten-free lunch meat:

Reading Labels Correctly

When selecting gluten-free lunch meat, it’s crucial to read labels carefully. Here are some tips:

  • Look for Gluten-Free Certification: Many products now carry a gluten-free certification symbol from recognized organizations, indicating they meet strict gluten-free standards.
  • Check for Allergen Statements: These statements can help identify if a product may contain gluten or was processed in a facility with gluten-containing products.
  • Understand Ingredient Lists: Beyond obvious gluten sources like wheat, barley, and rye, be aware of less obvious sources like malt or hydrolyzed vegetable protein, which can contain gluten.

Trusted Brands and Products

While I can’t provide external links, I recommend looking for brands that are known for their commitment to gluten-free products. Many reputable brands have gluten-free lunch meats and go to great lengths to avoid cross-contamination in their processing facilities.

You can find trusted gluten-free brands by:

  • Researching Online: Gluten-free communities and forums often share and recommend brands that are safe for individuals with celiac disease or gluten sensitivity.
  • Consulting Gluten-Free Certifying Organizations: Websites of organizations that certify gluten-free products often list brands and products that have received their certification.
  • Celiac Disease Foundation (celiac.org): Offers resources and guidance on managing a gluten-free diet, including safe food choices.
  • Gluten Intolerance Group (gluten.org): Provides a directory of certified gluten-free products and brands.
  • Verywell Fit (verywellfit.com): Features articles and lists of gluten-free foods, including lunch meats, with emphasis on health and nutrition.

Remember, it’s always best to contact the manufacturer directly if you have any doubts about a product’s gluten-free status. Manufacturers can provide the most current and accurate information regarding their products and their processing environments.

The Role of Certification in Gluten-Free Meats

Importance of Certification

Certification plays a crucial role in ensuring the safety and reliability of gluten-free meats. For individuals with celiac disease, gluten sensitivity, or those who choose a gluten-free diet for other health reasons, consuming gluten can lead to serious health consequences. Certification by recognized gluten-free organizations offers a layer of trust and security, indicating that a product meets stringent standards for gluten content.

  • Safety Assurance: Gluten-free certifications are awarded by organizations that conduct rigorous testing of products to ensure they contain less than a specified amount of gluten. This threshold is usually set at a level considered safe for most people with celiac disease, such as 20 parts per million (ppm) or less.
  • Cross-Contamination Prevention: Certified gluten-free products are also assessed for their risk of cross-contamination, a common concern in the processing of foods. Certification implies that the manufacturer has followed strict handling and processing protocols to minimize or eliminate this risk.
  • Consumer Confidence: For consumers, choosing certified gluten-free meats can alleviate the stress and uncertainty of label reading. It provides a simple and reliable way to identify products that are safe for their dietary needs.

How to Identify Certified Products

Identifying certified gluten-free products requires knowing what to look for on packaging. Here are tips for spotting certified gluten-free meats:

  • Look for Certification Seals: Gluten-free certification organizations, such as the Gluten-Free Certification Organization (GFCO), Celiac Support Association (CSA), and others, provide seals or logos that manufacturers can display on their packaging. These seals are a quick visual indication that a product is certified gluten-free.
  • Read the Packaging: Beyond the certification seal, check the packaging for any statements about gluten content. Certified products often have additional labeling, such as “certified gluten-free” or “meets the FDA standards for gluten-free.”
  • Check the Manufacturer’s Website: Many manufacturers provide detailed information about their gluten-free products and certification status online. If you’re unsure about a product’s certification status from its packaging, the manufacturer’s website can be a valuable resource.
  • Use Trusted Resources: Websites and apps dedicated to the gluten-free community often have databases or lists of certified gluten-free products and brands. These can be helpful tools for shopping and meal planning.

Remember, while certification is a strong indicator of a product’s safety for gluten-sensitive individuals, it’s always a good idea to remain vigilant about reading labels and staying informed about the manufacturing practices of your favorite brands. Manufacturers can change their formulations or processing practices, so regular checks are wise for staying on top of your gluten-free diet.

Home-Made Gluten-Free Lunch Meat Recipes

Creating your own gluten-free lunch meat at home can be a rewarding and safe way to enjoy delicious, nutritious options without the worry of cross-contamination. Here are some simple recipes and tips to ensure your home-made lunch meats are gluten-free and delicious.

Simple Recipes for Home Preparation

1. Basic Gluten-Free Turkey Breast

  • Ingredients: 1 whole turkey breast (boneless and skinless), 2 tablespoons olive oil, 1 teaspoon salt, 1/2 teaspoon black pepper, 1 teaspoon garlic powder, 1 teaspoon dried thyme.
  • Instructions:
    1. Preheat your oven to 325°F (163°C).
    2. Mix olive oil, salt, pepper, garlic powder, and thyme in a bowl.
    3. Rub the mixture all over the turkey breast.
    4. Place the turkey breast in a baking dish and cover with foil.
    5. Bake for about 60-70 minutes or until the internal temperature reaches 165°F (74°C).
    6. Let it cool before slicing thin.

2. Homemade Gluten-Free Beef Pastrami

  • Ingredients: 2 pounds beef brisket, 1/4 cup coarse salt, 1 tablespoon black pepper, 1 tablespoon paprika, 2 teaspoons garlic powder, 2 teaspoons onion powder, 1 teaspoon ground coriander, 1 teaspoon ground mustard, 1/2 teaspoon smoked paprika.
  • Instructions:
    1. Combine salt, pepper, paprika, garlic powder, onion powder, coriander, and mustard to create a rub.
    2. Apply the rub generously over the brisket.
    3. Wrap the brisket in plastic wrap and refrigerate for 24-48 hours.
    4. Preheat your oven to 300°F (150°C).
    5. Place the brisket on a rack in a roasting pan and cover tightly with foil.
    6. Bake for about 3 hours or until tender.
    7. Uncover and sprinkle with smoked paprika, then bake for an additional 10 minutes.
    8. Let it cool before slicing thin.

Tips for Ensuring Gluten-Free Ingredients

  • Double-Check Spices: Although spices are inherently gluten-free, cross-contamination can occur during processing. Always opt for spices labeled as gluten-free.
  • DIY Spice Mixes: Making your own spice mixes can help ensure they are gluten-free and allows you to adjust flavors to your liking.
  • Read Labels: Even when making homemade lunch meat, some ingredients like mustard or paprika might have added gluten or be processed in a facility that handles gluten. Always read labels carefully.
  • Avoid Cross-Contamination: Use separate utensils, cutting boards, and pans that have not been used to prepare gluten-containing foods, or make sure they are thoroughly cleaned if they have been.
  • Use Fresh Ingredients: Fresh herbs and vegetables are safe and add flavor and nutrition to your meats. Just ensure they haven’t been processed or pre-cut on surfaces that handle gluten-containing products.

By following these recipes and tips, you can enjoy delicious, homemade gluten-free lunch meats that are safe for those with celiac disease or gluten sensitivities. Not only do these home-prepared options allow for customization according to personal taste preferences, but they also offer a healthier alternative to store-bought processed meats, free from preservatives and unwanted additives.

Navigating Dining Out: Gluten-Free Options

Eating out when following a gluten-free diet can be challenging, but with the right knowledge and approach, it can also be a rewarding experience. Here are some tips on how to eat out safely and questions to ask when ordering, ensuring you can enjoy dining out without compromising your health or dietary needs.

How to Eat Out Safely

  1. Choose the Right Restaurant: Opt for restaurants known for their gluten-free options or those that offer a gluten-free menu. Many establishments are now aware of dietary restrictions and cater to gluten-free diets.
  2. Research Ahead of Time: Before visiting, check the restaurant’s menu online. Some places provide detailed allergen information or specify which dishes are gluten-free.
  3. Inform Your Server: Upon arrival, let your server know about your dietary restrictions. They can provide recommendations or alert the kitchen to take extra precautions to avoid cross-contamination.
  4. Look for Certification: Some restaurants are certified by gluten-free organizations, indicating they adhere to strict gluten-free preparation and cooking standards.
  5. Consider Cross-Contamination: Even if a dish is gluten-free, there’s always a risk of cross-contamination in a kitchen that handles gluten-containing ingredients. Don’t hesitate to ask how the kitchen manages this risk.

Questions to Ask When Ordering

  1. Is There a Dedicated Gluten-Free Menu? This is the first and most straightforward question that can help you narrow down your options quickly.
  2. How is the Gluten-Free Food Prepared? Ask about the preparation process to ensure there’s no cross-contamination. For instance, are gluten-free pizzas baked on the same surface as regular pizzas?
  3. Are the Ingredients Naturally Gluten-Free? Understanding whether the dish uses inherently gluten-free ingredients or substitutes can help gauge its safety.
  4. Do You Use Separate Cooking Utensils and Equipment for Gluten-Free Dishes? This question addresses the risk of cross-contamination during cooking.
  5. Can the Dish Be Modified to Be Gluten-Free? Sometimes, a simple modification (like substituting a sauce or removing croutons) can make a dish safe for those with gluten sensitivities.
  6. How Do You Train Your Staff About Gluten and Cross-Contamination? A restaurant that invests in training its staff about gluten sensitivities and cross-contamination is more likely to provide safe options.

By asking these questions, you can feel more confident in your dining choices and enjoy a safe, gluten-free meal. Remember, your health is paramount, so don’t hesitate to inquire and ensure your meal will meet your dietary needs. Dining out gluten-free requires a bit of vigilance, but it can still be an enjoyable and delicious experience.

Gluten-Free Lunch Meat Alternatives

For individuals following a gluten-free diet, whether due to celiac disease, gluten sensitivity, or personal preference, finding suitable alternatives to traditional lunch meats is essential. Beyond the realm of gluten-free processed meats, there are nutritious and delicious options that cater to a variety of tastes and dietary needs. Here are some plant-based alternatives and DIY meat substitutes that are naturally gluten-free and can enrich your meals with new flavors and textures.

Plant-Based Alternatives

1. Tofu

  • You can marinate and bake tofu, a versatile and protein-rich food made from soybeans, to create delicious slices that mimic the texture and flavor of lunch meats. Try marinating thin slices of tofu in a gluten-free soy sauce or tamari, garlic, and your favorite herbs before baking until crispy.

2. Tempeh

  • Tempeh is another soy-based option that has a firmer texture than tofu and a nutty flavor. It can be sliced and marinated in a mix of gluten-free tamari, apple cider vinegar, smoked paprika, and a touch of maple syrup, then baked or pan-fried until golden brown.

3. Chickpea and Bean Spreads

  • For a different approach, chickpeas and beans can be mashed and seasoned to create spreads that are perfect for sandwiches. Add in fresh herbs, spices, and a bit of lemon juice for a refreshing and filling alternative to sliced meats.

DIY Meat Substitutes

1. Gluten-Free Seitan

  • While traditional seitan is made from wheat gluten, it’s possible to create a gluten-free version using chickpea flour, nutritional yeast, and a blend of spices. This mixture can be cooked and sliced to create a chewy, protein-rich meat substitute.

2. Vegetable Slices

  • Thick slices of vegetables such as eggplant, zucchini, and portobello mushrooms can be marinated and grilled or baked to create flavorful and nutritious sandwich fillings. Experiment with different marinades to find your favorite combination.

3. Jackfruit

  • Young green jackfruit has a texture remarkably similar to shredded meat and is excellent for making gluten-free alternatives to traditional pulled pork or chicken. Cook it with a gluten-free barbecue sauce or a savory tomato-based sauce for a delicious sandwich filling.

Tips for Success

  • Experiment with Marinades: The key to delicious plant-based lunch meats is in the marinade. Use a variety of gluten-free sauces, spices, and herbs to achieve the flavors you love.
  • Texture is Important: Achieve the right texture by baking, grilling, or pan-frying your alternatives until they reach the desired consistency.
  • Check Labels: When using packaged ingredients like tofu or tempeh, always check labels to ensure they are certified gluten-free, as cross-contamination can occur during processing.

By exploring plant-based alternatives and DIY meat substitutes, you can enjoy a diverse and flavorful range of gluten-free lunch options. These alternatives not only cater to dietary restrictions but also offer health benefits and can be a part of a balanced diet.

Storing and Handling Gluten-Free Meats

Proper storage and handling of gluten-free meats are crucial not only to maintain freshness but also to avoid cross-contamination, ensuring those with celiac disease or gluten sensitivities can safely enjoy their meals. Here are best practices for storing and handling gluten-free meats, focusing on both freshness and safety.

Best Practices for Freshness

  • Refrigeration: Store gluten-free meats in the refrigerator immediately after purchasing or preparing them. Raw meats should be kept at 40°F (4°C) or below, ideally on the bottom shelf to prevent any juices from contaminating other foods.
  • Freezing: For long-term storage, gluten-free meats can be frozen. Wrap them tightly in plastic wrap, aluminum foil, or freezer paper, or place them in freezer bags to prevent freezer burn. Label the packages with the date of freezing. Most meats will retain quality for up to 4 months in the freezer.
  • Marinating: If marinating gluten-free meats, do so in a refrigerator, and use a gluten-free marinade. Ensure to marinate in a container that prevents leakage to avoid cross-contamination.
  • Cooking: Use a separate set of cooking tools (utensils, pans, grills) for gluten-free meats or thoroughly clean them if they have been used with gluten-containing foods. This prevents cross-contamination during the cooking process.

Avoiding Cross-Contamination

  • Separate Utensils and Cutting Boards: Always use separate, dedicated utensils, cutting boards, and serving plates for gluten-free meats. If this isn’t possible, thoroughly wash them with soap and hot water between uses.
  • Dedicated Storage Areas: In both the refrigerator and pantry, designate specific areas or shelves for gluten-free products, including meats, to avoid accidental cross-contamination.
  • Use Separate Condiments: Condiments and spreads can become contaminated with gluten through shared utensils. Use squeeze bottles where possible or maintain separate, labeled jars for gluten-free use.
  • Educate Household Members: Make sure everyone in your household understands the importance of keeping gluten-free meats and products separate from gluten-containing ones. Education about cross-contamination is key to a safe kitchen environment.
  • Washing Hands and Surfaces: Always wash your hands thoroughly before and after handling gluten-free meats. Additionally, clean all kitchen surfaces, including countertops and stove tops, before preparing gluten-free meals to eliminate any gluten residues.

By adhering to these storage and handling practices, you can significantly reduce the risk of cross-contamination and ensure the safety and freshness of gluten-free meats. This vigilance allows individuals with gluten-related disorders to enjoy their meals with peace of mind, knowing their food is not only delicious but also safe for their dietary needs.

The Future of Gluten-Free Lunch Meat

The landscape of gluten-free lunch meat is evolving rapidly, driven by advancements in food science and changing consumer demands. Significant growth and innovation are set to define the future of this market segment, mirroring broader trends in health, wellness, and dietary needs. Here’s a look at what we can expect in terms of innovations in food science and predictions for market trends.

Innovations in Food Science

  • Improved Taste and Texture: One of the primary focuses of food science innovation in gluten-free products is enhancing the taste and texture to more closely mimic their gluten-containing counterparts. By harnessing novel protein sources and natural binders, manufacturers will enable future gluten-free lunch meats to offer superior sensory experiences.
  • Nutritional Enhancements: Beyond merely removing gluten, future gluten-free lunch meats will likely be enhanced with additional nutrients, such as fiber, vitamins, and minerals, to offer greater health benefits. This shift is in response to a growing consumer desire for foods that support overall well-being.
  • Allergen-Free Options: As food scientists work to accommodate gluten sensitivities, there’s also a push towards creating products free from other common allergens, such as soy, nuts, and dairy. This inclusive approach will make gluten-free lunch meats safe for a wider range of consumers with dietary restrictions.
  • Sustainable and Ethical Production: Innovations in food science are also focusing on sustainability and ethical considerations. This includes lab-grown meats and plant-based alternatives that require fewer resources to produce and offer an ethical alternative to traditional meat.

Predictions for Market Trends

  • Increased Variety and Availability: As demand for gluten-free products continues to rise, consumers can expect to see a wider variety of gluten-free lunch meat options available, both in specialty stores and mainstream supermarkets.
  • Growth of Plant-Based Alternatives: The rise of plant-based diets is contributing to an increase in gluten-free, plant-based lunch meat alternatives. These products cater not only to those avoiding gluten but also to vegetarians, vegans, and environmentally conscious consumers.
  • Transparent Labeling and Certification: With the growing emphasis on health and wellness, consumers are becoming more discerning about what they eat. This will lead to more transparent labeling of gluten-free products, including clear information on ingredients, processing practices, and gluten-free certifications.
  • Technological Advancements in Production: Advances in technology will streamline the production of gluten-free lunch meats, making them more affordable and accessible. This includes the use of precision fermentation and 3D food printing to create complex textures and flavors without gluten.

The future of gluten-free lunch meat is bright, with innovations that promise to improve quality, taste, and nutritional value, while also addressing broader concerns such as allergen sensitivities and sustainability. As the market continues to evolve, consumers can look forward to more diverse and satisfying options that cater to their dietary needs and preferences.

Conclusion:

The future of gluten-free lunch meat is poised for significant growth and innovation, reflecting broader trends towards health-conscious eating and dietary inclusivity. Innovations in food science are already paving the way for more diverse and appealing gluten-free lunch meat options, utilizing new ingredients and processing techniques to enhance flavor, texture, and nutritional value. As consumer awareness and demand for gluten-free products continue to rise, market trends suggest an expanding availability of these products, not just in specialty stores but also in mainstream supermarkets and dining establishments.

Predictions for market trends indicate a continued push towards transparency in labeling, cleaner ingredient lists, and the development of products that cater not only to those with celiac disease or gluten sensitivity but also to a wider audience looking for healthier meat alternatives. The integration of plant-based and lab-grown meat alternatives into the gluten-free market could also play a significant role, offering more sustainable and ethical choices for consumers.

In conclusion, the landscape of gluten-free lunch meat is evolving rapidly, driven by technological advancements and a deepening understanding of dietary needs. As we move forward, the availability of safe, delicious, and varied gluten-free lunch meat options is likely to become a staple in diets worldwide, offering greater flexibility and enjoyment for individuals following a gluten-free lifestyle. The future looks promising, with continued innovation and market expansion making gluten-free dining an easier and more delightful experience for everyone.

5 Easy and Delicious Thin Sliced Chicken Breast Recipes for Every Occasion

thin sliced chicken breast recipes, Easy Chicken Breast Ideas, Quick Chicken Recipes Healthy Chicken Meals

Introduction to Thin Sliced Chicken Breast Recipes

Thin sliced chicken breast recipes are a cornerstone in the culinary world for their versatility, ease of preparation, and delicious taste. Whether you’re an experienced cook or just starting out, these recipes can be a game-changer in your kitchen. Thinly slicing chicken breast not only ensures a quicker cooking time but also allows for a delightful texture and the perfect absorption of flavors. From elegant dinners to casual weeknight meals, thin sliced chicken breast can be the star of dishes for every occasion. The following article will introduce you to five easy and delectable recipes that showcase the potential of this simple yet exquisite ingredient, proving that great taste doesn’t have to be complicated. Get ready to transform your cooking with these must-try thin sliced chicken breast recipes that promise to cater to all tastes and occasions.

Selecting the Perfect Chicken Breast

Tips for Choosing Fresh Chicken Breast

Selecting the right chicken breast is the first step towards creating a delicious meal. Freshness and quality are paramount, and here are some tips to ensure you choose the best:

  1. Check the Color: Look for chicken breast with a pinkish hue. Avoid any pieces that look gray or have yellow spots, as these are signs of aging or poor handling.
  2. Smell Test: Fresh chicken should have a very mild smell. If it emits a strong, unpleasant odor, it’s best to avoid it.
  3. Firmness: Give the chicken a gentle press. Fresh chicken should be firm to the touch and bounce back.
  4. Packaging: Ensure the package is sealed properly without any tears or leaks. Liquid in the package should be minimal, as excess can indicate poor storage.
  5. Sell-By Date: Always check the sell-by or use-by date to make sure it’s within a reasonable timeframe. Even if it looks and smells okay, it’s best not to purchase chicken that is past its sell-by date.
  6. Certification: Look for any certifications that indicate the chicken was raised and processed according to certain standards, such as organic or free-range.

How to Slice Chicken Breast Thinly at Home

Slicing chicken breast thinly at home is a simple technique that can be mastered with a little practice. Here’s how to do it:

  1. Chill the Chicken: It’s easier to slice chicken breast thinly if it’s partially frozen. Place the chicken in the freezer for about 15-20 minutes before you intend to slice it.
  2. Use a Sharp Knife: A sharp chef’s knife or a fillet knife is essential for making clean, even slices. Make sure your knife is well-honed before you begin.
  3. Stabilize the Chicken: Place the chicken breast on a cutting board. You might want to put a damp paper towel under the board to prevent it from sliding.
  4. Slice Against the Grain: Look for the muscle fibers in the chicken breast and slice against them, not parallel. This makes the chicken more tender.
  5. Hold the Chicken Firmly: Use your non-dominant hand to hold the chicken breast in place. Keep your fingers curled back to avoid cuts.
  6. Angle the Knife Slightly: Instead of slicing straight down, angle the knife slightly towards the cutting board. This helps in achieving thinner slices.
  7. Use Smooth, Even Strokes: Apply gentle, consistent pressure and use long, smooth strokes to slice the chicken. Aim for slices about ¼ inch thick or as desired.

By following these tips and techniques, you can ensure that your chicken breast is not only fresh and of high quality but also perfectly sliced for your recipes. Whether you’re preparing a quick sauté or a slow-cooked stew, these foundational skills will elevate your cooking to new heights.

Essential Ingredients for Flavorful Chicken

Tips for Choosing Fresh Chicken Breast

Selecting high-quality, fresh chicken breast is crucial for any recipe. Here are some tips to ensure you choose the best:

  1. Look for Color: Fresh chicken breast should have a pinkish hue. Avoid any pieces that look grayish or translucent, as these are signs of age.
  2. Check the Texture: The meat should feel firm and slightly moist. If it’s sticky, slimy, or overly dry, it’s best to pass.
  3. Smell Test: Fresh chicken has a very mild scent. Any sour or ammonia-like smells indicate that the chicken is past its prime.
  4. Packaging Integrity: Ensure the packaging is intact, with no tears or leaks. Exposure to air can spoil chicken faster.
  5. Sell-By Date: While not the only indicator of freshness, check the sell-by date to ensure you’re getting the freshest option available.

How to Slice Chicken Breast Thinly at Home

Achieving thin slices of chicken breast at home is easier than you might think:

  1. Partially Freeze: Place the chicken breast in the freezer for about 15-30 minutes. This firms up the meat, making it easier to slice.
  2. Use a Sharp Knife: A sharp chef’s knife or a fillet knife is crucial for clean, even slicing.
  3. Butterfly Cut: Start by placing your hand on top of the breast. Slice horizontally, stopping just before you cut all the way through, then open it like a book. This method is great for even cooking.
  4. Thin Slices: For thinner slices, after butterflying, place a piece of plastic wrap over the chicken and gently pound it with a meat mallet to your desired thickness.
  5. Steady Cutting: Slice steadily with a gentle sawing motion, aiming for even thickness throughout for consistent cooking.

Essential Ingredients for Flavorful Chicken

Spices and Herbs That Complement Chicken

Chicken is like a blank canvas that beautifully absorbs the flavors of herbs and spices. Here are some that complement chicken wonderfully:

  • Salt and Pepper: The basics that can never go wrong.
  • Paprika: Adds a sweet-smoky flavor and a vibrant color.
  • Garlic Powder: For a rich, aromatic touch.
  • Rosemary and Thyme: These herbs add a fragrant, earthy flavor perfect for roasting.
  • Lemon Zest: Adds a fresh, citrusy brightness.
  • Cumin: Brings a warm, earthy note to dishes.
  • Chili Powder: For a bit of heat and depth.

Marinating Techniques for Maximum Flavor

Marinating not only tenderizes chicken but also infuses it with flavor:

  1. Acid or Enzyme: Include an acidic component (like lemon juice or vinegar) or an enzymatic one (like pineapple or papaya juice) to help break down tough fibers.
  2. Time: Marinate for at least 30 minutes, but not more than 12 hours. Over-marinating, especially in acidic mixtures, can make the meat mushy.
  3. Fat: Adding oil to your marinade helps transfer fat-soluble flavors into the meat and keeps it moist during cooking.
  4. Seasonings: Incorporate a mix of the spices and herbs mentioned above. Feel free to experiment with different combinations to suit your taste.
  5. Zip-Top Bags: Marinate in a zip-top bag to ensure the chicken is evenly coated and to minimize cleanup. Make sure to turn the bag occasionally.

By selecting the perfect chicken breast and utilizing these marinating techniques with complementary spices and herbs, you’re well on your way to creating flavorful and succulent chicken dishes that will impress anyone.

Innovative Thin Sliced Chicken Breast Recipes

Grilled Lemon Garlic Chicken

This zesty, fragrant dish is a testament to the power of simple ingredients coming together to create a flavorful meal. Marinate thin slices of chicken breast in a mixture of olive oil, lemon juice, minced garlic, chopped rosemary, salt, and pepper for at least 30 minutes (or overnight for deeper flavor). Grill on high heat for 2-3 minutes per side or until fully cooked and serve with a side of grilled vegetables or a fresh salad for a light, satisfying meal.

Crispy Chicken Parmesan

A classic Italian dish with a crispy twist. Begin by seasoning your thin chicken slices with salt and pepper. Dip in flour, then a beaten egg, and finally coat with a mixture of breadcrumbs, Parmesan cheese, and Italian seasoning. Pan-fry in olive oil until the coating is golden and crispy. Top with a spoonful of marinara sauce and a slice of mozzarella cheese. Broil for a minute until the cheese melts and bubbles. Serve over spaghetti with more marinara sauce and a sprinkle of fresh basil.

Asian-Inspired Chicken Stir-Fry

This stir-fry is a quick, delicious way to enjoy chicken with a burst of Asian flavors. Marinate chicken slices in a blend of soy sauce, sesame oil, minced ginger, and garlic for about 30 minutes. Stir-fry in a hot pan or wok with a mix of your favorite vegetables (like bell peppers, broccoli, and snap peas) until the chicken is cooked through and the vegetables are tender-crisp. Finish with a splash of lime juice and serve over steamed rice or noodles.

Mediterranean Chicken Wraps

These wraps are filled with the vibrant flavors of the Mediterranean. Season chicken slices with a mix of oregano, paprika, garlic powder, salt, and pepper. Cook in a skillet until golden and cooked through. On a warm whole wheat wrap, spread a generous layer of hummus, add the cooked chicken, and top with sliced cucumbers, tomatoes, red onions, and feta cheese. Drizzle with tzatziki sauce and roll up the wrap tightly. Cut in half to serve. This makes for a refreshing lunch or light dinner.

Each of these recipes showcases the versatility of thin sliced chicken breast, making it easy to enjoy a delicious and healthy meal any day of the week. Whether you’re in the mood for the comforting flavors of Chicken Parmesan, the fresh zest of Lemon Garlic Chicken, the exotic taste of an Asian Stir-Fry, or the refreshing bite of Mediterranean Wraps, there’s a thin sliced chicken breast recipe here for every palate.

Cooking Techniques for Thin Sliced Chicken Breast

Cooking thin sliced chicken breast involves various techniques that can enhance its flavor and texture. Here are three popular methods, each offering its own unique taste and presentation:

Grilling for a Smoky Flavor

Grilling chicken breasts adds a delightful smoky flavor and appealing grill marks, making it perfect for summer barbecues or a simple family dinner. To achieve the best results:

  • Preheat your grill to a medium-high heat to ensure even cooking.
  • Marinate or brush the chicken with oil and your choice of seasonings to prevent sticking and add flavor.
  • Grill for a few minutes on each side, until the chicken is cooked through and has beautiful char marks.

Pan-Frying for Crispiness

Pan-frying is ideal for achieving a crispy outer texture while keeping the inside moist and tender. Here’s how to pan-fry chicken breast to perfection:

  • Use a heavy skillet (cast iron is great) and heat it with a bit of oil over medium-high heat.
  • Season the chicken as desired, then place it in the pan once the oil is hot.
  • Cook for a few minutes on each side until golden brown and cooked through, adjusting the heat as necessary to prevent burning.

Baking for Healthier Options

Baking chicken breast is a healthier alternative to frying, as it requires less oil. This method is also great for meal prepping or family dinners:

  • Preheat your oven to the recommended temperature (usually around 375°F or 190°C).
  • Season the chicken breasts and place them in a baking dish. You can also add vegetables for a complete meal.
  • Bake until the chicken is thoroughly cooked, usually about 20-25 minutes, depending on the thickness of the slices.

For specific recipes and more detailed instructions, you can explore resources such as The Spruce Eats, which offers a variety of chicken breast recipes including grilling, pan-frying, and baking methods, among others.

Pairing Sides with Your Chicken Dishes

Pairing the right sides with your chicken dishes can transform a simple meal into a memorable dining experience. The key is to balance flavors and textures to complement the chicken. Here’s how to choose the perfect sides for a well-rounded meal.

Vegetable Sides for a Balanced Meal

Vegetables are essential for adding color, nutrition, and freshness to your chicken dishes. Here are some versatile options:

  • Roasted Asparagus: Quick and easy to prepare, roasted asparagus becomes tender and slightly crispy in the oven. Drizzle with olive oil and sprinkle with salt and garlic powder for a simple yet delicious side.
  • Sautéed Green Beans: Sautéed with garlic and a hint of lemon juice, green beans offer a crunchy texture and vibrant color that pairs well with any chicken dish.
  • Grilled Zucchini: Grilled zucchini slices are a great way to add a smoky flavor to your meal. Season with herbs like thyme or oregano for an extra flavor boost.
  • Carrot and Cucumber Salad: For a lighter side, a refreshing salad of shredded carrots and cucumber dressed in a light vinaigrette can cleanse the palate and complement richer chicken flavors.
  • Steamed Broccoli or Cauliflower: Both broccoli and cauliflower are nutritious options that steam beautifully, maintaining their texture and bright color. A sprinkle of Parmesan cheese or a squeeze of lemon can elevate these vegetables.

Starch-Based Sides for a Hearty Dinner

Starch-based sides can add a comforting and satisfying element to your chicken dishes, making the meal more filling.

  • Garlic Mashed Potatoes: Creamy and rich, garlic mashed potatoes are a classic side that pairs wonderfully with chicken, especially when served with gravy.
  • Rice Pilaf: A fragrant rice pilaf, cooked with onions, garlic, and chicken broth, can complement the flavors of your chicken dish while adding a fluffy texture.
  • Quinoa Salad: For a healthier, protein-packed alternative, try a quinoa salad mixed with vegetables and a light dressing. It’s especially good with grilled or roasted chicken.
  • Roasted Sweet Potatoes: Sweet potatoes, roasted until caramelized and tender, offer a sweet and savory contrast to savory chicken dishes.
  • Pasta: Simple pasta tossed in olive oil and Parmesan or a light tomato sauce makes for an easy and versatile side. It’s particularly good with Italian-inspired chicken recipes.

When planning your meal, consider the seasonings and cooking methods used for the chicken to ensure a harmonious blend of flavors across your dishes. A well-chosen side not only complements the chicken but can also elevate the entire meal, making each bite a delightful experience.

Meal Prepping with Thin Sliced Chicken Breast

Meal prepping with thin sliced chicken breast is a smart and efficient way to ensure you have healthy, protein-rich meals ready to go throughout the week. Here’s how to make the most of your meal prep with this versatile ingredient.

Efficient Use of Ingredients

  1. Bulk Preparation: Cook a large batch of chicken breasts at the beginning of the week. You can grill, bake, or pan-fry them with basic seasonings like salt, pepper, and garlic powder. This way, you can easily add them to different dishes throughout the week.
  2. Versatile Marinades: Prepare two or three different marinades, and divide your chicken breasts among them before cooking. This variety will keep your meals interesting and flavorful without requiring completely separate preparations.
  3. Mix and Match: Think about recipes that share similar ingredients but deliver different flavors and textures. For example, you can use the same vegetables for a stir-fry one day and a salad the next, incorporating your cooked chicken in both.

Storage Tips for Longer Freshness

  1. Cooling Down: Allow the cooked chicken to cool completely before storing. This prevents condensation inside the storage container, which can lead to sogginess or spoilage.
  2. Airtight Containers: Use airtight containers to store your chicken in the fridge. This helps maintain freshness and prevents the chicken from absorbing odors from other foods.
  3. Portioning: Store chicken in individual portions for easy grab-and-go lunches or dinners. This not only makes it easier to manage portion sizes but also helps in reducing waste by only taking out what you need.
  4. Freezing: If you’ve cooked more chicken than you can eat within a few days, consider freezing it. Place individual portions in freezer-safe bags, removing as much air as possible before sealing. Frozen cooked chicken can last up to 3 months. Thaw overnight in the fridge before using.
  5. Labeling: Always label your containers with the date of cooking or freezing. This helps you keep track of what needs to be eaten first and ensures you’re enjoying your meals at their best quality.

By following these meal prepping tips, you can enjoy delicious and nutritious chicken-based meals with minimal effort throughout the week. Efficient use of ingredients and proper storage are key to maximizing freshness and flavor in your meal prep routine.

Health Benefits of Lean Chicken Recipes

Lean chicken recipes, particularly those utilizing chicken breast, are a staple in many health-conscious diets. Chicken breast is renowned for its high protein content and low fat, making it an excellent choice for anyone looking to maintain a balanced and nutritious diet. Here’s a closer look at the nutritional values of chicken breast and how to incorporate it into a healthy diet effectively.

Nutritional Values of Chicken Breast

  1. High Protein Content: Chicken breast is an excellent source of lean protein, which is crucial for muscle building, repair, and overall body function. A typical serving (3 ounces or 85 grams) of cooked, skinless chicken breast contains about 26 grams of protein.
  2. Low in Fat: Compared to other cuts of chicken, the breast is lower in fat, particularly saturated fat. This makes it a healthier choice for heart health.
  3. Rich in Vitamins and Minerals: Chicken breast provides a variety of vitamins and minerals, including B vitamins (such as niacin and B6), which are important for energy production and maintaining proper function of the body. It also contains phosphorus, essential for healthy bones and teeth, and selenium, an antioxidant that helps to protect against cellular damage.
  4. Low Calorie: Due to its high protein and low fat content, chicken breast is relatively low in calories, making it a great option for weight management.

Incorporating Chicken into a Healthy Diet

  1. Grill, Bake, or Steam: Opt for cooking methods like grilling, baking, or steaming rather than frying. These methods do not require excessive amounts of added fats, preserving the lean quality of the chicken.
  2. Marinate for Flavor: Instead of relying on heavy sauces or creams, use a variety of herbs, spices, and citrus to marinate the chicken. This enhances the flavor without adding significant calories or sodium.
  3. Balance Your Plate: Pair lean chicken recipes with a variety of vegetables and whole grains to ensure a balanced meal. The fiber from these foods will help you feel full longer, aiding in weight management and providing a broad spectrum of nutrients.
  4. Portion Control: Even with healthier recipes, it’s important to pay attention to portion sizes. A proper serving size of chicken is about 3 ounces cooked, roughly the size of a deck of cards.
  5. Diverse Recipes: Incorporate chicken into a range of recipes to keep your meals interesting and balanced. From salads and soups to stir-fries and wraps, chicken is incredibly versatile.

Lean chicken breast recipes can play a significant role in a healthy diet, offering essential nutrients while helping maintain a healthy weight. By choosing the right cooking methods and pairing chicken with a variety of other nutritious foods, you can enjoy delicious meals that are both satisfying and beneficial for your health.

FAQs About Thin Sliced Chicken Breast Recipes

How do you keep thin chicken breast moist?

To keep thin chicken breast moist, consider the following tips:

  1. Marinate: Soaking the chicken in a marinade can help retain moisture. Ingredients like olive oil, lemon juice, or yogurt in the marinade can tenderize the chicken and enhance its juiciness.
  2. Pound the Chicken: Evenly pounding the chicken breast to an even thickness can promote uniform cooking, preventing dryness in thinner parts.
  3. Avoid Overcooking: Use a meat thermometer to ensure you cook the chicken to the safe minimum internal temperature of 165°F (74°C) without going over.
  4. Let it Rest: After cooking, let the chicken rest for a few minutes before slicing. This allows the juices to redistribute throughout the meat, keeping it moist.

How do you not overcook a thin chicken breast?

Avoiding overcooking requires careful monitoring and proper cooking techniques:

  1. Use a Thermometer: Cooking the chicken until it reaches an internal temperature of 165°F (74°C) is key. A meat thermometer can help you achieve this precision.
  2. Cook on Medium Heat: Cooking on medium heat allows the chicken to cook through evenly without burning the outside.
  3. Timely Flipping: Flip the chicken only once midway through cooking to ensure even exposure to heat.
  4. Thin Cut Cooking Time: Thinly sliced chicken breasts cook quickly, often in just a few minutes per side, depending on the cooking method.

What is thin cut chicken breast called?

Thin cut chicken breast is often referred to as “chicken cutlets.” These are simply chicken breasts that have been sliced horizontally into thinner pieces or pounded to reduce their thickness. They are favored for their shorter cooking times and versatility in recipes.

How long does it take to boil thin sliced chicken breast?

Boiling thin sliced chicken breast typically takes about 10-15 minutes. The exact time can vary based on the thickness of the slices and whether they are started in cold or boiling water. To ensure they are fully cooked, check that the internal temperature has reached 165°F (74°C) with a meat thermometer. Always start with cold water and bring it to a boil to ensure the chicken cooks evenly throughout.

Conclusion:

Mastering the art of cooking with chicken, particularly with thin sliced chicken breast, opens up a world of culinary possibilities. Chicken breast, known for its lean profile and versatility, can be transformed into a myriad of dishes suitable for any occasion, diet, or preference. The key to success lies in understanding both the ingredient itself and the techniques best suited to its preparation.

Pairing these dishes with complementary sides, from vibrant vegetables to hearty starches, elevates the meal to a balanced and satisfying dining experience. Moreover, the efficiency and practicality of meal prepping with chicken breast not only cater to our busy lives but also align with a healthy, nutritious diet.

In conclusion, the journey through the world of thin sliced chicken breast recipes reaffirms the ingredient’s esteemed place in culinary practice. Whether you’re a novice cook or a seasoned chef, the versatility, health benefits, and sheer variety of dishes that can be created with chicken breast make it an indispensable part of modern cooking. By embracing the techniques and tips shared, you are well-equipped to explore the full potential of chicken recipes, enhancing both your cooking skills and your mealtime experiences.

7 Ultimate Tips for Perfect Bake Salmon Sushi Recipe

bake salmon sushi recipe, Can you use canned salmon for sushi bake?

Baked salmon sushi offers a unique and enticing fusion of flavors, combining the delicate, rich taste of baked salmon with the tangy sweetness of seasoned sushi rice and the crisp, salty bite of nori. This contemporary twist on traditional sushi not only elevates the dish to a new level of gourmet delight but also introduces a warm, comforting element to a typically cold and raw cuisine. Ideal for sushi enthusiasts looking to explore new variations or for those who prefer their fish cooked, this recipe is both accessible and versatile, allowing for various adaptations and toppings to suit individual tastes. Whether served as an elegant appetizer or a satisfying main course, baked salmon sushi is a testament to the endless creativity and innovation in the world of culinary arts, promising a memorable dining experience that bridges the gap between traditional and modern flavors.

The Origin of Baked Salmon Sushi

Origin and Cultural Significance

Baked salmon sushi, a delightful variation of traditional sushi, encapsulates the rich cultural heritage and culinary evolution of Japanese cuisine. The roots of sushi in Japan are deep, with the art of combining vinegared rice with various ingredients, especially seafood, dating back centuries. The significant turning point in sushi’s history came with the creation of nigiri-zushi in the early 19th century, where seafood was elegantly placed atop hand-pressed vinegared rice, symbolizing the dawn of modern sushi as a form of fast food during the Edo period.

Evolution Over Time

The journey from the ancient narezushi, a form of fermented fish with rice, to the modern delicacy of baked salmon sushi, demonstrates sushi’s remarkable ability to adapt over time. The origins of narezushi trace back to lacto-fermentation techniques in Southeast Asia, highlighting the global influences that have shaped sushi. The advent of haya-zushi during the Edo period marked a pivotal evolution, introducing vinegar to the rice and eliminating the need for fermentation. This innovation paved the way for the diverse array of sushi types enjoyed today, including the widely popular baked salmon sushi.

For more in-depth exploration of sushi’s fascinating evolution and its enduring cultural significance, consider reading the extensive overview on Wikipedia and the detailed historical account provided in the History of Sushi. These resources shed light on sushi’s journey from a traditional Japanese staple to a global culinary phenomenon, constantly adapting to meet the palates of generations past and present.

Ingredients for the Perfect Bake

Creating the perfect baked salmon sushi involves a delightful blend of essential ingredients, the right choice of salmon, and an array of additional flavors and garnishes that elevate the dish to a culinary masterpiece. Here’s a guide to assembling the ingredients for this delectable dish:

Essential Sushi Ingredients

  • Sushi Rice: The foundation of any sushi dish, ensure the rice is properly rinsed and cooked to achieve the perfect texture.
  • Rice Vinegar, Sugar, and Salt: These are mixed into the cooked sushi rice to give it the characteristic sushi flavor.
  • Nori Sheets: Seaweed sheets that add a crisp texture and oceanic flavor to the sushi bake.

Choosing the Right Salmon

  • Salmon Fillets: Opt for fresh, high-quality salmon fillets. The freshness of the salmon impacts the overall flavor of the dish.
  • Preparation: The salmon should be baked until flaky and then mixed with soy sauce and Kewpie mayo for added flavor.

Additional Flavors and Garnishes

  • Kewpie Mayo and Sriracha: These provide a creamy and spicy element to the dish, enhancing the flavors of the salmon and rice.
  • Furikake Seasoning: A Japanese seasoning that adds a punch of flavor with a mix of sesame seeds, chopped seaweed, salt, and sugar.
  • Sesame Seeds: Both white and black sesame seeds are sprinkled on top for a nutty flavor and decorative touch.
  • Scallions: Chopped scallions are added after baking for a fresh, crisp contrast.
  • Customizable Toppings: The beauty of this dish lies in its versatility. Feel free to add toppings like avocado slices, cucumber, radishes, teriyaki sauce, yum yum sauce, fish roe, asparagus, carrots, or cooked edamame based on your preferences.

This salmon sushi bake combines the traditional elements of a sushi roll in a deconstructed, bakeable form, making it an accessible and customizable option for sushi lovers and those new to sushi alike. The dish is perfect for an easy dinner, a fun appetizer, or a party dish that’s sure to impress. For a detailed recipe and more inspiration, visit Tasting Table’s Salmon Sushi Bake Recipe.

Preparing Your Salmon

Creating the perfect baked salmon sushi involves meticulous preparation, particularly when it comes to the salmon. Here’s a guide on cleaning, slicing, and seasoning your salmon to ensure it’s perfectly suited for this delicious dish.

Cleaning and Slicing Techniques

Cleaning Your Salmon

Before slicing, it’s crucial to clean your salmon properly. Begin by rinsing the salmon fillet under cold water to remove any debris or scales. Pat the salmon dry with paper towels to ensure it’s completely dry. If your salmon fillet still has the skin on, decide whether you want to remove it based on your personal preference and the specific recipe you’re following.

Slicing Your Salmon

For baked salmon sushi, the way you slice the salmon can impact the texture and overall eating experience. After cleaning, if you’re working with a whole fillet, you might consider two main methods for slicing:

  1. Horizontal Slices: Lay the fillet flat and slice it horizontally into thin strips. This method is ideal if you’re aiming for a layered look in your sushi bake.
  2. Cubing: For a more rustic feel or if you’re mixing the salmon into the rice more thoroughly, cutting the salmon into small cubes can be more appropriate.

Ensure your knife is sharp to make clean cuts without tearing the fish. Whether you’re slicing or cubing the salmon, aim for uniform pieces to ensure even cooking.

Seasoning for Success

Basic Seasoning

Seasoning the salmon is where you can really start to build flavor. A simple yet effective seasoning for salmon intended for sushi bake could include:

  • Salt and Pepper: A basic seasoning that should be applied lightly over the salmon pieces to enhance their natural flavors.
  • Soy Sauce: Adds a rich, umami flavor that complements the salmon beautifully. You can marinate the salmon pieces in soy sauce for a few minutes before baking.
  • Sesame Oil: A little drizzle can add depth and a hint of nuttiness.

Enhanced Flavor Profile

For those looking to add more complexity to their baked salmon sushi, consider incorporating:

  • Mirin: A sweet rice wine that adds a subtle sweetness and depth.
  • Ginger: Freshly grated ginger can provide a sharp, spicy note that cuts through the richness of the salmon.
  • Garlic: A little garlic, minced or grated, can add a warm, aromatic quality to the fish.
  • Lemon Zest: Adding a bit of lemon zest can brighten up the dish, lending a fresh, citrusy aroma.

Final Touches

After seasoning, let the salmon sit for a few minutes to marinate and absorb the flavors. This not only enhances the taste but also tenderizes the salmon, making it more succulent.

When baking, keep an eye on the salmon to ensure it doesn’t overcook. The goal is to achieve flaky, moist pieces that will melt in your mouth when combined with the sushi rice and other ingredients in your sushi bake.

By following these cleaning, slicing, and seasoning tips, you’ll be well on your way to creating a delicious baked salmon sushi that’s sure to impress.

The Art of Sushi Rice

Creating the perfect sushi rice is an art that lies at the heart of any sushi dish, including baked salmon sushi. This process involves selecting the right rice variety and employing specific cooking and seasoning techniques to achieve the ideal texture and flavor.

Selecting Rice Varieties

Importance of Choosing the Right Rice

The foundation of good sushi rice begins with selecting the appropriate rice variety. Sushi rice, also known as shari, must be sticky enough to hold together yet retain a distinct, individual grain texture.

Suitable Rice Varieties

  • Short-Grain Japanese Rice: This is the most traditional choice for sushi rice. It’s known for its ability to absorb water and stick together, making it ideal for sushi.
  • Medium-Grain California Rice: If Japanese rice isn’t available, medium-grain rice grown in California can serve as a good substitute. It has similar characteristics in terms of stickiness and texture.

Cooking and Seasoning Methods

Cooking Sushi Rice

Properly cooking sushi rice is crucial for achieving the desired texture.

  1. Rinse the Rice: Begin by rinsing the rice in cold water until the water runs clear. This step removes excess starch, preventing the rice from becoming too sticky.
  2. Ratio and Cooking: Use a 1:1.2 ratio of rice to water. Cook the rice in a rice cooker or on the stovetop. If using a pot, bring the water to a boil, add the rice, cover, reduce to a simmer, and cook until the water is absorbed (about 15-20 minutes).
  3. Rest the Rice: After cooking, let the rice rest covered for about 10 minutes. This allows the rice to finish steaming and become fluffy.

Seasoning Sushi Rice

The seasoning adds the distinctive sushi rice flavor that complements the fish and other ingredients.

  1. Sushi Vinegar Mixture: Prepare a mixture of rice vinegar, sugar, and salt. The typical ratio is 1/4 cup of rice vinegar, 2 tablespoons of sugar, and 1 teaspoon of salt for every 2 cups of uncooked rice. Adjust according to taste.
  2. Season the Rice: Once the rice has rested, transfer it to a wide bowl (preferably wooden, like a hangiri) to cool slightly. Sprinkle the sushi vinegar mixture over the rice, using a cutting motion with a spatula to gently fold it in. This method helps distribute the seasoning evenly without crushing the rice grains.
  3. Cooling: Fan the rice while mixing to cool it down quickly. This process gives sushi rice its characteristic shine and prevents it from becoming mushy.

Final Touches

  • Keep it Covered: Sushi rice should be kept at room temperature until ready to use. Cover it with a damp cloth to prevent drying out.
  • Texture and Flavor: The rice should be sticky yet retain a slight firmness to the bite. The seasoning should taste balanced—not too sweet, salty, or acidic.

Mastering the art of making sushi rice takes practice, but it’s a rewarding skill that elevates your sushi dishes. Whether you’re making traditional rolls or a modern sushi bake, the quality of your sushi rice can make all the difference.

Assembling Baked Salmon Sushi

Assembling baked salmon sushi involves a creative layering process that differs slightly from traditional sushi making. This dish combines the essence of sushi with the comfort of a baked casserole, making for an irresistible fusion that’s perfect for gatherings or a family meal. Here’s how to layer and roll your baked salmon sushi for optimal taste.

Layering for Optimal Taste

The Sushi Rice Foundation

Start with a base of sushi rice, which should be spread evenly at the bottom of your baking dish. The rice acts as the foundation of your sushi bake and should be well-seasoned and slightly cooled for easier handling. Ensure the rice layer is not too thick to maintain a balanced ratio between the rice and toppings.

Adding the Salmon

Over the rice, layer your seasoned, cooked salmon. Whether you’ve opted for flaked, cubed, or sliced salmon, ensure it’s evenly distributed across the rice. This allows every bite to have a perfect mix of rice and salmon. If you’ve added seasonings or marinades to the salmon, ensure it’s not too wet to avoid making the rice soggy.

Creamy Layer

If you’re using a creamy component, such as a mix of mayo and Sriracha, dollop this over the salmon. This layer adds moisture and flavor, creating a delightful contrast with the savory salmon and the tangy rice.

Additional Toppings

Now’s the time to add any additional toppings you desire before the bake goes into the oven. This could include thinly sliced avocados, diced cucumbers, or a sprinkle of furikake for an extra burst of flavor and texture. Remember, fresh toppings like avocado or cucumber should be added after baking to maintain their texture and coolness.

Rolling Techniques

For baked salmon sushi, the traditional rolling technique is replaced by a serving style that emulates the experience of eating sushi.

Serving Style

  • Cut Nori Sheets: Prepare nori (seaweed) sheets by cutting them into manageable pieces for guests to use.
  • Scoop and Roll: Once the sushi bake is cooked and slightly cooled, guests can scoop a portion onto their piece of nori.
  • Rolling: Encourage guests to wrap the nori around the sushi bake filling, creating a hand roll. This interactive eating experience adds fun to the meal and allows everyone to customize their bite.

Final Touches

Before serving, garnish the top of the baked sushi with additional toppings for color and flavor. This could include:

  • Sliced green onions for freshness.
  • A drizzle of soy sauce or a special sushi bake sauce for extra moisture and flavor.
  • A sprinkle of sesame seeds or extra furikake for crunch and umami.

Assembling baked salmon sushi is more about layering and personalization at the table rather than precise rolling techniques. By preparing your ingredients thoughtfully and encouraging guests to create their own sushi rolls, you’ll offer a unique dining experience that’s both delicious and memorable.

The Baking Process

The baking process is a crucial step in making baked salmon sushi, transforming it into a warm, comforting dish with flavors that meld beautifully together. Proper temperature and timing, along with techniques to retain moisture, ensure that your sushi bake comes out perfectly. Here’s how to navigate the baking process.

Temperature and Timing

Setting the Right Temperature

For baked salmon sushi, preheat your oven to 350°F (175°C). This moderate temperature allows the ingredients to warm through and meld together without overcooking the delicate salmon or drying out the sushi rice.

Timing is Key

Bake your assembled sushi bake for about 15-20 minutes. The exact time may vary depending on the depth of your dish and your oven’s characteristics. You’re looking for a lightly golden top and edges that indicate everything is heated through and flavors have combined. Keep an eye on the bake during the last few minutes to prevent overcooking.

Tips for Moisture Retention

Covering During Baking

To prevent the top from drying out or burning, you can cover the dish with aluminum foil for the first 10-15 minutes of baking. Remove the foil for the last 5-10 minutes to allow the top to become slightly crispy and golden.

The Role of Mayonnaise and Sauces

Incorporating a layer of mayonnaise or a creamy sauce not only adds flavor but also helps retain moisture within the salmon and rice. Mixing some mayo directly into the salmon before layering it over the rice can keep the fish moist and tender. Drizzling additional sauce or mayo over the top before baking can protect the surface from drying out.

Adding a Water Bath

For extra moisture retention, especially in dry ovens, place your baking dish within a larger pan filled with water to create a water bath. This method helps to regulate the temperature and ensures that the heat surrounds the sushi bake more gently, reducing the risk of drying out the ingredients.

Avoid Overbaking

Overbaking is the quickest way to dry out your sushi bake. It’s better to err on the side of underbaking, as you can always bake it a bit longer if needed. The ingredients are generally pre-cooked (like the rice and salmon), so you’re essentially warming and melding the flavors rather than cooking from scratch.

Resting Before Serving

Allowing the sushi bake to rest for a few minutes after taking it out of the oven can help redistribute and retain moisture. It also makes the dish easier to serve, as the ingredients set slightly and don’t fall apart as easily when scooping.

By following these guidelines for temperature, timing, and moisture retention, you’ll ensure that your baked salmon sushi is flavorful, moist, and perfectly cooked every time.

Serving and Presentation

Serving and presenting baked salmon sushi involves thoughtful plating strategies and selecting the right accompaniments and sauces to enhance the flavors and dining experience. Here’s how to make your dish not only taste great but also look inviting.

Cutting and Plating Strategies

Cutting

In the case of baked salmon sushi, which is more of a casserole than traditional rolled sushi, cutting isn’t usually necessary. However, if you’ve topped your bake with additional layers of nori or have incorporated any larger elements that need to be divided, ensure your utensil is sharp and cut gently to avoid squashing the layers.

Plating

  • Individual Portions: Consider serving individual portions in small bowls or plates. You can use a spoon or a spatula to scoop out sections of the sushi bake, ensuring each portion has a bit of every layer.
  • Family Style: Presenting the sushi bake in the dish it was baked in encourages a communal dining experience. Place the baking dish in the center of the table on a trivet or heatproof mat. Provide a serving spoon for guests to help themselves.

Accompaniments and Sauces

Accompaniments

The right accompaniments can elevate the sushi bake from a simple dish to a memorable meal. Consider serving with:

  • Pickled Ginger: Offers a refreshing contrast to the richness of the salmon.
  • Wasabi: Adds a spicy kick for those who enjoy heat.
  • Sliced Cucumbers: Provide a cool, crisp texture and freshness.
  • Nori Sheets: Essential for guests to create their own hand rolls with the sushi bake. Cut them into smaller, manageable sizes for easier use.

Sauces

Sauces can add moisture and depth to the baked salmon sushi. Offer a selection of sauces on the side for guests to add according to their taste:

  • Soy Sauce: A classic sushi accompaniment, perfect for dipping.
  • Spicy Mayo: Mix mayonnaise with Sriracha or another hot sauce for a creamy, spicy sauce.
  • Eel Sauce (Unagi Sauce): Offers a sweet and savory flavor that complements the salmon well.
  • Ponzu Sauce: Provides a citrusy soy-based option for those looking for something tangy.

Presentation Tips

  • Garnish: Before serving, sprinkle the top of your sushi bake with thinly sliced green onions, sesame seeds, or a light dusting of furikake for color and texture.
  • Sauce Drizzle: For an aesthetically pleasing presentation, consider drizzling one of the sauces in a zigzag pattern over the top of the bake before adding your final garnishes.
  • Serve with Style: Use decorative plates or bowls that complement the colors and textures of the sushi bake. Small, individual dipping bowls for the sauces can also add a touch of elegance to the presentation.

By focusing on cutting and plating strategies as well as carefully selecting your accompaniments and sauces, you can turn the simple act of serving baked salmon sushi into an impressive and enjoyable dining experience.

Nutritional Benefits

Salmon, as a centerpiece of baked salmon sushi, brings a plethora of nutritional benefits that contribute significantly to a balanced diet. Understanding these benefits can help appreciate not just the flavor but also the health aspects this dish offers.

Health Aspects of Salmon

Omega-3 Fatty Acids

Salmon is renowned for its high content of omega-3 fatty acids, which are essential fats the body cannot produce by itself. Omega-3s are crucial for maintaining heart health by reducing inflammation, lowering blood pressure, and decreasing risk factors for diseases. They also support brain health, potentially reducing the risk of depression and cognitive decline.

High-Quality Protein

Salmon provides high-quality protein, essential for healing, bone health, and maintaining muscle mass. Protein is a fundamental component of a balanced diet, aiding in the repair and building of tissues.

Vitamins and Minerals

Salmon is a rich source of several vitamins and minerals, including:

  • Vitamin B12: Essential for blood formation and brain function.
  • Vitamin D: Critical for bone health and immune function. Salmon is among the few natural food sources of this vitamin, making it especially valuable.
  • Selenium: Plays a role in thyroid function and antioxidant defenses.
  • Potassium: Helps control blood pressure and prevents excess fluid retention.

Balanced Diet Considerations

Incorporating Salmon into a Balanced Diet

When incorporating salmon into your diet through dishes like baked salmon sushi, consider the following to maintain balance:

  • Portion Control: While salmon is nutritious, it’s also rich in calories. Ensure your portion sizes are appropriate for your dietary needs.
  • Diversity: Pair salmon with a variety of vegetables and whole grains. For sushi bake, consider adding avocado, cucumber, and serving it with a side of mixed vegetables or a salad to increase fiber intake and add more nutrients to your meal.
  • Frequency: Including salmon in your diet 2-3 times a week can help you reap its health benefits without overdoing it on any particular nutrient.

Dietary Considerations

For those with dietary restrictions or preferences, salmon sushi bake can be adapted. Use gluten-free soy sauce for a gluten-free option or adjust the toppings and sauces to cater to specific dietary needs.

Creative Variations

Creative variations of baked salmon sushi allow for a delightful exploration of flavors and ingredients, merging traditional sushi elements with innovative fusion concepts. Here are some ideas to inspire your next culinary creation, incorporating different ingredients and embracing fusion flavors.

Incorporating Different Ingredients

Alternative Proteins

  • Crab Meat: Either fresh or imitation crab meat can offer a sweet, delicate flavor reminiscent of California rolls.
  • Tuna: Opt for canned tuna in water for a more budget-friendly option or fresh tuna steaks seared and flaked for a luxurious twist.
  • Shrimp: Cooked and chopped shrimp can add a succulent, seafood flavor to the dish.

Vegetarian Options

  • Tofu: Marinated and baked tofu, cut into small cubes, can serve as a hearty, protein-rich alternative to salmon.
  • Mushroom: Sautéed mushrooms, particularly shiitake or oyster mushrooms, can add a meaty texture and umami depth.
  • Avocado and Cucumber: These can be used not just as toppings but also as main ingredients, layered within the bake for a refreshing, creamy texture.

Grains and Rice Alternatives

  • Quinoa: A protein-packed grain that can stand in for sushi rice, offering a nutty flavor and a different nutritional profile.
  • Cauliflower Rice: For a low-carb version, finely chopped cauliflower mixed with a bit of vinegar and salt mimics the texture and tang of traditional sushi rice.

Fusion Flavors

Mexican-Japanese Fusion

  • Spicy Tuna Nachos: Replace the salmon with spicy tuna and serve the bake on tortilla chips, garnished with sliced jalapeños and a drizzle of chipotle mayo.
  • Sushi Burrito Bake: Layer ingredients akin to a sushi burrito, including rice, salmon, avocado, and spicy mayo, then bake and serve with a side of tortilla wraps for a “make-your-own” sushi burrito experience.

Korean-Japanese Fusion

  • Kimchi Sushi Bake: Add chopped kimchi and a layer of bulgogi beef or tofu for a spicy and savory dish that combines the best of Korean and Japanese flavors.
  • Gochujang Salmon: Mix gochujang (Korean chili paste) into the mayo or the salmon marinade for a spicy kick.

Mediterranean-Japanese Fusion

  • Greek Sushi Bake: Incorporate ingredients like chopped kalamata olives, feta cheese, and sun-dried tomatoes with a layer of spinach for a Mediterranean twist.
  • Salmon and Pesto: Blend basil pesto into the creamy layer or drizzle over the top before serving for an aromatic, herby flavor.

By experimenting with these creative variations and fusion flavors, you can transform the traditional baked salmon sushi into an exciting, global culinary adventure. These variations not only introduce new tastes and textures but also cater to a wide range of dietary preferences and culinary curiosities.

Bake Salmon Sushi Recipe

Creating a delicious Baked Salmon Sushi at home is an exciting way to bring a contemporary twist to traditional sushi. Follow this step-by-step guide, complete with expert tips, to craft a dish that’s sure to impress.

Ingredients:

  • 2 cups sushi rice
  • 2 ½ cups water
  • ¼ cup rice vinegar
  • 2 tablespoons sugar
  • 1 teaspoon salt
  • 1 lb salmon fillet
  • 1 tablespoon olive oil
  • Salt and pepper, to taste
  • ½ cup mayonnaise (preferably Kewpie for authenticity)
  • 1-2 tablespoons Sriracha sauce (adjust to taste)
  • 1 avocado, sliced
  • 1 cucumber, thinly sliced
  • Furikake seasoning, for sprinkling
  • Soy sauce, pickled ginger, and wasabi, for serving
  • Nori sheets, cut into halves or quarters, for serving

Step-by-Step Guide:

Preparing the Rice:

  1. Rinse the sushi rice under cold water until the water runs clear.
  2. Cook the rice with 2 ½ cups of water in a rice cooker or on the stovetop. If using the stovetop, bring to a boil, then cover and simmer for 18-20 minutes.
  3. Season the cooked rice by gently folding in a mixture of rice vinegar, sugar, and salt. Spread the rice on a tray to cool slightly and to stop the cooking process.

Preparing the Salmon:

  1. Preheat your oven to 375°F (190°C). Line a baking sheet with parchment paper.
  2. Season the salmon fillet with olive oil, salt, and pepper. Bake for 12-15 minutes or until cooked through and flaky. Let it cool, then flake the salmon with a fork.
  3. Mix the flaked salmon with mayonnaise and Sriracha sauce, adjusting the amount of Sriracha based on your desired spice level.

Assembling the Bake:

  1. Layer the seasoned sushi rice in a baking dish, pressing it firmly into an even layer.
  2. Spread the salmon mixture over the rice.
  3. Sprinkle a generous amount of furikake seasoning over the top.

Baking:

  1. Bake in the preheated oven for 10-15 minutes, or until the top is slightly golden and heated through.

Finishing Touches:

  1. Garnish with slices of avocado and cucumber. Sprinkle additional furikake if desired.
  2. Serve the bake immediately with nori sheets, allowing guests to scoop the sushi bake onto nori and roll it up to eat. Provide soy sauce, pickled ginger, and wasabi on the side for dipping and extra flavor.

Expert Tips and Tricks:

  • Rice Vinegar Mixture: Heat the vinegar, sugar, and salt together until dissolved before mixing into the rice for a more uniform flavor.
  • Salmon Selection: Opt for fresh, high-quality salmon. If you prefer a raw fish taste similar to traditional sushi, consider using sushi-grade salmon and adding it to the bake just before serving instead of baking it.
  • Customize Your Heat: Adjust the amount of Sriracha in the salmon mixture according to your taste. You can also add a layer of thinly sliced jalapeños between the rice and salmon for extra heat.
  • Texture Contrast: For an added crunch, sprinkle crispy fried onions or tempura flakes over the top before serving.
  • Make Ahead: You can prepare the sushi rice and salmon mixture ahead of time. Assemble and bake just before serving to ensure everything is warm and delicious.

Enjoy crafting this modern, deconstructed sushi dish that combines the warmth of a baked casserole with the classic flavors of sushi.

FAQs

What temperature do you bake sushi at?

Baked sushi, including the popular baked salmon sushi, is typically baked at a moderate oven temperature to ensure the ingredients are heated through without drying out. A common temperature setting is 375°F (190°C). This temperature is hot enough to warm the dish thoroughly and meld the flavors together, while gentle enough to preserve the delicate texture of the rice and toppings. Adjustments might be needed based on your specific oven and the depth of your baking dish.

How to make salmon sushi grade at home?

Making salmon “sushi-grade” at home focuses on reducing the risk of parasites, which is a concern with consuming raw fish. Officially, there’s no regulated standard for “sushi-grade” fish, but here are steps to make salmon safer for raw consumption:

  1. Freezing: According to the FDA, freezing fish at -4°F (-20°C) or below for 7 days, or at -31°F (-35°C) or below until solid and storing at the same temperature for 15 hours, or at -31°F (-35°C) for 24 hours, can kill parasites. Most home freezers won’t reach these temperatures, so purchasing previously frozen salmon from a reputable supplier is recommended.
  2. Selection: Choose fresh, high-quality salmon from trusted fish markets or suppliers known for handling fish intended for raw consumption.

It’s important to note that home freezers may not achieve the necessary temperatures required for making fish truly “sushi-grade,” and there’s always a risk when consuming raw or undercooked seafood.

Can you use canned salmon for sushi bake?

Yes, you can use canned salmon for a sushi bake as a convenient and budget-friendly alternative to fresh salmon. While the flavor and texture will differ from fresh salmon, canned salmon can still create a delicious dish. Here are a few tips for using canned salmon:

  • Drain Well: Ensure the canned salmon is thoroughly drained to remove excess moisture, which could make the sushi bake soggy.
  • Remove Bones and Skin: Some canned salmon comes with bones and skin. While the bones in canned salmon are soft and edible, you may want to remove them along with the skin for a smoother texture.
  • Season Well: Canned salmon might need extra seasoning to enhance its flavor. Adjust the amount of mayonnaise, Sriracha, and other seasonings to ensure the salmon mixture is flavorful and moist.

Conclusion

In crafting a delightful Baked Salmon Sushi, embracing creativity and culinary expertise ensures a dish that’s both a feast for the eyes and a celebration of flavors. As we conclude, consider exploring further within the culinary universe of RecipesPlan for more inspiration and guidance.

For enthusiasts eager to dive deeper into the rice-centric culinary journey, “Are Rice Cakes Healthy for You? An In-Depth Analysis” offers insights that could complement your understanding of sushi rice’s role in a balanced diet. Meanwhile, those curious about the versatility of rice cakes might find “Why Can You Not Microwave Rice Cakes? An In-Depth Exploration” an intriguing read, shedding light on the do’s and don’ts of handling similar ingredients.

As you embark on or continue your culinary journey, integrating knowledge from diverse sources enriches not only your dishes but also your appreciation for the art of cooking. Whether it’s perfecting the Baked Salmon Sushi or exploring the myriad ways rice can be transformed into delightful snacks, RecipesPlan offers a treasure trove of culinary wisdom waiting to be uncovered.

Can You Cook Rice Cakes in the Microwave?

Can You Cook Rice Cakes in the Microwave?

Introduction

Rice cakes, those delightful, versatile snacks that come in various shapes, sizes, and flavors, have become a staple in many households. Whether enjoyed as a light snack or a part of a meal, rice cakes offer a satisfying crunch and a neutral flavor that pairs well with a variety of toppings. From savory to sweet, the possibilities are endless when it comes to enjoying rice cakes.

Microwave cooking has gained immense popularity in recent years, offering convenience and efficiency to busy individuals and families alike. With just the push of a button, you can whip up a meal or snack in minutes, making it the go-to method for those with hectic schedules. And when it comes to rice cakes, the microwave presents an enticing option for quick and easy preparation.

In this comprehensive guide, we’ll delve into the intriguing question: Can you cook rice cakes in the microwave? We’ll explore the ins and outs of this cooking method, providing tips, tricks, and insights to help you achieve perfect rice cakes every time. So, grab your favorite toppings and let’s dive into the world of microwave-cooked rice cakes!

Risks of Cooking Rice Cakes in Microwave

Microwaves are undoubtedly convenient, but like any cooking method, there are potential hazards associated with cooking rice cakes in the microwave. It’s essential to be aware of these risks and take appropriate safety precautions to ensure a safe cooking experience.

Potential hazards:

  1. Uneven heating: Microwaves cook food by agitating water molecules, which can lead to uneven heating. Rice cakes may not cook uniformly, resulting in some areas being overcooked while others remain undercooked.
  2. Burn risk: Rice cakes can become extremely hot when cooked in the microwave, increasing the risk of burns if handled improperly. Care must be taken when removing them from the microwave to avoid accidental burns.
  3. Moisture content: Depending on the type of rice cake and its ingredients, there may be variations in moisture content. Excessive moisture can cause rice cakes to become soggy or chewy when cooked in the microwave.
  4. Potential for explosions: Rice cakes can expand when exposed to heat, leading to the risk of explosions if not properly vented. This is especially true for dense or thick rice cakes that may trap steam during the cooking process.

Safety precautions:

  1. Use microwave-safe cookware: Ensure that the container or plate used to cook rice cakes in the microwave is labeled as microwave-safe. Avoid using metal containers or utensils, as they can cause sparks and damage to the microwave.
  2. Cover loosely: To prevent moisture from escaping and ensure more even cooking, cover the rice cakes loosely with a microwave-safe lid or microwave-safe plastic wrap. Leave a small vent to allow steam to escape safely.
  3. Monitor closely: Keep a close eye on the rice cakes while they’re cooking in the microwave. Check them periodically to ensure they’re cooking evenly and adjust the cooking time if necessary.
  4. Allow to cool: After cooking, allow the rice cakes to cool for a few moments before handling them. They will be extremely hot immediately after cooking and can cause burns if handled too soon.

By being aware of these potential hazards and following the recommended safety precautions, you can enjoy the convenience of cooking rice cakes in the microwave while minimizing the risks associated with this cooking method.

Advantages of Microwave Cooking

Microwave cooking offers several distinct advantages that make it a popular choice for busy individuals and families alike. From time efficiency to energy conservation, here are some of the key benefits of cooking with a microwave:

Time efficiency:

Microwave cooking is renowned for its unparalleled speed. With just a few minutes of cooking time, you can prepare a wide variety of dishes, including rice cakes, in a fraction of the time it would take using conventional cooking methods. This time-saving feature is particularly beneficial for those with hectic schedules or limited time to devote to meal preparation.

Convenience:

One of the most significant advantages of microwave cooking is its unparalleled convenience. With the push of a button, you can quickly and easily cook or reheat food, making it an ideal option for busy individuals on the go. Whether you’re whipping up a quick snack or reheating leftovers from last night’s dinner, the microwave offers unparalleled convenience and ease of use.

Energy conservation:

Compared to conventional cooking methods such as stovetop or oven cooking, microwave cooking is significantly more energy-efficient. Microwaves use electromagnetic waves to heat food directly, rather than heating the surrounding air like traditional ovens or stovetops. This targeted heating process requires less energy and results in reduced cooking times, making microwave cooking a more environmentally friendly option.

In addition to these primary advantages, microwave cooking also offers other benefits, such as minimal preheating time, easy cleanup, and the ability to retain nutrients in food better than some other cooking methods. Overall, microwave cooking is a versatile and efficient way to prepare a wide range of dishes, including delicious rice cakes, with minimal time and effort.

Necessary Equipment

Before diving into the world of microwave cooking, it’s essential to ensure you have the necessary equipment on hand to prepare delicious rice cakes. Here’s what you’ll need:

Microwave-safe cookware:

First and foremost, you’ll need microwave-safe cookware to cook your rice cakes safely and effectively. Look for dishes, plates, or containers that are specifically labeled as microwave-safe to avoid any potential hazards or damage to your microwave. Glass, ceramic, and certain types of plastic are typically safe options for microwave cooking.

Ingredients required:

Now, let’s gather the ingredients you’ll need to whip up a batch of delectable rice cakes in the microwave. Here’s what you’ll need:

  1. Rice cakes: The star of the show! Choose your favorite variety of rice cakes, whether plain, flavored, or multigrain, to serve as the base for your creations.
  2. Toppings: Get creative with your toppings! Whether you prefer sweet or savory, the options are endless. Some popular topping choices include peanut butter, avocado, hummus, sliced vegetables, fruit preserves, cheese, or even smoked salmon.
  3. Additional ingredients: Depending on your recipe preferences, you may want to include additional ingredients such as seasoning blends, herbs, spices, or sauces to enhance the flavor of your rice cakes.

By ensuring you have the necessary equipment and ingredients on hand, you’ll be well-equipped to embark on your microwave cooking adventure and create delicious rice cakes that are sure to delight your taste buds.

Step-by-Step Guide

Before diving into the batter preparation, consider reading about the health aspects in “Are Rice Cakes Healthy for You? An In-Depth Analysis”, which provides a comprehensive look at the nutritional benefits. To start, mix your chosen rice flour with water until you achieve a smooth consistency. For a unique twist, explore the “Chocolate Rice Cakes Recipe” for a delicious variation.

Now that we’ve gathered our equipment and ingredients, let’s dive into the step-by-step process of preparing and cooking rice cakes in the microwave:

Preparation of rice cake batter:

  1. Gather your ingredients: Start by assembling all the ingredients you’ll need to make your rice cake batter. This typically includes rice flour, water, salt, and any additional flavorings or seasonings you’d like to add.
  2. Mix the ingredients: In a mixing bowl, combine the rice flour, water, and salt, stirring until the mixture forms a smooth batter. If desired, you can add in flavorings such as vanilla extract, cocoa powder, or spices to enhance the taste of your rice cakes.
  3. Adjust the consistency: Depending on the type of rice flour you’re using, you may need to adjust the consistency of the batter. Add more water if the batter is too thick or more rice flour if it’s too thin, until you achieve a smooth, pourable consistency.

Cooking process:

  1. Prepare microwave-safe dish: Lightly grease a microwave-safe dish or plate with cooking spray or oil to prevent the rice cakes from sticking during cooking.
  2. Pour the batter: Pour the rice cake batter into the prepared dish, spreading it out evenly with a spatula to ensure uniform thickness.
  3. Cook in the microwave: Place the dish in the microwave and cook the rice cakes on high power for 2-3 minutes, or until they are set and cooked through. Keep a close eye on them to prevent overcooking or burning.

Cooling and serving:

  1. Allow to cool: Once the rice cakes are cooked, remove them from the microwave and allow them to cool for a few minutes in the dish.
  2. Slice and serve: Once cooled, carefully slice the rice cakes into individual servings using a sharp knife. Serve them plain or with your favorite toppings and enjoy!

Now that you have mastered the art of cooking rice cakes in the microwave, you can experiment with different flavors, toppings, and variations to create your own delicious creations. Happy cooking!

FAQs on Rice Cakes

Are rice cakes healthy to eat?

Rice cakes are often considered a healthy snack option due to their low fat content and the fact that they are gluten-free. However, they are also low in essential nutrients and can be high in glycemic index, which may not be suitable for everyone’s diet plan. For a balanced diet, it’s advisable to consume rice cakes with toppings rich in protein and fiber. Learn more about their health benefits in this detailed analysis on Healthline.

Can I store leftover rice cakes?

Yes, leftover rice cakes can be stored to maintain their freshness. Once cooled, place them in an airtight container and store them in a cool, dry place for up to a week. For longer storage, you can freeze them for up to a month. Thaw before reheating or serving. For more storage tips, check out StillTasty.

Can I add flavors to rice cakes?

Absolutely! Rice cakes are incredibly versatile and can be flavored in numerous ways. You can mix in herbs, spices, or sweeteners into the batter before cooking. Additionally, toppings like hummus, avocado, or almond butter can add both flavor and nutritional value. Get creative with flavor ideas from Food Network.

Can I use a microwave-safe plate instead of a cooker?

While traditional rice cakes are usually steamed, you can use a microwave-safe plate for a quick alternative. Ensure the plate is microwave-safe to prevent any accidents. However, the texture and taste might vary slightly from the traditional cooking method. For microwave cooking tips, visit Microwave Cooking for One.

Can I cook frozen rice cakes in the microwave?

Yes, you can cook frozen rice cakes directly in the microwave. Place them on a microwave-safe dish, cover with a damp paper towel to prevent drying out, and heat on high for 1-2 minutes or until thoroughly warmed. Be sure to check if they’re heated evenly to avoid cold spots. For best results, consult the cooking instructions on The Kitchn.

Can I reheat rice cakes in the microwave?

Reheating rice cakes in the microwave is possible. Place the rice cakes on a microwave-safe plate, cover with a damp paper towel to add moisture, and heat for 30 seconds to 1 minute or until warm. Be cautious as overheating can make them hard and chewy. For reheating tips, explore options on Food52.

Conclusion: Rice Cakes – A Balanced Perspective

Rice cakes offer a unique blend of benefits and risks that cater to diverse dietary needs and preferences. On the one hand, they stand out as a low-fat, gluten-free snack option that can easily fit into various diet plans, especially for those seeking weight management or with specific dietary restrictions. Their simplicity and versatility allow for endless flavor combinations, making them a canvas for nutritious toppings that can enhance their nutritional value.

However, it’s essential to acknowledge the risks associated with rice cakes. Due to their high glycemic index, they can lead to spikes in blood sugar levels, making them less ideal for individuals with diabetes or those monitoring their blood sugar levels. Additionally, on their own, rice cakes lack significant nutritional content, emphasizing the importance of pairing them with nutrient-dense foods to create a more balanced snack or meal.

Encouragement for Experimenting with Microwave Cooking

Despite traditional methods of preparation, exploring microwave cooking for rice cakes opens up a realm of convenience and innovation. The microwave offers a quick and easy alternative to steam cooking, allowing for the incorporation of various flavors directly into the batter or through creative toppings post-cooking. This method not only saves time but also encourages culinary creativity, making it an excellent option for busy individuals or those new to cooking.

Microwave cooking is not without its nuances. Achieving the perfect texture and flavor may require a bit of experimentation with cooking times and power settings. However, this process can be an enjoyable and rewarding journey, leading to the discovery of new favorite recipes and methods.

In conclusion, while rice cakes are a simple snack, they hold the potential for nutritional richness and culinary creativity, especially when explored through microwave cooking. Embracing this approach with an open mind and a willingness to experiment can transform the humble rice cake into a delightful treat that complements a healthy and balanced diet. So, go ahead, experiment with your microwave, and discover the myriad of possibilities that rice cakes have to offer!

Is Rice Cakes Healthier Than Potato Chips ?

are rice cakes healthy, Is Rice Cakes Healthier Than Potato Chips

Is Rice Cakes Healthier Than Potato Chips? In the realm of snack choices, the debate between rice cakes and potato chips often arises, with health-conscious consumers seeking to make the best choice for their diet. While both options offer a satisfying crunch, the question remains: Is one truly healthier than the other? Let’s delve into the nutritional differences between rice cakes and potato chips to uncover the answer.

Introduction

Background on Snacking Trends

In the ever-evolving world of dietary habits and health awareness, snacking trends have undergone a significant transformation. Gone are the days when snacks were merely viewed as indulgent treats with little to no nutritional value. Today, the landscape is markedly different, with a growing emphasis on snacks that not only satiate hunger but also contribute positively to one’s health. This shift is reflective of a broader societal move towards health-conscious eating, where the nutritional profile of every bite is scrutinized and valued.

The Rise of Health

The rise of health-conscious eating is not a trend that emerged overnight. It has been building momentum over the years, fueled by increasing awareness of the links between diet and health outcomes. The proliferation of information on the internet, coupled with a surge in wellness culture, has empowered individuals to make more informed choices about their diets. Snacks, as a significant part of daily food intake, have not been exempt from this scrutiny. The result is a discernible shift towards options that promise benefits such as improved energy levels, better weight management, and overall well-being.

Conscious Eating

This newfound emphasis on health-conscious eating has led to a reevaluation of traditional snacking options. Among these, rice cakes and potato chips stand out as two snacks at opposite ends of the health spectrum. Rice cakes, frequently praised for their low calorie count and simple ingredient list, have found favor among individuals in search of a lighter, healthier snack option. Conversely, potato chips, with their irresistible crunch and bold flavors, have faced scrutiny due to their high caloric content, fat, and sodium levels. The question of whether rice cakes are indeed healthier than potato chips is one that merits a closer look, considering the complex interplay of nutrition, taste preferences, and dietary needs that influence snacking choices today.

Understanding Rice Cakes

Rice cakes have become a popular snack for those looking for a lighter, healthier alternative to traditional snacks like potato chips. But what exactly are rice cakes, and how do they stack up nutritionally?

What Are Rice Cakes?

Rice cakes are made from whole grains of rice that are puffed, expanded, and then pressed together to form a cake. They offer a versatile snacking option, ranging from savory to sweet, depending on the toppings or flavorings added.

Nutritional Profile of Rice Cakes

Nutritionally, rice cakes are known for being low in calories, which makes them a go-to snack for weight management. However, they can vary in their nutritional content based on the type of rice used and any additional flavorings or ingredients. Generally, they are a good source of carbohydrates while being low in fat and protein.

Varieties and Flavors

Rice cakes come in a variety of flavors and types, catering to a wide range of taste preferences. From plain and lightly salted to more adventurous flavors like apple cinnamon or chocolate, there’s a rice cake for every palate.

For those interested in exploring different ways to enjoy rice cakes, including creative recipes and flavor combinations, check out “Discover the World of Rice Cakes” for inspiration. Additionally, for chocolate lovers, the “Chocolate Rice Cakes Recipe” offers a delightful twist on the traditional rice cake snack.

Incorporating rice cakes into your diet can be a simple way to enjoy a snack that’s light on calories but satisfying in taste. For more insights into their health benefits and how to make them part of your snacking routine, consider reading “Are Rice Cakes Healthy for You? An In-Depth Analysis”.

Understanding Potato Chips

Potato chips are a central part of snack and convenience food markets in Western countries, with their history and production evolving significantly over time. The allure of potato chips comes from their crunchy texture and the ability to flavor them in countless ways, making them a favorite across the globe.

The Allure of Potato Chips

The crispy texture and vast variety of flavors make potato chips an irresistible snack for many. Their convenience and satisfying crunch have contributed to their widespread popularity, making them a staple at gatherings and a go-to comfort food for many individuals.

Nutritional Downsides

However, potato chips are often criticized for their nutritional profile, which typically includes high levels of calories, fats, and sodium. These aspects can have negative impacts on health, especially when consumed in large quantities. Efforts have been made within the snack industry to offer healthier options with reduced fat and sodium content.

Popular Varieties

The variety of potato chips available today is vast, ranging from classic salted to innovative flavors inspired by cuisines around the world. This diversity caters to a wide range of taste preferences, ensuring that there is a potato chip out there for everyone.

The origins of potato chips trace back to the 1800s, with various stories attributing their creation to chefs aiming to please or playfully annoy their patrons. One popular tale credits George Crum, a chef in Saratoga Springs, New York, with the invention of the potato chip in 1853, aiming to respond to a customer’s complaint about the thickness of his fried potatoes. This invention led to the snack’s popularity in New England and the eventual spread of potato chips as a beloved snack across the United States and beyond. Innovations in packaging, such as Laura Scudder’s wax paper bags in 1926, further facilitated the mass-market spread of potato chips, allowing for extended freshness and reducing the risk of staleness and breakage.

For a detailed exploration of the history and evolution of potato chips, including their invention and spread into the mass market, you can visit sources like Smithsonian Magazine​​ and Wikipedia​​. Britannica​​ offers additional insights into the invention of potato chips and their rise to popularity in New England and across the globe.

Comparative Analysis: Rice Cakes vs. Potato Chips

When considering healthier snack options, it’s crucial to compare the nutritional content, caloric intake, fat content, and sodium levels of popular choices like rice cakes and potato chips. This analysis aims to provide a clearer understanding of the differences between these two snacks, helping you make informed dietary choices.

Nutritional Comparison

Rice cakes typically earn recognition as a healthier alternative owing to their simple ingredient list, primarily comprising puffed rice. They are low in calories and fat but also low in essential nutrients, offering minimal protein, fiber, vitamins, and minerals unless fortified.

Potato chips, on the other hand, are higher in calories and fats, including saturated fats, which can contribute to increased heart disease risk. They do provide some nutrients, such as vitamin C, potassium, and fiber, but these benefits are often outweighed by the snack’s overall fat and calorie content.

Caloric Intake

One of the most significant differences between rice cakes and potato chips is in their caloric intake. A standard serving of rice cakes (about 9 grams or one cake) contains approximately 35 calories, making them a low-calorie snack option.

Conversely, a similar 28-gram serving of potato chips (about 15 chips) typically contains 150 to 200 calories, making them a higher calorie snack choice. This difference is crucial for those monitoring their calorie intake for weight management or health reasons.

Fat Content

Fat content is another critical factor in this comparison. Rice cakes contain negligible amounts of fat, making them an excellent option for low-fat diets.

Potato chips are high in fats, with a standard serving containing around 10 grams of fat, of which 1-3 grams may be saturated. The type of oil used in frying can also add trans fats, which are harmful to heart health.

Sodium Levels

Sodium levels in snacks are essential to consider, especially for those with high blood pressure or looking to reduce sodium intake. Rice cakes can be very low in sodium, especially the plain varieties, but flavored versions may have added sodium.

Potato chips are notoriously high in sodium, with a serving containing anywhere from 170 to 200 mg of sodium, contributing significantly to the daily recommended limit of 2,300 mg. High sodium intake is associated with increased blood pressure and heart disease risk.

In conclusion, while both rice cakes and potato chips can fit into a balanced diet when consumed in moderation, rice cakes offer a lower calorie, fat, and sodium alternative to traditional potato chips. However, it’s important to complement them with nutrient-rich foods to ensure a balanced intake of essential vitamins and minerals.

Health Implications of Rice Cakes and Potato Chips

When considering the health implications of snacks like rice cakes and potato chips, it’s essential to look at how they affect weight management, heart health, and blood sugar levels. Each of these factors plays a crucial role in overall health and well-being.

Effects on Weight Management

Rice Cakes: Due to their low calorie content, rice cakes are often considered a better option for weight management. They can be a part of a calorie-controlled diet, offering a feeling of fullness without a significant calorie load. However, it’s important to note that their nutritional value is relatively low, so pairing them with protein or healthy fats can make a more balanced snack.

Potato Chips: The high caloric density of potato chips makes them less ideal for weight management. Easy to overeat, they can contribute to calorie surplus and weight gain. The satisfying crunch and flavors can lead to consuming more than a serving size without realizing it.

Impact on Heart Health

Rice Cakes: Being low in saturated fats, rice cakes have a minimal direct impact on heart health. However, some flavored varieties may contain added sugars or sodium, which should be consumed in moderation.

Potato Chips: Regularly consuming high amounts of the saturated fats and sodium typically found in potato chips can contribute to heart disease. The fats can lead to higher levels of bad cholesterol, while excessive sodium intake can increase blood pressure, both of which are risk factors for heart disease.

Influence on Blood Sugar Levels

Rice Cakes: Although low in calories, rice cakes have a high glycemic index (GI), meaning they can cause a quick spike in blood sugar levels. This can be particularly concerning for individuals managing diabetes or insulin resistance. Balancing them with low-GI foods can help mitigate this effect.

Potato Chips: While potato chips also have a high GI, their fat content slows the absorption of carbohydrates, leading to a slower rise in blood sugar than might be expected. However, this does not make them a healthy choice, especially considering the other nutritional downsides.

Conclusion

While both rice cakes and potato chips can fit into a balanced diet in moderation, their impact on weight management, heart health, and blood sugar levels varies significantly. Opting for whole, nutrient-dense snacks instead can offer better health benefits and support long-term well-being.

Dietary Considerations

When incorporating rice cakes into your diet, it’s beneficial to understand how they align with various dietary needs, enhancing their appeal across different eating habits:

  • Gluten-Free Options: For those with celiac disease or gluten intolerance, rice cakes offer a worry-free snack option. Being naturally gluten-free, they provide a convenient and safe choice, preventing the discomfort and health issues associated with gluten consumption.
  • Vegan and Vegetarian Considerations: Rice cakes, being inherently plant-based, serve as an ideal snack for vegans and vegetarians. They lend themselves to creative toppings from avocado and tomato to almond butter and bananas, accommodating a diverse range of tastes and adhering to dietary restrictions.
  • Whole Grain Choices: Opting for rice cakes made from whole grains rather than white rice can significantly boost your dietary fiber intake, contributing to better digestion and overall health. Whole grain rice cakes contain more nutrients, including B vitamins, iron, and magnesium, making them a healthier option for those looking to maximize the nutritional value of every snack.

By choosing rice cakes, individuals can enjoy a versatile snack that accommodates a broad spectrum of dietary needs, from gluten-free to whole grain, enriching their diet with a simple yet nutritious option.

Consumer Preferences and Taste: A Deep Dive into Rice Cake Enjoyment

Flavor and Texture Comparison

Rice cakes, a staple in the world of snacks, offer a remarkable range of flavors that cater to a wide audience, from those seeking the comforting taste of savory snacks to others who lean towards the sweet indulgence. This spectrum of flavors ensures that rice cakes have a place in virtually everyone’s pantry, satisfying diverse dietary preferences and whims. The texture of rice cakes is equally appealing; their unique, airy crispness provides a satisfying crunch that’s both light and fulfilling. It’s this distinctive combination of flavor and texture that sets rice cakes apart, making them a favored choice among a broad array of consumers. For a closer look at how rice cakes can fit into a healthy diet, consider exploring “Are Rice Cakes Healthy for You? An In-Depth Analysis”, which sheds light on their nutritional value and how they can be incorporated into various dietary regimens.

Moreover, the article “Discover World Rice Cakes” takes readers on a global tour, showcasing the myriad ways in which different cultures enjoy rice cakes. From the traditional Korean ‘tteok’ to the Japanese ‘senbei’, this exploration underscores the universal appeal of rice cakes and their versatility in flavor and form.

Snack Satisfaction

Rice cakes uniquely strike a balance between being a light, healthier snack option and effectively fulfilling cravings. This balance is largely due to their versatility, not just in terms of flavor, but also in how they can be paired with a multitude of toppings. Whether it’s a layer of almond butter for a protein-packed snack, a spread of avocado for a heart-healthy option, or a drizzle of chocolate for a quick dessert fix, rice cakes serve as the perfect canvas for creativity in the kitchen. This adaptability contributes significantly to their snack satisfaction rating among consumers, who appreciate the ability to tailor their rice cake experience to their current craving or dietary need.

For those looking to explore the sweet potential of rice cakes, the “Chocolate Rice Cakes Recipe” offers a delightful way to transform the simple rice cake into a dessert. It’s a testament to the snack’s versatility and its ability to adapt to the tastes of a wide audience.

Innovating further in the realm of rice cake enjoyment, the “Rice Cake Chip Recipes” article introduces a creative twist on the traditional snack. By turning rice cakes into chips, this variation opens up new avenues for snack time, offering a crunchier, more snackable version that’s perfect for dipping or enjoying on the go.

Conclusion

The appeal of rice cakes lies in their simplicity and the endless possibilities they offer for customization. Their wide range of flavors, satisfying texture, and versatility in preparation make them a staple in the snack world. By exploring the various aspects of rice cake enjoyment, from their health benefits to their global variations and innovative recipes, consumers can discover new ways to appreciate this timeless snack. Through the suggested articles, readers are invited to deepen their understanding and appreciation of rice cakes, exploring the countless ways they can be enjoyed.

Environmental and Ethical Considerations in Rice Cake Production

In the journey from paddies to plates, rice cake production encompasses various environmental and ethical dimensions that merit closer examination. These considerations play a crucial role in shaping consumer choices in today’s increasingly eco-conscious market.

Production Impact on the Environment

The production of rice cakes begins with the cultivation of rice, a process that, depending on the methods employed, can have a significant impact on the environment. Traditional rice farming techniques, for instance, are known for their high water requirements and potential contribution to methane emissions — a potent greenhouse gas. Sustainable practices, such as the System of Rice Intensification (SRI), offer a more eco-friendly approach by reducing water usage and methane emissions, thereby mitigating the environmental footprint of rice cultivation. Transitioning to these sustainable farming practices not only addresses environmental concerns but also supports the long-term viability of rice production.

Moreover, the manufacturing process of transforming rice into cakes involves energy consumption, packaging, and transportation, each with its own environmental implications. Companies are increasingly adopting greener manufacturing technologies, biodegradable packaging, and more efficient logistics to minimize their carbon footprint. For instance, utilizing renewable energy sources for production and opting for minimal, recyclable packaging can significantly reduce the environmental impact associated with rice cake production.

Ethical Sourcing of Ingredients

Beyond the environmental impact, the ethical sourcing of ingredients is paramount in the production of rice cakes. This entails confirming that rice and any supplementary ingredients, like flavors or toppings, originate from suppliers who actively adhere to fair labor practices and bolster local communities. Ethical sourcing aims to avoid exploitation, protect workers’ rights, and contribute positively to the communities involved in the agricultural and manufacturing processes.

Consumers are increasingly seeking transparency in the supply chain, prompting companies to provide more information about the origin of their ingredients and the sustainability of their operations. Certifications like Fair Trade or Rainforest Alliance can serve as indicators of ethical sourcing, offering consumers peace of mind that the products they enjoy are not only delicious but also responsibly produced.

Is Rice Cakes Healthier Than Potato Chips? A Comparative Analysis

In the realm of snack foods, the debate between rice cakes and potato chips is a common one, especially when it comes to health considerations. This analysis aims to shed light on which option might be healthier and provide recommendations for consumption based on their nutritional profiles and impact on overall health.

Overall Health Verdict

Rice cakes are often lauded for their low calorie and low fat content, making them a popular choice for individuals seeking a lighter snack option. Made primarily from puffed rice, they contain minimal ingredients and are free from the high fats and oils found in potato chips. This composition renders rice cakes a lower calorie, lower fat substitute for potato chips, which are commonly deep-fried and contain elevated levels of saturated fats and calories. Furthermore, rice cakes have a simplistic ingredient list, which often appeals to those looking for a snack with fewer processed components.

On the other hand, potato chips, while offering a satisfying crunch and flavor, are generally higher in calories and fats due to their cooking process. The deep-frying method used in producing potato chips results in a snack that can contribute to unhealthy cholesterol levels and weight gain if consumed in excess. Additionally, many potato chips contain added flavors and preservatives to enhance taste and shelf life, which can further detract from their nutritional value.

Recommendations for Consumption

Given the nutritional differences between rice cakes and potato chips, rice cakes emerge as the healthier option for those conscious about calorie intake and fat consumption. However, it’s important to consider that not all rice cakes are created equal. Some flavored rice cakes can contain added sugars and sodium, diminishing their health benefits. Therefore, opting for plain rice cakes and adding natural toppings, like avocado or hummus, can enhance their nutritional value while keeping calorie intake in check.

For those who enjoy potato chips, moderation is key. Opting for chips that are baked rather than fried, and those with reduced sodium content, can make for a healthier choice. Additionally, many brands now offer chips made from alternative vegetables, like sweet potatoes or kale, which can provide more nutrients than traditional potato chips.

Incorporating Rice Cakes and Potato Chips Into a Balanced Diet

Incorporating snacks like rice cakes and potato chips into a balanced diet requires mindful selection and moderation. Here’s how you can enjoy these snacks healthfully, with suggestions for alternative snacking options and tips on maintaining portion control, supplemented by external resources for deeper insight.

Healthy Snacking Tips

  1. Opt for Whole Grains: Select whole-grain or brown rice cakes to increase your fiber intake and improve satiety. Whole grains are essential for digestive health and can keep you feeling full longer. ChooseMyPlate.gov offers guidance on incorporating whole grains into your diet.
  2. Careful Label Reading: Pay attention to the nutritional information when choosing rice cakes or potato chips. Look for options low in sodium and free from added sugars and artificial ingredients. The FDA’s guide to Nutrition Facts labels can help you make informed choices.
  3. Enhance with Nutritious Toppings: Boost the nutritional value of rice cakes with toppings like avocado or almond butter. The American Heart Association provides recommendations on healthy fats and oils, perfect for topping selections.

Alternatives to Both Snacks

  1. Vegetable Chips: Make your own vegetable chips from kale, sweet potatoes, or beets for a nutrient-rich snack. This BBC Good Food guide to healthy chips offers easy recipes for baking your own.
  2. Nuts and Seeds: A small portion of unsalted nuts or seeds can be a nutritious snack. The Mayo Clinic’s snack-wise article highlights the health benefits of nuts and seeds, emphasizing their role in a healthy diet.
  3. Fresh Fruits and Vegetables: Crunchy vegetables and fresh fruits are excellent for snacking. The CDC’s Fruits & Vegetables guide offers creative ways to include more fruits and vegetables in your diet.

Portion Control

  1. Measure Snacks: Avoid eating directly from the package by measuring out your snacks. This WebMD article on portion control provides practical tips for measuring servings accurately.
  2. Mindful Eating: Listen to your body’s hunger and fullness signals. Mindful eating practices can help you enjoy snacks without overdoing it. Harvard Health Publishing offers an introduction to mindful eating.
  3. Balance Your Plate: Aim for a balanced intake of macronutrients (carbohydrates, proteins, fats) and a variety of vitamins and minerals at meals and snacks. The MyPlate Plan by the USDA can help you plan balanced meals according to your individual needs.

Incorporating snacks into a balanced diet effectively involves choosing healthier options, exploring nutritious alternatives, and practicing portion control. By making informed choices and listening to your body, you can enjoy these snacks while nourishing your body and supporting your health goals.

FAQs: Navigating the Nutritional Landscape of Rice Cakes and Potato Chips

Are rice cakes good for weight loss?

Rice cakes are often considered a good snack option for those looking to lose weight due to their low calorie and low-fat content. However, it’s important to remember that successful weight loss involves a comprehensive approach, including a balanced diet and regular physical activity. Rice cakes can be part of a weight-loss diet if consumed in moderation and paired with healthy toppings to increase satiety and nutritional value. For more in-depth guidance on weight loss strategies, visiting reputable sources like the Mayo Clinic’s weight management section (Mayo Clinic – Weight Management) can provide valuable insights.

Can rice cakes be a part of a keto diet?

The ketogenic (keto) diet emphasizes high-fat, moderate-protein, and low-carbohydrate foods to induce a state of ketosis in the body. As rice cakes consist predominantly of carbohydrates, they typically fall outside the strict carbohydrate parameters of a keto regimen. Nonetheless, for adherents of a more flexible low-carb diet, rice cakes could be included in minuscule amounts. It’s essential to consult with a healthcare provider or a dietitian before incorporating rice cakes into a keto diet to ensure it aligns with your dietary goals and nutritional needs. The official site for the Keto Diet (Keto Diet Official Site) offers comprehensive advice on what foods to eat and avoid.

How can I make rice cakes and potato chips healthier?

  1. Choose Whole-Grain or Brown Rice Cakes: Opting for rice cakes made from whole grains can add fiber to your diet, which is beneficial for digestive health and may help you feel fuller longer.
  2. Look for Low-Sodium and Baked Potato Chips: To make potato chips a healthier option, choose brands that offer baked chips with reduced sodium content. This can help decrease calorie intake and lower the risk of high blood pressure.
  3. Add Nutritious Toppings: Enhancing rice cakes with healthy toppings like avocado, hummus, or cottage cheese can increase their protein and healthy fat content, making them a more balanced snack. Similarly, pairing potato chips with a healthy dip like Greek yogurt can improve their nutritional profile.
  4. Make Your Own: Preparing homemade rice cakes or potato chips allows you to control the ingredients and cooking methods. Using air-popping for rice cakes or baking potato slices in the oven can create healthier alternatives to store-bought snacks. Websites like Allrecipes (Allrecipes) offer numerous recipes for making healthier snack options at home.

Incorporating these adjustments can help make rice cakes and potato chips healthier snack choices. As with any dietary change, it’s important to consider these snacks as part of an overall balanced diet to support your health and wellness goals.

Conclusion: Embracing Healthier Snacking Habits

In our journey through understanding the nutritional dynamics of rice cakes versus potato chips, it’s clear that both snacks hold a place in the realm of healthier snacking, albeit with careful consideration towards consumption practices. Rice cakes stand out as a lower calorie, lower fat option, ideal for those conscious of their intake and looking for a versatile snack base. However, the importance of complementing them with nutritious toppings cannot be overstated, as it elevates their nutritional value significantly.

Conversely, while potato chips are often viewed through a lens of caution due to their higher fat and calorie content, choosing baked versions or those with reduced sodium can mitigate some health concerns. The overarching theme in healthier snacking revolves around balance, portion control, and the pursuit of whole, minimally processed foods.

Healthier snacking is not about strict restrictions or denying oneself the pleasure of flavorful snacks. Instead, it’s about making informed choices, embracing variety, and finding balance. Incorporating a mix of fruits, vegetables, nuts, seeds, and whole grains alongside mindful consumption of rice cakes and potato chips can lead to a satisfying and nutritious snacking experience.

As we conclude, let’s remember that the essence of a balanced diet lies in diversity and moderation. By educating ourselves on the nutritional content of our snacks and making conscious choices, we can enjoy the vast spectrum of flavors and textures that snacks offer without compromising our health goals. Healthier snacking is an achievable and enjoyable part of a comprehensive approach to eating well, contributing to our overall well-being and enriching our culinary experiences.


Delicious Rice Cake Chip Recipes for Every Occasion

rice cakes

In the vibrant snack world, rice cake chips have emerged as a new favorite, balancing indulgence with health. This journey delves deep into the phenomenon of rice cake chips, highlighting their nutritional benefits, wide range of flavors, global culinary roles, and more. We’ll explore making your own, their cultural impact, answer common questions, and share DIY tips. Ready to dive into the world of rice cake chips? Let’s discover what makes them a rising star in the snack realm.

Introduction to Rice Cake Chips

The Rise of Rice Cake Chips

In the snack world’s ever-evolving landscape, rice cake chips have surged from the sidelines, offering a scrumptious and healthier alternative to traditional munchies like potato chips and crackers. Celebrated for their crispiness and a smorgasbord of flavors, these chips have quickly charmed those in search of a snack that’s light yet immensely satisfying.

What Are Rice Cake Chips?

Rice cake chips are a crunchy snack made from puffed rice that is either baked or fried to achieve a delightful crispiness. Unlike their thicker counterparts, rice cakes, these chips are thinly sliced, seasoned, and often come in a variety of flavors ranging from savory to sweet. Their light texture and ability to carry a range of seasonings make them a versatile snack for any occasion.

Moreover, as people become more health-conscious, the demand for snacks that not only taste good but also offer nutritional benefits has skyrocketed. Enter rice cake chips, a snack that stands at the intersection of health and flavor. With a base of whole grain rice, these chips often boast a lower calorie count and are gluten-free, catering to a wide audience with dietary restrictions or preferences.

So, why the sudden popularity? Well, it seems that in our quest for healthier eating, we’ve turned to ancient grains and simple ingredients for inspiration. Rice, being a staple in diets around the world, offers a familiar yet innovative base for creating snacks that feel indulgent without the guilt. Additionally, the versatility of rice allows for endless flavor combinations, making rice cake chips a dynamic snack option that never gets boring.

For those eager to dive deeper into the health benefits of whole grains, the Whole Grains Council offers a treasure trove of information. Meanwhile, Food & Nutrition provides expert nutritional advice for those looking to balance indulgence with health. And for the home chefs itching to try their hand at healthy snack recipes, Cooking Light is your go-to source for inspiration.

The Health and Nutritional Profile of Rice Cake Chips

In our continuous journey to find snacks that satisfy without the guilt, rice cakes stand out as a beacon of health and simplicity. This part of the article delves deeper into the nutritional landscape of rice cakes, their role in maintaining a healthy lifestyle, and creative culinary applications that elevate this humble snack to new heights. With guidance from RecipesPlan, we explore how rice cakes can be both a nutritious snack option and a versatile ingredient in your culinary arsenal.

Nutritional Benefits and Culinary Adventures

Rice cakes, celebrated for their minimalistic ingredient list, primarily consist of whole grain rice and a pinch of salt. This simplicity is their strength, offering a snack low in calories but rich in satisfaction. Each rice cake serves as a blank canvas, inviting a variety of toppings to suit any dietary preference, from vegan to gluten-free.

Health at the Heart

At their core, rice cakes embody the essence of mindful eating. They encourage portion control, a crucial aspect of maintaining a balanced diet. The high dietary fiber content in whole grain rice aids digestion and provides a feeling of fullness, which can help curb overeating. For a deeper dive into their health benefits, RecipesPlan’s article, “Are Rice Cakes Healthy for You? An In-Depth Analysis”, sheds light on how rice cakes contribute to a nutritious eating plan.

A Platform for Creativity

Beyond their health benefits, rice cakes are incredibly versatile. They can be dressed up or down, making them suitable for any meal of the day. Breakfast might see rice cakes topped with avocado and poached egg, while lunch could feature rice cakes with hummus and cucumber. For those with a penchant for sweetness, the transformation of rice cakes into a dessert is as simple as adding almond butter and fresh berries. The “Chocolate Rice Cakes Recipe” on RecipesPlan illustrates just how indulgent a healthy snack can become, proving that nutritious choices don’t have to be devoid of pleasure.

Global Inspirations

The appeal of rice cakes extends far beyond any single dietary trend or culture. They are a global phenomenon, adapting to the flavors and dietary habits of cultures worldwide. From the savory crunch of Korean tteok-bokki to the sweet, chewy Japanese mochi, rice cakes take on many forms and flavors. RecipesPlan’s “Discover World Rice Cakes” offers a fascinating glimpse into the global versatility of rice cakes, inspiring readers to explore the myriad ways rice cakes are enjoyed around the world.

Navigating the Do’s and Don’ts

While rice cakes are undeniably versatile and healthful, certain methods of preparation can enhance or diminish their nutritional value. A common misconception is that microwaving rice cakes can save time while preserving their texture. However, as explained in “Why Can You Not Microwave Rice Cakes? An In-Depth Exploration”, this method can lead to undesirable outcomes, emphasizing the importance of following best practices to fully enjoy their crunchy goodness.

Varieties and Flavors

Unveiling the Spectrum of Flavors

Rice cakes are far from mundane when it comes to flavor possibilities. The variety spans from plain and salted to flavors like honey-cinnamon, spicy chili, and barbecue. Sweet lovers can enjoy rice cakes dipped in dark chocolate or with fruit jam, combining taste and health. Savory fans will like them with sharp cheddar or herbs and spices for a hearty snack.

The true magic of rice cakes lies in their potential as a base for a myriad of homemade toppings. Imagine transforming a plain rice cake into a gourmet bite by adding a layer of pesto, fresh tomato slices, and a sprinkle of feta cheese, creating a Mediterranean-inspired snack. Or, for an elegant yet easy appetizer, top rice cakes with a spread of goat cheese, figs, and a drizzle of honey. The options are limitless, inviting creativity in the kitchen.

Crafting Homemade Rice Cake Chips

Inspired by the adaptability of rice cakes, homemade rice cake chips offer a delightful twist on this classic snack. Slicing rice cakes thinly, seasoning them with your choice of spices or herbs, and baking them to crispy perfection yields a snack that’s ideal for dipping or enjoying solo. Following the inspiration from RecipesPlan’s “Chocolate Rice Cakes Recipe”, you can see how ordinary rice cakes can be transformed into extraordinary treats that cater to both health and indulgence.

Savory fans can mix seasonings like rosemary with sea salt or chili with lime for tasty chips. These homemade versions are healthier than store-bought snacks and can be tailored to fit dietary needs and flavor preferences.

Embracing Global Influences

Rice cakes’ global popularity is clear from their varied use in different cultures. Korean tteokbokki, Japanese onigiri, and Western toppings like almond butter with strawberries or avocado with tomatoes show their versatility. RecipesPlan’s “Discover World Rice Cakes” highlights this adaptability, confirming rice cakes as a favorite snack worldwide.

Rice Cake Chips in Culinary Cultures

A Global Culinary Staple

Rice cakes have earned their place at the table in numerous cultures, celebrated for their simplicity and adaptability. In Asia, rice cakes are integral to many traditional dishes, from the spicy, stir-fried tteokbokki of Korea to the sweet, dessert-like mochi of Japan. These variations highlight the versatility of rice cakes, able to carry both sweet and savory flavors with ease.

In the Western culinary scene, rice cakes have been embraced as a health-conscious alternative to bread and crackers. They provide a gluten-free option for sandwiches, canapés, and even pizzas. The adaptability of rice cakes knows no bounds, as seen in RecipesPlan’s exploration of rice cake recipes from around the globe in “Discover World Rice Cakes”. This journey through different cultures illustrates the universal appeal of rice cakes and their ability to blend seamlessly into various culinary traditions.

Rice Cake Pairings and Innovations

Rice cakes shine in their flavor flexibility and pairing potential. They complement many beverages, from coffee and tea to cocktails and wine, suiting any meal or event. For example, a lightly salted rice cake with crisp white wine turns a simple snack into a refined culinary delight.

Moreover, rice cakes serve as an excellent base for creative culinary innovations. Chefs and home cooks alike have begun to experiment with rice cakes in unconventional ways, using them as the foundation for deconstructed sushi, layered dessert bars, and even as croutons in salads. These culinary experiments not only showcase the versatility of rice cakes but also inspire others to view them as more than just a snack.

Embracing the Nutritional Aspect

As we celebrate the global and culinary versatility of rice cakes, it’s also important to acknowledge their nutritional benefits. Rice cakes, particularly those made from whole grains, offer a source of fiber and essential nutrients, making them a smart choice for those looking to maintain a balanced diet. The article “Are Rice Cakes Healthy for You? An In-Depth Analysis” on RecipesPlan delves into the health aspects of rice cakes, providing readers with a comprehensive understanding of how rice cakes fit into a healthy lifestyle.

Making Rice Cake Chips

The Process of Making Rice Cake Chips

Embarking on the journey of making rice cake chips, whether industrially or in the comfort of your home, unveils a fascinating blend of simplicity and culinary craftsmanship. In a commercial setting, the production of rice cake chips begins with selecting premium whole grain rice, which is then soaked, ground into a fine dough, and seasoned. This mixture is spread thinly before being cooked at high temperatures. The heat puffs the rice, transforming it into the airy, crispy chips we adore. This method ensures a uniform texture and flavor, integral to the mass production of these beloved snacks.

For the home cook, the adventure is no less intriguing. Starting with store-bought rice cakes provides a convenient shortcut to homemade crispiness. The art lies in slicing these cakes into thin, even pieces—a task that demands a steady hand and a keen eye. Once sliced, these pieces become the canvas for your culinary creativity, ready to be brushed with oils, sprinkled with seasonings, or even coated with sweet glazes.

DIY Tips and Tricks

Perfecting homemade rice cake chips is a rewarding endeavor, offering endless opportunities for customization. Here are detailed tips to elevate your homemade chips:

Precision in Slicing:

Achieving the perfect slice is paramount. Consider using a mandoline slicer for consistent thickness. The ideal slice should be thin enough to crisp up, yet thick enough to handle your chosen seasonings.

Bold Seasoning:

Beyond traditional salt or sugar, explore global flavors. A dash of za’atar for Middle Eastern zest, a sprinkle of furikake for Japanese umami, or a brush of maple syrup for a touch of Canadian sweetness can transform your chips.

The Perfect Bake:

Oven temperatures and cooking times can make or break your chips. A preheated oven set to around 250°F (120°C) and a baking time of 30-40 minutes usually strike the right balance. Rotate your baking sheet halfway through for even cooking.

Air-Frying Mastery:

For those with an air fryer, this device can be a game-changer. Air frying at 350°F (175°C) for about 10-15 minutes can produce exceptionally crispy chips. Keep an eye on them to prevent overcooking, as air fryers can vary in power.

Resting Time:

Patience is a virtue, especially when it comes to cooling. Letting your chips cool on a wire rack not only stops the cooking process but also helps evaporate any lingering moisture, ensuring that crunch factor.

Storage Smarts:

To maintain freshness and crunch, store your rice cake chips in an airtight container. If you’ve made a large batch, consider vacuum sealing portions to extend their shelf life.

By embracing these detailed tips and tricks, you can craft delicious, crispy rice cake chips that are customized to your taste preferences. Whether you’re experimenting with new flavor combinations, perfecting the texture, or simply enjoying the process of creation, homemade rice cake chips offer a delightful culinary project with tasty rewards.

Frequently Asked Questions about Rice Cakes

1. Are rice cakes actually healthy?

Yes, rice cakes are considered a healthy snack option, especially when made from whole grain rice. They are low in calories and fat, making them a suitable choice for weight management. However, their nutritional value largely depends on the toppings or seasonings added. For a deeper dive into their health benefits, check out RecipesPlan’s “Are Rice Cakes Healthy for You? An In-Depth Analysis”.

2. Can rice cakes help with weight loss?

Rice cakes can be a part of a weight loss diet due to their low calorie and minimal fat content. They can satisfy the need for a crunchy snack without adding excessive calories. Pairing rice cakes with healthy toppings like avocado or hummus can also provide essential nutrients while keeping calorie intake in check.

3. Are rice cakes gluten-free?

Most rice cakes are inherently gluten-free since they are made from rice. However, it’s important to check the packaging for any added ingredients that may contain gluten or for cross-contamination warnings if you have celiac disease or a gluten sensitivity.

4. How can I make rice cakes more flavorful?

Rice cakes can serve as a versatile base for a wide range of toppings and seasonings. From sweet spreads like peanut butter and honey to savory options like cottage cheese and tomatoes, the possibilities are endless. For inspiration, explore innovative recipes like the “Chocolate Rice Cakes Recipe” on RecipesPlan.

5. Can rice cakes be used in cooking?

Absolutely! Rice cakes extend beyond snack status, integrating into diverse dishes. Crushing rice cakes introduces a crunchy texture to salads, and they serve as foundations for distinctive appetizers and desserts. Their mild flavor and crunchy texture make them an excellent ingredient for culinary creativity.

6. How long do rice cakes last?

Unopened rice cakes typically have a shelf life of several months. Once opened, it’s best to consume them within a week or two to enjoy their optimal freshness and crispiness. Storing them in an airtight container can help extend their crispness.

7. Are rice cakes suitable for diabetics?

Rice cakes have a high glycemic index, which means they can cause a quick increase in blood sugar levels. Diabetics can still enjoy rice cakes in moderation, ideally pairing them with protein or healthy fats to help balance blood sugar levels.

CONCLUSION

In conclusion, rice cake chips stand as a testament to the joy of snacking thoughtfully. They encourage us to think outside the box, whether we’re seeking a nutritious snack, a gluten-free alternative, or a creative culinary ingredient. Through insights and recipes from RecipesPlan, we’ve learned that our creativity is the only limit to enjoying rice cake chips. So, whether you’re a seasoned chef or a casual snacker, let the humble rice cake chip inspire you to embrace healthier, more flavorful snacking options that don’t skimp on taste or satisfaction.

How do you tenderize calamari steak? Mastering Calamari Steak: A Seafood Delight

How do you tenderize calamari steak?

How do you tenderize calamari steak? In the culinary world, the quest for the perfect dish is akin to an artist’s pursuit of beauty—it requires skill, passion, and a touch of magic. Among the treasures of the sea, calamari steaks stand out for their potential to transform into a tender, flavorful delight. However, the journey from sea to plate is fraught with challenges, the most daunting of which is ensuring that these delicacies don’t end up tough and chewy. Fear not, for this article is your compass, guiding you through the murky waters of seafood preparation. From the initial clean-up to the final sear, we’ll embark on a voyage to unlock the secrets of tenderizing calamari steaks. So, buckle up, and let’s dive into the depths of culinary excellence.

Introduction to Calamari Steaks

Ah, calamari steaks, the unsung heroes of the seafood world! These flat, tender slices of squid offer a canvas for a myriad of flavors, but they’re also notorious for turning into a chewy mess if not handled with care. The trick to unlocking their potential lies not just in the cooking but in understanding the beast itself.

First things first, let’s get our hands dirty—figuratively speaking, of course. Preparing calamari steaks for cooking is a bit like preparing for a first date; you want to make a good impression. This means removing any unwanted bits—skin, beak, and tentacles—to reveal the true beauty of the calamari. It’s a simple step, but it’s the foundation of a successful dish.

But why stop at good when you can aim for extraordinary? The secret sauce, if you will, lies in tenderizing the meat. A gentle pounding with a meat mallet or tenderizer, sandwiched between two pieces of plastic wrap, can make all the difference. It’s like giving the calamari a mini spa treatment, breaking down the fibers and setting the stage for a mouthwatering experience.

At this point, you might be thinking, “Is that all there is to it?” Oh, but we’re just getting started. The marinade is where the magic happens, infusing the calamari with flavors that will dance on your palate. A concoction of lemon juice, olive oil, garlic, and herbs can elevate the humble calamari steak from good to unforgettable.

And there you have it, the groundwork for a dish that promises to delight. But remember, this is just the beginning. Stay tuned as we delve deeper into the art of cooking calamari steaks to perfection, exploring techniques that will ensure they’re always tender, juicy, and, above all, delicious.

Preparing Calamari Steaks for Tenderizing

Before we dive into the nitty-gritty of tenderizing, let’s take a moment to discuss the prelude to perfection: preparing calamari steaks. This initial step is crucial, folks! It sets the stage for everything that follows, ensuring your culinary creation turns out just right.

Cleaning the Calamari Steaks

First things first, cleanliness is key. Begin by laying your calamari steaks on a clean surface. You’ll want to rid them of any lingering remnants from their oceanic journey. Using a sharp knife, gently remove the skin, beak, and tentacles. This process isn’t just about cleanliness; it’s about ensuring that every bite is as tender as can be, without any unwelcome chewiness.

Tenderizing the Meat

Now, onto the main event: tenderizing. Grab a meat mallet or tenderizer, and let’s get to work. Place your calamari steak between two pieces of plastic wrap to keep things neat. Gently pound the steak, showing it who’s boss, but remember, we’re aiming for tender love, not a culinary beatdown. This step is all about breaking down those stubborn fibers, making the steak more receptive to the flavors and cooking techniques that follow.

And there you have it, the groundwork for tender calamari steaks is laid. With your calamari cleaned and tenderized, you’re well on your way to creating a dish that’s as flavorful as it is tender. Remember, the journey to culinary mastery is filled with small, thoughtful steps, and you’re doing great!

Marinating for Flavor and Tenderness

Ah, the marinade – a magical potion that not only imbues your calamari steaks with an explosion of flavor but also plays a crucial role in the tenderizing process. This step is where your culinary creativity can shine, combining herbs, spices, and acids to create a bath of deliciousness that your calamari steaks simply can’t resist.

The Role of Marinades

Marinades are more than just flavor enhancers; they’re tenderizing wizards. The secret? Acidic ingredients like lemon juice or vinegar, which work to gently break down proteins, making the meat more tender and receptive to flavors. But remember, while our goal is tender calamari, we’re not looking to turn it into mush. Balance is key, my friends.

Recommended Marinade Ingredients

For a marinade that’ll make your calamari steaks sing, combine the following:

  • Fresh lemon juice for that zesty kick
  • Olive oil for moisture and richness
  • Minced garlic for a punch of flavor
  • A blend of your favorite herbs, like parsley or oregano, to add depth

Mix these ingredients in a bowl, and let your calamari steaks soak in this flavorful bath for at least an hour (the longer, the better, but don’t let them party in there for more than four hours). This process not only flavors the steaks but also further tenderizes them, setting you up for a truly tender and juicy culinary experience.

And just like that, your calamari steaks are marinated and one step closer to achieving tender perfection. The stage is set for a flavor-packed journey that promises to delight your taste buds and impress even the toughest of seafood critics.

Cooking Techniques for Tender Calamari Steaks

After your calamari steaks have bathed in their flavorful marinade, it’s time for the grand finale – cooking them to tender perfection. The right technique here can mean the difference between a succulent masterpiece and a rubbery misstep. So, let’s turn up the heat and dive into the best methods to ensure your calamari steaks are the talk of the table.

Quick Cooking Over High Heat

When it comes to cooking calamari, time is of the essence. The golden rule? Cook it quickly over high heat. This method seals in the flavors and ensures the steak remains tender and juicy, rather than turning into a chewy ordeal. Whether you’re grilling or sautéing, keep an eye on the clock – 2-3 minutes on each side should do the trick. It’s a quick dance with the flames, one that promises a tender and flavorful reward.

Grilling and Sautéing

Grilling brings out a smoky flavor that complements the calamari’s natural taste, making it a summer favorite. Ensure your grill is piping hot before you lay down the steaks, and remember, a quick sear on each side is all it takes. On the other hand, sautéing in a pan offers more control over the heat and allows for an even, golden crust. A dash of olive oil, a sizzling pan, and a watchful eye are your best allies here.

Cooking Times and Methods

  • Grilling: 2-3 minutes per side, giving those steaks a beautiful char and a smoky aroma.
  • Sautéing: Also 2-3 minutes per side, for a golden, succulent finish.
  • Deep-Frying: 1-2 minutes, for a crispy exterior and tender inside.
  • Braising: 30-45 minutes in a flavorful liquid, perfect for a slow-cooked, fall-apart tender result.

Cooking calamari steaks is a testament to the beauty of simplicity. With just a few minutes and the right technique, you can transform them into a dish that’s both sophisticated and deeply satisfying. Remember, the key to tender calamari lies not just in the preparation but in the care and attention to detail during the cooking process.

Advanced Tips for Ultimate Tenderness

You’ve mastered the basics of preparing and cooking calamari steaks, but if you’re looking to elevate your dish to the next level, a few advanced tips can make all the difference. These are the secrets that transform good calamari into great calamari, ensuring each bite is a tender, flavorful experience that delights the senses.

Choosing Fresh Calamari Steaks

The journey to tender calamari begins at the market. Opting for fresh calamari steaks is crucial. Look for steaks that are firm and have a mild, ocean-fresh scent. Avoid any that give off a fishy odor or have a slimy texture, as these are telltale signs of seafood past its prime. Freshness is the foundation of tenderness, so choose wisely.

Saltwater Soak and Velveting Technique

Before you even think about cooking, consider a saltwater soak. Mixing cold water with a tablespoon of salt per quart and soaking your calamari for about 30 minutes can work wonders. This process not only seasons the meat but also begins the tenderization process from the inside out.

For those willing to try something a bit more unconventional, the velveting technique is a game-changer. Borrowed from Chinese cuisine, this method involves coating the steaks in a mixture of cornstarch and water before a quick blanch in boiling water followed by an ice bath. This extra step ensures your calamari steaks are unbelievably tender and velvety.

Acidic Dairy Marinade and Slicing Techniques

Marinating in acidic dairy like yogurt or buttermilk, combined with lemon juice or vinegar, adds a new dimension of tenderness and flavor. The enzymes in the dairy break down the protein in the calamari, making it more tender, while the acid adds a bright, tangy note.

When it comes to slicing your calamari, thickness matters. If your steaks are on the thicker side, consider slicing them into thinner pieces. This not only ensures even cooking but also maximizes the surface area for your marinades and seasonings to work their magic.

Experimenting with Cooking Methods

While grilling and sautéing are fantastic, don’t be afraid to experiment with other cooking methods. Deep-frying quickly in hot oil can create a crispy exterior while keeping the inside tender. Alternatively, braising your calamari in a flavorful sauce can result in a melt-in-your-mouth texture that’s hard to achieve with quicker cooking methods.

By embracing these advanced tips, you’re not just cooking calamari; you’re crafting a culinary experience. Each technique, from selecting the freshest steaks to experimenting with cooking methods, builds on the last to create a dish that’s truly greater than the sum of its parts.

FAQs on Calamari Steak

1. How can I make my calamari steak tender and flavorful?

To achieve a tender and flavorful calamari steak, marinating prior to cooking is key. Use a mixture of olive oil, lemon juice, garlic, and herbs for at least an hour. For a detailed recipe and more tips, check out our “Calamari Steak Recipe: A Seafood Delight” on RecipesPlan.

2. What are some common mistakes to avoid when cooking calamari steak?

One of the most common mistakes is overcooking, which can make the calamari steak rubbery. High heat and a quick cooking time are crucial. For a comprehensive guide, visit “Calamari Steak Recipe: A Seafood Delight”, where we dive into the dos and don’ts of calamari preparation.

3. Can I grill calamari steak, and if so, how?

Yes, grilling is a great way to cook calamari steak, offering a smoky flavor. Preheat your grill to high heat, lightly oil the steak, and cook for about 2-3 minutes on each side. For grill-specific tips, our calamari steak recipe provides insights to ensure perfect results every time.

4. Are there any alternative cooking methods for calamari steak besides grilling?

Absolutely! Besides grilling, calamari steak can be pan-seared, broiled, or even deep-fried for a crispy exterior. Each method offers a unique texture and flavor profile to the dish. Explore different techniques to find your favorite.

5. Where can I find innovative calamari steak recipes for special occasions?

RecipesPlan features a variety of seafood recipes, including special occasion dishes that highlight calamari steak. While direct links to multiple calamari steak recipes were not available in the sitemap, visiting the site’s seafood section will provide a wealth of culinary inspiration to make your next celebration a hit.

For more detailed guidance and innovative recipes, exploring the full range of options available on RecipesPlan is highly recommended. Whether you’re a seasoned chef or new to seafood, these resources will enhance your cooking repertoire and delight your palate with the rich flavors of the sea.

Conclusion

Remember, the key to exceptional calamari lies not just in the methods we’ve explored but in the willingness to experiment and adapt. Whether you’re soaking your steaks in a saltwater bath, tenderizing with a mallet, or exploring the velveting technique, each approach offers its own unique benefits. And when it comes to cooking, the high heat of grilling or the controlled sizzle of sautéing can both yield delicious results, depending on your preference and the occasion.

For those eager to dive deeper into the culinary arts of calamari, resources like Martha Stewart’s Calamari 101 provide a treasure trove of information, from tenderizing techniques to innovative recipes. Similarly, the community insights and shared experiences on platforms like eGullet Forums can offer valuable tips and encouragement from fellow seafood enthusiasts.

And let’s not forget the power of a good marinade. As explored in Recipes.net, the right blend of acidity, herbs, and oils can not only enhance flavor but also contribute significantly to the tenderness of your calamari steaks.

Thank you for joining me on this culinary voyage. Here’s to many more tender, flavorful bites of calamari steaks, crafted with love and a touch of chef’s magic. Bon appétit!